标签 wifidog认证 wifidog安装 wifidog原理 wifidog分析 wifidog配置 wifidog流程 wifidog服务器 wifidog-ddwrt wifidog openwrt 下的文章

wifidog 源码初分析(2)

上一篇分析了接入设备的首次浏览器访问请求如何通过 防火墙过滤规则 重定向到 wifidog 的 HTTP 服务中,本篇主要分析了 wifidog 在接收到 接入设备的 HTTP 访问请求后,如何将此 HTTP 请求重定向到 认证服务器(auth-server) 上。

通过上面的防火墙规则,会将通过上面的防火墙规则,会将HTTP请求的外部IP地址和端口通过NAT方式重定向至本地wifidog内嵌HTTP服务器的地址和端口上,并由内嵌HTTP服务器进行服务,而内嵌HTTP服务器的路径和回调处理如下:

if ((webserver = httpdCreate(config->gw_address, config->gw_port)) == NULL) {
    debug(LOG_ERR, "Could not create web server: %s", strerror(errno));
    exit(1);
}
debug(LOG_DEBUG, "Assigning callbacks to web server");
httpdAddCContent(webserver, "/", "wifidog", 0, NULL, http_callback_wifidog);
httpdAddCContent(webserver, "/wifidog", "", 0, NULL, http_callback_wifidog);
httpdAddCContent(webserver, "/wifidog", "about", 0, NULL, http_callback_about);
httpdAddCContent(webserver, "/wifidog", "status", 0, NULL, http_callback_status);
httpdAddCContent(webserver, "/wifidog", "auth", 0, NULL, http_callback_auth);

httpdAddC404Content(webserver, http_callback_404);

客户端首次访问时回调客户端首次访问时回调http_callback_404函数,在该函数中根据获取的客户端信息来配置重定向的URL fragment,如下:

void
http_callback_404(httpd *webserver, request *r)
{
    char tmp_url[MAX_BUF],
            *url,
            *mac;
    s_config    *config = config_get_config();
    t_auth_serv *auth_server = get_auth_server();
    memset(tmp_url, 0, sizeof(tmp_url));
    /*
     * XXX Note the code below assumes that the client's request is a plain
     * http request to a standard port. At any rate, this handler is called only
     * if the internet/auth server is down so it's not a huge loss, but still.
     */ /* 用户需要访问的URL */
        snprintf(tmp_url, (sizeof(tmp_url) - 1), "http://%s%s%s%s",
                        r->request.host,
                        r->request.path,
                        r->request.query[0] ? "?" : "",
                        r->request.query);
    url = httpdUrlEncode(tmp_url);
    if (!is_online()) {
        /* 路由器都接入不到 internet */
        char * buf;
        send_http_page(r, "Uh oh! Internet access unavailable!", buf);
        free(buf);
    }
    else if (!is_auth_online()) {
        /* auth server 挂起 */
        char * buf;
        send_http_page(r, "Uh oh! Login screen unavailable!", buf);
        free(buf);
    }
    else {
        /* 配置重定向到 auth server 的 url 参数 */
        char *urlFragment;
        if (!(mac = arp_get(r->clientAddr))) {
            /* We could not get their MAC address */
            debug(LOG_INFO, "Failed to retrieve MAC address for ip %s, so not putting in the login request", r->clientAddr);
            safe_asprintf(&urlFragment, "%sgw_address=%s&gw_port=%d&gw_id=%s&url=%s",
                auth_server->authserv_login_script_path_fragment,
                config->gw_address,
                config->gw_port,
                config->gw_id,
                url);
        } else {          
            debug(LOG_INFO, "Got client MAC address for ip %s: %s", r->clientAddr, mac);
            safe_asprintf(&urlFragment, "%sgw_address=%s&gw_port=%d&gw_id=%s&mac=%s&url=%s",
                auth_server->authserv_login_script_path_fragment,
                config->gw_address,
                config->gw_port,
                config->gw_id,
                mac,
                url);
        }
        /* 调用该函数将用户请求重定向到 auth server 的登录页面 */
        http_send_redirect_to_auth(r, urlFragment, "Redirect to login page");
        free(urlFragment);
    }
    free(url);
}

上面代码基本不用解释,具体重定向至auth server的消息在下面的 http_send_redirect_to_auth 函数中实现:

void http_send_redirect_to_auth(request *r, char *urlFragment, char *text)
{
    char *protocol = NULL;
    int port = 80;
    t_auth_serv *auth_server = get_auth_server();
    if (auth_server->authserv_use_ssl) {
        protocol = "https";
        port = auth_server->authserv_ssl_port;
    } else {
        protocol = "http";
        port = auth_server->authserv_http_port;
    }

    char *url = NULL;
    safe_asprintf(&url, "%s://%s:%d%s%s",
        protocol,
        auth_server->authserv_hostname,
        port,
        auth_server->authserv_path,
        urlFragment
    );
    http_send_redirect(r, url, text);
    free(url);
}

具体的重定向URL给个实例:

POST /login/?gw_address=192.168.1.1&gw_port=2060&gw_id=default&mac=44:94:fc:ef:28:40&url=http%3A//www.baidu.com/ HTTP/1.1

可以看到这里有这几个参数信息:

gw_address,路由器的LAN地址
gw_port:为wifidog的监听端口
gw_id:路由器的标识名
mac:客户端设备的MAC地址
url:为客户端访问的原URL(以便于重定向)

转载时请务必以超链接形式标明文章 原始出处 、作者信息和本声明。否则将追究法律责任。http://quietmadman.blog.51cto.com/3269500/1384761

本文章由 http://www.wifidog.pro/2015/01/23/wifidog%E6%BA%90%E7%A0%81%E5%88%86%E6%9E%90-2.html 整理编辑,转载请注明出处
wifidog 源码初分析(1)

因为最近公司内部有个关于路由器的项目使用了该开源项目做Demo,安装配置很简单,但是对运行机制不是太了解,所以抽了点时间初步对 wifidog 的源码进行了分析。
(对于 wifidog 是什么开源项目,以及如何安装配置,就不做解释了,直接 Google 吧)。
另外,wifidog 的核心还是依赖于 iptables 防火墙过滤规则来实现的,所以建议对 iptables 有了了解后再去阅读 wifidog 的源码。
在路由器上启动 wifidog 之后,wifidog 在启动时会初始化一堆的防火墙规则,如下:

/** Initialize the firewall rules
*/
int iptables_fw_init(void)
{
    … …
/*
     *
     * Everything in the NAT table
     *
     */
    /* Create new chains */
    iptables_do_command("-t nat -N " TABLE_WIFIDOG_OUTGOING);
    iptables_do_command("-t nat -N " TABLE_WIFIDOG_WIFI_TO_ROUTER);
    iptables_do_command("-t nat -N " TABLE_WIFIDOG_WIFI_TO_INTERNET);
    iptables_do_command("-t nat -N " TABLE_WIFIDOG_GLOBAL);
    iptables_do_command("-t nat -N " TABLE_WIFIDOG_UNKNOWN);
    iptables_do_command("-t nat -N " TABLE_WIFIDOG_AUTHSERVERS);
    /* Assign links and rules to these new chains */
    iptables_do_command("-t nat -A PREROUTING -i %s -j " TABLE_WIFIDOG_OUTGOING, config->gw_interface);
    iptables_do_command("-t nat -A " TABLE_WIFIDOG_OUTGOING " -d %s -j " TABLE_WIFIDOG_WIFI_TO_ROUTER, config->gw_address);
    iptables_do_command("-t nat -A " TABLE_WIFIDOG_WIFI_TO_ROUTER " -j ACCEPT");
    iptables_do_command("-t nat -A " TABLE_WIFIDOG_OUTGOING " -j " TABLE_WIFIDOG_WIFI_TO_INTERNET);
    iptables_do_command("-t nat -A " TABLE_WIFIDOG_WIFI_TO_INTERNET " -m mark --mark 0x%u -j ACCEPT", FW_MARK_KNOWN);
    iptables_do_command("-t nat -A " TABLE_WIFIDOG_WIFI_TO_INTERNET " -m mark --mark 0x%u -j ACCEPT", FW_MARK_PROBATION);
    iptables_do_command("-t nat -A " TABLE_WIFIDOG_WIFI_TO_INTERNET " -j " TABLE_WIFIDOG_UNKNOWN);
    iptables_do_command("-t nat -A " TABLE_WIFIDOG_UNKNOWN " -j " TABLE_WIFIDOG_AUTHSERVERS);
    iptables_do_command("-t nat -A " TABLE_WIFIDOG_UNKNOWN " -j " TABLE_WIFIDOG_GLOBAL);
    // 将 80 端口的访问重定向(REDIRECT)到 (本路由)网关web服务器的监听端口
    iptables_do_command("-t nat -A " TABLE_WIFIDOG_UNKNOWN " -p tcp --dport 80 -j REDIRECT --to-ports %d", gw_port);
    /*
     *
     * Everything in the FILTER table
     *
     */
    /* Create new chains */
    iptables_do_command("-t filter -N " TABLE_WIFIDOG_WIFI_TO_INTERNET);
    iptables_do_command("-t filter -N " TABLE_WIFIDOG_AUTHSERVERS);
    iptables_do_command("-t filter -N " TABLE_WIFIDOG_LOCKED);
    iptables_do_command("-t filter -N " TABLE_WIFIDOG_GLOBAL);
    iptables_do_command("-t filter -N " TABLE_WIFIDOG_VALIDATE);
    iptables_do_command("-t filter -N " TABLE_WIFIDOG_KNOWN);
    iptables_do_command("-t filter -N " TABLE_WIFIDOG_UNKNOWN);
    /* Assign links and rules to these new chains */
    /* Insert at the beginning */
    iptables_do_command("-t filter -I FORWARD -i %s -j " TABLE_WIFIDOG_WIFI_TO_INTERNET, config->gw_interface);
    iptables_do_command("-t filter -A " TABLE_WIFIDOG_WIFI_TO_INTERNET " -m state --state INVALID -j DROP");

    /* TCPMSS rule for PPPoE */
    iptables_do_command("-t filter -A " TABLE_WIFIDOG_WIFI_TO_INTERNET " -o %s -p tcp --tcp-flags SYN,RST SYN -j TCPMSS --clamp-mss-to-pmtu", ext_interface);
    iptables_do_command("-t filter -A " TABLE_WIFIDOG_WIFI_TO_INTERNET " -j " TABLE_WIFIDOG_AUTHSERVERS);
    iptables_fw_set_authservers();
    iptables_do_command("-t filter -A " TABLE_WIFIDOG_WIFI_TO_INTERNET " -m mark --mark 0x%u -j " TABLE_WIFIDOG_LOCKED, FW_MARK_LOCKED);
    iptables_load_ruleset("filter", "locked-users", TABLE_WIFIDOG_LOCKED);
    iptables_do_command("-t filter -A " TABLE_WIFIDOG_WIFI_TO_INTERNET " -j " TABLE_WIFIDOG_GLOBAL);
    iptables_load_ruleset("filter", "global", TABLE_WIFIDOG_GLOBAL);
    iptables_load_ruleset("nat", "global", TABLE_WIFIDOG_GLOBAL);
    iptables_do_command("-t filter -A " TABLE_WIFIDOG_WIFI_TO_INTERNET " -m mark --mark 0x%u -j " TABLE_WIFIDOG_VALIDATE, FW_MARK_PROBATION);
    iptables_load_ruleset("filter", "validating-users", TABLE_WIFIDOG_VALIDATE);
    iptables_do_command("-t filter -A " TABLE_WIFIDOG_WIFI_TO_INTERNET " -m mark --mark 0x%u -j " TABLE_WIFIDOG_KNOWN, FW_MARK_KNOWN);
    iptables_load_ruleset("filter", "known-users", TABLE_WIFIDOG_KNOWN);
    iptables_do_command("-t filter -A " TABLE_WIFIDOG_WIFI_TO_INTERNET " -j " TABLE_WIFIDOG_UNKNOWN);
    iptables_load_ruleset("filter", "unknown-users", TABLE_WIFIDOG_UNKNOWN);
    iptables_do_command("-t filter -A " TABLE_WIFIDOG_UNKNOWN " -j REJECT --reject-with icmp-port-unreachable");
    UNLOCK_CONFIG();
    return 1;
}

在该 防火墙规则的初始化过程中,会首先清除掉已有的防火墙规则,重新创建新的过滤链,另外,除了通过 iptables_do_command("-t nat -A "TABLE_WIFIDOG_UNKNOWN " -p tcp --dport 80 -j REDIRECT --to-ports %d",gw_port); 这个命令将 接入设备的 80 端口(HTTP)的访问重定向至网关自身的 HTTP 的端口之外,还通过 iptables_fw_set_authservers(); 函数设置了 鉴权服务器(auth-server) 的防火墙规则:

void iptables_fw_set_authservers(void)
{
    const s_config *config;
    t_auth_serv *auth_server;
    config = config_get_config();
    for (auth_server = config->auth_servers; auth_server != NULL; auth_server = auth_server->next) {
        if (auth_server->last_ip && strcmp(auth_server->last_ip, "0.0.0.0") != 0) {
            iptables_do_command("-t filter -A " TABLE_WIFIDOG_AUTHSERVERS " -d %s -j ACCEPT", auth_server->last_ip);
            iptables_do_command("-t nat -A " TABLE_WIFIDOG_AUTHSERVERS " -d %s -j ACCEPT", auth_server->last_ip);
        }
    }
}

首先从上面的代码可以看出 wifidog 支持多个 鉴权服务器,并且针对每一个鉴权服务器 设置了如下两条规则:

1)在filter表中追加一条[任何访问鉴权服务器都被接受]的WiFiDog_$ID$_AuthServers过滤链:

iptables -t filter -A  WiFiDog_$ID$_AuthServers -d auth-server地址 -j ACCEPT

2)在nat表中追加一条[任何访问鉴权服务器都被接受]的WiFiDog_$ID$_AuthServers过滤链:

iptables -t nat -A WiFiDog_$ID$_AuthServers  -d auth-server地址 -j ACCEPT

这样确保可以访问鉴权服务器,而不是拒绝所有的出口访问。

转载时请务必以超链接形式标明文章 原始出处 、作者信息和本声明。否则将追究法律责任。http://quietmadman.blog.51cto.com/3269500/1384175

本文章由 http://www.wifidog.pro/2015/01/23/wifidog-%E6%BA%90%E7%A0%81%E5%88%86%E6%9E%90-1.html 整理编辑,转载请注明出处

WiFidog简介

WIFIdog是一种新的认证方式,这种认证方式的优势在于安全性高,不容易被破解验证。
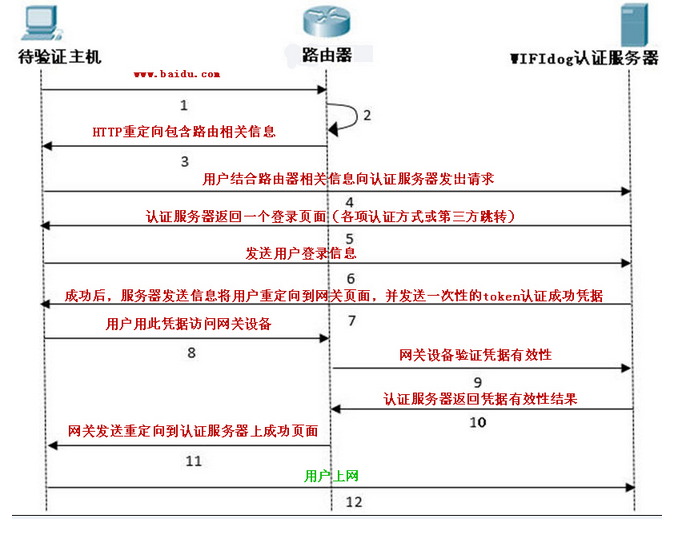
客户端发出初始化请求,比如访问www.baidu.com
网关的防火墙规则将这个请求重定向到本地网关的端口上。这个端口是Wifidog监听的端口。
Wfidog提供一个HTTP重定向回复,重定向到Web认证页面,重定向的Url的Querystring中包含了Gateway的ID,Gateway的FQDN以及其他的信息。
用户向认证服务器发出认证请求。
网关返回一个(可以是自定义的)splash(也称作“登录”)页面。
用户提供他的凭据信息,比如用户名和密码。
成功认证的话,客户端将会被重定向到网关的自己的web页面上,并且带有一个认证凭据(一个一次性的token)
用户就是用获取到的凭据访问网关。
网关去认证服务器询问token的有效性。
认证服务器确认token的有效性。
网关发送重定向给客户端,以从认证服务器上获取 成功提示页面,重定向到 http://portal_server:port/portal_script 这个位置。
认证服务器通知客户请求成功,可以上网了。
整个过程如下图所示
1.png

本文章由 http://www.wifidog.pro/2015/01/23/wifidog%E7%AE%80%E4%BB%8B-1.html 整理编辑,转载请注明出处

CentOS6.6下的authpuppy源码安装与配置

安装与配置authpuppy:
源码包:

#wget https://launchpad.net/authpuppy/trunk/1.0.0-stable/+download/authpuppy-1.0.0-stable.tgz

#cd /home
tar -xvf authpuppy-1.0.0-stable.tgz

#// apache配置一个虚拟域名(比如http://authpuppy.localhost/)指向目录 /home/authpuppy

打开http://authpuppy.localhost/
按提示完成对依赖包的安装(Requirements下的最好都安装), 如下:
依赖库: // 主要是PHP扩展包

APCu:
http://blog.163.com/liyi8798@126/blog/static/674546582012012115111847/
#wget http://pecl.php.net/get/apcu-4.0.6.tgz
#phpize
#./configure --with-php-config=/usr/local/php/bin/php-config --enable-apcu --enable-apc-bc
#make -s
#make install
#vi /usr/local/php/etc/php.ini
extension=apcu.so
// 其他类似

Permissions下出现红色部分,则需要做下面操作:

#chmod a+w authpuppy/ -R
#//自动创建authpuppy.yml

// 必须需要启用pdo_mysql,因为symfony的用的是PDO, 灵感来自http://bbs.csdn.net/topics/390036982
#cd php-5.6.2/ext/pdo_mysql
#phpize
#./configure --with-php-config=/usr/local/php/bin/php-config --with-pdo-mysql=/usr/local/mysql/
#make -s
#make install

#mysqladmin -uroot -p create authpuppy
#mysql -uroot -p

#create user 'authpuppy'@'localhost' identified by 'authpuppydev';
#grant all privileges on authpuppy.* to 'authpuppy'@'localhost' with grant option;

// 按界面来走就好了。

问题卡在连接不上mysql服务器上了两天,解决办法:
步骤1, 在http://authpuppy.localhost/install/3中点击next会有提示,如下:
Impossible to connect to the database with those credentials. Please make sure the database exists and try again.
此时,从/home/authpuppy目录中找到php的源码,如下:

#grep "Impossible to connect to the database" * -R
apps/frontend/modules/install/actions/actions.class.php: $this->getUser()->setFlash('error', "Impossible to connect to the database with those credentials. Please make sure the database exists and try again.", false);

打开上面文件,找到相应的行,将Exception $e打印出来

#vi apps/frontend/modules/install/actions/actions.class.php
// $this->getUser()->setFlash('error', "Impossible to connect to the database with those credentials. Please make sure the database exists and try again.", false);
$this->getUser()->setFlash('error', $e, false);

再在http://authpuppy.localhost/install/3中点击next, 出现提示:

exception 'Doctrine_Connection_Exception' with message 'Couldn't locate driver named mysql' in /home/www/authpuppy/lib/vendor/symfony/lib/plugins/sfDoctrinePlugin/lib/vendor/doctrine/Doctrine/Connection.php:486 Stack trace: #0 
/home/www/authpuppy/lib/vendor/symfony/lib/plugins/sfDoctrinePlugin/lib/vendor/doctrine/Doctrine/Connection/Mysql.php(101): Doctrine_Connection->connect() #1 
/home/www/authpuppy/lib/form/apDatabaseInstallForm.php(133): Doctrine_Connection_Mysql->connect() #2
/home/www/authpuppy/apps/frontend/modules/install/actions/actions.class.php(173): apDatabaseInstallForm->save() #3
/home/www/authpuppy/apps/frontend/modules/install/actions/actions.class.php(71): installActions->executePage3(Object(sfWebRequest)) #4
/home/www/authpuppy/cache/frontend/prod/config/config_core_compile.yml.php(459): installActions->executeIndex(Object(sfWebRequest)) #5
/home/www/authpuppy/lib/model/authpuppycore/util/apActions.class.php(56): sfActions->execute(Object(sfWebRequest)) #6 
/home/www/authpuppy/cache/frontend/prod/config/config_core_compile.yml.php(945): apActions->execute(Object(sfWebRequest)) #7 
/home/www/authpuppy/cache/frontend/prod/config/config_core_compile.yml.php(940): sfExecutionFilter->executeAction(Object(installActions)) #8 
/home/www/authpuppy/cache/frontend/prod/config/config_core_compile.yml.php(926): sfExecutionFilter->handleAction(Object(sfFilterChain), Object(installActions)) #9 
/home/www/authpuppy/cache/frontend/prod/config/config_core_compile.yml.php(1021): sfExecutionFilter->execute(Object(sfFilterChain)) #10 
/home/www/authpuppy/apps/frontend/lib/CheckDBAvailabilityFilter.class.php(95): sfFilterChain->execute() #11 
/home/www/authpuppy/cache/frontend/prod/config/config_core_compile.yml.php(1021): CheckDBAvailabilityFilter->execute(Object(sfFilterChain)) #12 
/home/www/authpuppy/cache/frontend/prod/config/config_core_compile.yml.php(988): sfFilterChain->execute() #13 /home/www/authpuppy/cache/frontend/prod/config/config_core_compile.yml.php(1021): sfRenderingFilter->execute(Object(sfFilterChain)) #14 
/home/www/authpuppy/cache/frontend/prod/config/config_core_compile.yml.php(658): sfFilterChain->execute() #15 
/home/www/authpuppy/cache/frontend/prod/config/config_core_compile.yml.php(2340): sfController->forward('install', 'index') #16 
/home/www/authpuppy/lib/vendor/symfony/lib/util/sfContext.class.php(170): sfFrontWebController->dispatch() #17 
/home/www/authpuppy/web/index.php(15): sfContext->dispatch() #18 {main}

步骤2, 从第一句“'Doctrine_Connection_Exception' with message 'Couldn't locate driver named mysql'”中可以看出,肯定是没有相关连接mysql的驱动,于是网上查找
www.baidu.com 查找“'Doctrine_Connection_Exception' with message 'Couldn't locate driver named mysql'”
有一个类似的问题,点击链接http://bbs.csdn.net/topics/390036982
其中一行是:
dream1206回复于: 2012-05-06 00:50:17
你需要启用pdo_mysql
windows下去掉 pdo_mysql.dll前面的注释,重启服务器。linux下编译时加上 with-pdo-mysql。
如果你已经这么做了,那么看看phpinfo()中的配置是否有生效
步骤3, 果断安装pdo_mysql
// 必须需要启用pdo_mysql,因为symfony的用的是PDO, 灵感来自http://bbs.csdn.net/topics/390036982

cd php-5.6.2/ext/pdo_mysql
phpize
./configure --with-php-config=/usr/local/php/bin/php-config --with-pdo-mysql=/usr/local/mysql/
make -s
make install

本文章由 http://www.wifidog.pro/2015/01/22/centos-authpuppy.html 整理编辑,转载请注明出处