标签 wifidog流程 下的文章

wifidog用php实现验证流程

步骤
1.首先简单说说wifidog认证的过程
客户端首次连接到wifi后,浏览器请求将会被重定向到:

login/?gw_address=%s&gw_port=%d&gw_id=%s&url=%s

验证通过后,客户端被重定向到网关,url格式如下:
http://网关地址:网关端口/wifidog/auth?token=
wifidong会启动一个线程周期性地报告每一个用户的状态信息,并通过如下地址发送给认证
服务器:

auth_server:/auth/?stage=
ip=
mac=
token=
incoming=
outgoing=

认证服务器根据该状态信息决定是否允许该用户继续连接,并回复网关,回复格式为:Auth:状态码,
如:Auth:1
常用状态码:
0:AUTH_DENIED,表示拒绝
1:AUTH_ALLOWED,验证通过
验证通过后,将重定向到如下地址:
portal/?gw_id=%s
wifidog的ping协议
wifidog通过ping协议将当前状态信息发送给认证服务器,发送地址为:

http://auth_sever/ping/?
gw_id=%s
sys_uptime=%lu
sys_memfree=%u
sys_load=%.2f
wifidog_uptime=%lu

认证服务器须返回一个“Pong”作为回应。
具体php实现代码如下

public function auth()
    {
        //响应客户端的定时认证,可在此处做各种统计、计费等等
        /*
            wifidog 会通过这个接口传递连接客户端的信息,然后根据返回,对客户端做开通、断开等处理,具体返回值可以看wifidog的文档
        wifidog主要提交如下参数
        1.ip
        2. mac
        3. token(login页面下发的token)
        4.incoming 下载流量
        5.outgoing 上传流量
        6.stage  认证阶段,就两种 login 和 counters
        */


        $stage = $_GET['stage'] == 'counters'?'counters':'login';
        if($stage == 'login')
        {
            //XXXX跳过login 阶段的处理XXXX不能随便跳过的
            //默认返回 允许
            echo "Auth: 1";
        }
        else if($stage == 'counters')
        {

            //做一个简单的流量判断验证,下载流量超值时,返回下线通知,否则保持在线
            if(!empty($_GET['incoming']) and $_GET['incoming'] > 10000000)
            {
                echo "Auth: 0";
            }else{
                echo "Auth: 1\n";
            }
        }
        else
            echo "Auth: 0"; //其他情况都返回拒绝


        /*
            返回值:主要有这两种就够了
        0 - 拒绝
        1 - 放行

        官方文档如下
        0 - AUTH_DENIED - User firewall users are deleted and the user removed.
        6 - AUTH_VALIDATION_FAILED - User email validation timeout has occured and user/firewall is deleted(用户邮件验证超时,防火墙关闭该用户)
        1 - AUTH_ALLOWED - User was valid, add firewall rules if not present
        5 - AUTH_VALIDATION - Permit user access to email to get validation email under default rules (用户邮件验证时,向用户开放email)
        -1 - AUTH_ERROR - An error occurred during the validation process
        */
    }
    public function portal()
    {
        /*
         wifidog 带过来的参数 如下
        1. gw_id
        */
        //重定到指定网站 或者 显示splash广告页面
        redirect('http://www.baidu.com', 'location', 302);

    }
    public function ping()
    {
        //url请求 "gw_id=$gw_id&sys_uptime=$sys_uptime&sys_memfree=$sys_memfree&sys_load=$sys_load&wifidog_uptime=$wifidog_uptime";
        //log_message($this->config->item('MY_log_threshold'), __CLASS__.':'.__FUNCTION__.':'.debug_printarray($_GET));

        //判断各种参数是否为空
        if( !(isset($_GET['gw_id']) and isset($_GET['sys_uptime']) and isset($_GET['sys_memfree']) and isset($_GET['sys_load']) and isset($_GET['wifidog_uptime']) ) )
        {
            echo '{"error":"2"}';
            return;
        }
        //添加心跳日志处理功能
        /*
            此处可获取 wififog提供的 如下参数
        1.gw_id  来自wifidog 配置文件中,用来区分不同的路由设备
        2.sys_uptime 路由器的系统启动时间
        3.sys_memfree 系统内存使用百分比
        4.wifidog_uptime wifidog持续运行时间(这个数据经常会有问题)
        */

        //返回值
        echo 'Pong';
    }
    /**
     * wifidog 的gw_message 接口,信息提示页面
     */
    function gw_message()
    {
        if (isset($_REQUEST["message"])) {
            switch ($_REQUEST["message"]) {
                case 'failed_validation':
                    //auth的stage为login时,被服务器返回AUTH_VALIDATION_FAILED时,来到该处处理
                    //认证失败,请重新认证
                    break;
                case 'denied':
                    //auth的stage为login时,被服务器返回AUTH_DENIED时,来到该处处理
                    //认证被拒
                    break;
                case 'activate':
                    //auth的stage为login时,被服务器返回AUTH_VALIDATION时,来到该处处理
                    //待激活
                    break;
                default:
                    break;
            }
        }else{
            //不回显任何信息
        }
    }

本文章由 http://www.wifidog.pro/2015/04/09/wifidog-php-2.html 整理编辑,转载请注明出处
wifidog认证wifidog流程auth server简单配置

前段时间使用wifidog进行wifi强制认证,现在做个小结。
1.首先简单说说wifidog认证的过程
客户端首次连接到wifi后,浏览器请求将会被重定向到:

login/?gw_address=%s&gw_port=%d&gw_id=%s&url=%s

验证通过后,客户端被重定向到网关,url格式如下:
http://网关地址:网关端口/wifidog/auth?token=
wifidong会启动一个线程周期性地报告每一个用户的状态信息,并通过如下地址发送给认证
服务器:

auth_server:/auth/?stage=
ip=
mac=
token=
incoming=
outgoing=

认证服务器根据该状态信息决定是否允许该用户继续连接,并回复网关,回复格式为:Auth:状态码,
如:Auth:1
常用状态码:
0:AUTH_DENIED,表示拒绝
1:AUTH_ALLOWED,验证通过
验证通过后,将重定向到如下地址:
portal/?gw_id=%s
wifidog的ping协议
wifidog通过ping协议将当前状态信息发送给认证服务器,发送地址为:

http://auth_sever/ping/?
gw_id=%s
sys_uptime=%lu
sys_memfree=%u
sys_load=%.2f
wifidog_uptime=%lu

认证服务器须返回一个“Pong”作为回应。
2.实战应用
struts配置文件:

<package name="index" namespace="/" extends="interceptorMy,struts-default">
<action name="login/" class="goodsAction" method="login">
<result name="success" type="redirect">/Login/index.jsp</result>
<result name="input">/error.jsp</result>
</action>
<action name="ping/" class="goodsAction" method="ping">
</action>
 <action name="auth/" class="goodsAction" method="auth">
</action>
<action name="portal/" class="goodsAction" method="portal">
</action>
</package>

Action方法

public String login() {
    try{
        System.out.println("login start!");
                System.out.println("gw_port:"+gw_port);
        System.out.println("login end!");

     }
    catch(Exception e)
    {
        e.printStackTrace();
        return INPUT;
    }
    return "success";
}
public void ping() {
    try{
        System.out.println("ping start!");
        System.out.println(gw_id);
        ServletActionContext.getResponse().getWriter().write("Pong");
        System.out.println("ping end!");
         }
    catch(Exception e)
    {
        e.printStackTrace();
    }
}
public void portal() {
    try{
        System.out.println("portal start");
        System.out.println("protal"+token);
    ServletActionContext.getResponse().sendRedirect("/demo/listAction");
        System.out.println("portal end");
     }
    catch(Exception e)
    {
        e.printStackTrace();
    }
}
public void auth() {
    try{
        System.out.println("auth start!");
        System.out.println("mac"+mac);
        System.out.println("stage"+stage);
        System.out.println("token"+token);
        ServletActionContext.getResponse().getWriter().write("Auth: 1");
        System.out.println("auth end!");

     }
    catch(Exception e)
    {
        e.printStackTrace();
    }
}

/Login/index.jsp代码:

<%
String path = request.getContextPath();
String basePath = request.getScheme()+"://"+request.getServerName()+":"+request.getServerPort()+path+"/";
    DateFormat format=new SimpleDateFormat("yyMMddHHmmss");
    String formatData=format.format(new Date());
    int ramdom=new Random().nextInt(1000);
    String token=formatData+ramdom;
    if(session.getAttribute("token")==null)
       session.setAttribute("token",token);

%>
<form method="GET" action='http://192.168.1.1:2060/wifidog/auth'>
<input type='hidden' name='token' value="<s:property value="#session.token" />" />
<input type='submit' value='Welcome!'/>
</form>

上面的192.168.1.1为网关的ip,2060为网关端口。
当然,完全可以在处理完login后直接跳到该地址。我们这里为演示其认证流程,故跳到该页面
效果:
客户端连接到wifi后,打开任何连接均跳到上面的index.jsp中,点击"Welcome"后,跳到/demo/listAction,即我们的目标地址。此后点击其他连接将不再拦截。
提示:安装wifidog的路由器必须可以访问Internet,否则wifidog拦截失败,无法跳到我们设定的页面。

本文章由 http://www.wifidog.pro/2015/04/08/wifidog%E6%B5%81%E7%A8%8Bwifidog%E8%AE%A4%E8%AF%81.html 整理编辑,转载请注明出处

Wifidog认证wifidog路由接口文档

概述

wifidog是搭建无线热点认证系统的解决方案之一,他比nocat更适合互联网营销思路。目前支持openwrt系统,他实现了路由器和认证服务器的数据交互,在路由器方是用C语言代码,通过wifidog程序和linux iptables防火墙实现接入用户的认证跳转和控制,在认证服务器方是通过php实现用户的认证流程和管理。
优点:有开源代码,可以很方便的搭建认证系统。
缺点:通过iptables方式实现,性能比较差,整体拉低了路由器的数据包处理速度,协议比较繁琐,对认证服务器的造成性能损耗比较大,在安全方面都是明文传输,有一定的安全隐患。

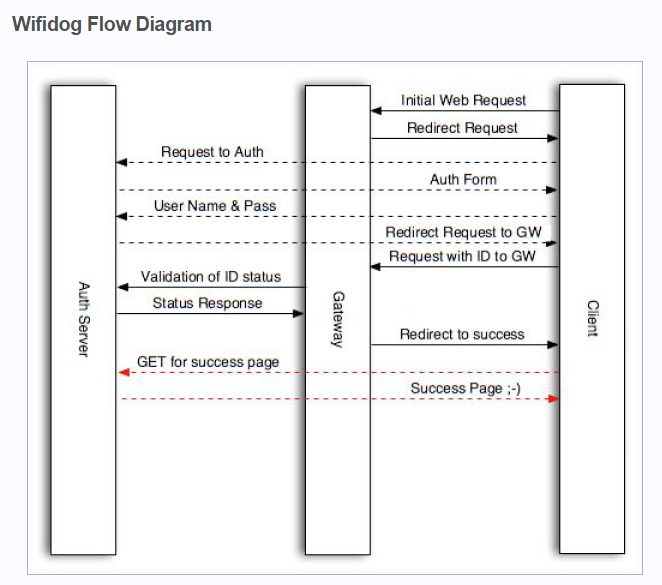
认证流程图:

wifidog-flow-2009.png

网关心跳协议

Wifidog将ping协议作为心跳机制向认证服务器发送当前状态信息。实现认证服务器和每个节点的状态双向健康监测的机制。
请求信息:

http://auth_sever/ping/?gw_id=%s&sys_load=%lu&sys_memfree=%u&sys_load=%.2f&wifidog_uptime=%lu

回复格式:

Pong

例子:

GET /ping/?gw_id=001217DA42D2&sys_uptime=742725&sys_memfree=2604&sys_load=0.03&wifidog_uptime=3861HTTP/1.0 User-Agent:wifidog Host:www.wifidog.pro

用户状态心跳协议

请求格式:

http://auth_server/auth/?stage= &ip= mac= &token= &incoming= &outgoing=

注意:
ip,mac,token为用户的基本信息,incoming/outgoing为用户的连接计数信息。 stage=counter|login|logout,分别表示:已认证,新认证用户,超时需要删除的用户。

回复格式:

Auth:状态码(注意中间冒号和状态码之间有个空格)

状态码:

0-AUTH_DENIED-Userfirewallusersaredeletedandtheuserremoved. 1-AUTH_ALLOWED-Userwasvalid,addfirewallrulesifnotpresent

例子:

GET /auth/?stage=counters&ip=7.0.0.107&mac=00:40:05:5F:44:43&token=4f473ae3ddc5c1c2165f7a0973c57a98&incoming=6031353&outgoing=827770HTTP/1.0 User-Agent:wifidog Host:www.wifidog.pro

跳转协议

对于新连接用户,路由器将其产生的任意url请求通过302重定向到认证平台。

请求格式:

http://auth_server/login/?gw_id= &gw_address= &gw_port= &mac= &url=

例子:

GET /login/? gw_id=808100949391&gw_address=192.168.81.1&gw_port=80&mac=aa:bb:cc:dd:cc:ee&url=http://www.sina.com.cn/HTTP/1.0 User-Agent:wifidog Host:www.wifidog.pro

注册协议

请求格式:

http://gw_ip/wifidog/auth?token=

例子:

GET wifidog/auth?token=12312412124 User-Agent:iphone Host:路由器ip 注册请求成功,以307的方式跳转平台的portal/?gw_id=

本文章由 http://www.wifidog.pro/2015/03/27/wifidog%E6%8E%A5%E5%8F%A3-1.html 整理编辑,转载请注明出处

wifidog 配置radius配置文件radiusd.conf分析

Radiusd.conf文件是freeradius的核心配置文件,其中设置了 服务器的基本信息, 配置文件与日志文件的环境变量,并详细配置freeradius模块所使用的信息, 与认证和计费所使用模块的配置. 配置的变量定义的形式为${foo},他们就在这个文件上,并且不随请求到请求而改变. 变量的格式参照 variables.txt.

1.1 环境变量
此处定义其他配置文件以及目录的位置,也就是环境变量

prefix = /usr/local

exec_prefix = ${prefix}

sysconfdir = ${prefix}/etc

localstatedir = ${prefix}/var

sbindir = ${exec_prefix}/sbin

logdir = ${localstatedir}/log/radius

raddbdir = ${sysconfdir}/raddb

radacctdir = ${logdir}/radacct

配置文件和日志文件的位置

confdir = ${raddbdir}

run_dir = ${localstatedir}/run/radiusd

日志文件的信息,添加到如下配置文件的底部

log_file = ${logdir}/radius.log

1.2 全局配置
模块的位置由 libdir来配置。

如果不能工作,那么你可以从新配置,从新Build源码,并且使用 共享库。

pidfile: Where to place the PID of the RADIUS server.

pidfile = ${run_dir}/radiusd.pid

user/group

如果有评论,服务器会运行 用户/组 启动它. 修改用户/组,必须具有root权限启动服务器

这里的含义是指定启动radius服务可以限定操作系统上的用户和组,但是不建议启动它.

#user = nobody

#group = nobody

最长请求时间(秒),这样的问题经常需要存在在应用SQL数据库时候,建议设置为5秒到120秒之间.

max_request_time = 30

当请求超过最长请求时间的时候,可以设置服务器删除请求.

当你的服务在threaded(线程下)运行,或者 线程池(thread pool) 模式,建议这里设置为no.

但用threaded 服务设置为yes时,有可能使服务器崩溃.

delete_blocked_requests = no

在 reply 发送给NAS后的等待清空时间. 建议 2秒 到 10秒

cleanup_delay = 5

服务器的请求最大数 ,建议值 256 到无穷

max_requests = 1024

让服务器监听某个IP,并且从次IP发送 相应 信息. 主要是为了 服务器同时具有多服务器时候使用.

bind_address = *

可以指定raidus的使用端口号,使用0表示使用默认的radius端口, 在配置文件 /etc/services配置.

port = 0

如果需要服务器同时监听其他的IP,可以用listen 块. 下面是例子

#listen {

# IP address on which to listen.

# Allowed values are:

# dotted quad (1.2.3.4)

# hostname (radius.example.com)

# wildcard (*)

# ipaddr = *

# Port on which to listen.

# Allowed values are:

# integer port number (1812)

# 0 means "use /etc/services for the proper port"

# port = 0

# Type of packets to listen for.

# Allowed values are:

# auth listen for authentication packets

# acct listen for accounting packets

#

# type = auth

#}

hostname_lookups大概是表示为NAS查找它的域名信息?可以通过域名配置NAS?

hostname_lookups = no

是否允许 core dumps.

allow_core_dumps = no

expressions支持,规则和扩展.

regular_expressions = yes

extended_expressions = yes

记录User-Name属性的全称.

log_stripped_names = no

是否记录认证请求信息到日志文件

log_auth = no

当请求被拒绝时记录密码, 当请求正确时记录密码

log_auth_badpass = no

log_auth_goodpass = no

是否允许用户名冲突,即重复同用户同时登陆.强烈不建议启用重复用户.

usercollide = no

将用户名 小写化, 将密码小写化.

lower_user = no

lower_pass = no

是否去除用户名和密码中的空格

nospace_user = no

nospace_pass = no

程序执行并发检查(不理解含义)

checkrad = ${sbindir}/checkrad

安全 配置 域

security {

指在Radius包中的最大属性数目.设置为0表示无穷大.

max_attributes = 200

发送 Access-Reject 包时候,可以设置一定的延迟,以缓慢DOS攻击,也可以缓慢穷举破解用户名和密码的攻击

reject_delay = 1

服务器是否对状态服务器的请求信息进行相应.

status_server = no

}

PROXY CONFIGURATION

代理域.

是否开启代理服务,具体配置参照 ${confdir}/proxy.conf

proxy_requests = yes

$INCLUDE ${confdir}/proxy.conf

Clients配置

$INCLUDE ${confdir}/clients.conf

是否启用snmp配置,具体配置文件在snmp.conf

snmp = no

$INCLUDE ${confdir}/snmp.conf

线程池 配置 域

thread pool {

启动时服务的个数.(在启动Mysql模块后可以明显看到.)当同时进行的请求数超过5个时,会增加线程服务.

start_servers = 5

最大的服务数

max_servers = 32

当少于最少空闲服务时,它会建立服务,大于最大空闲服务时会停止多余的服务.

最少空闲服务,与最大空闲服务.

min_spare_servers = 3

max_spare_servers = 10

每个server最大的请求数.当有内存漏洞时,可能需要配置.

max_requests_per_server = 0

}

1.3 模块配置
1.3.1 PAP 模块

# Supports multiple encryption schemes 支持多种加密方式

# clear: Clear text 明文

# crypt: Unix crypt Unix 加密

# md5: MD5 ecnryption MD5加密

# sha1: SHA1 encryption. SHA1加密

# DEFAULT: crypt 默认是Unix加密

pap {

encryption_scheme = crypt

}

1.3.2 CHAP模块
chap {

authtype = CHAP

}

1.3.3 PAM模块
PAM模块 (PAM) 是行业标准验证框架,

鉴于很多系统的PAM库都有内存漏洞,所以不建议使用。

pam {

pam_auth = radiusd

}

1.3.4 UNIX 系统用户的 认证模块
unix {

cache = no

cache_reload = 600

# passwd = /etc/passwd

# shadow = /etc/shadow

# group = /etc/group

radwtmp = ${logdir}/radwtmp

}

1.3.5 EAP模块
详细见${confdir}/eap.conf

$INCLUDE ${confdir}/eap.conf

1.3.6 MSCHAP 模块
mschap {

#use_mppe = no

#require_encryption = yes

#require_strong = yes

# 为了纠正window发送chap时有时包括域,有时又不包括域的信息.

#with_ntdomain_hack = no#ntlm_auth = "/path/to/ntlm_auth –request-nt-key –username=%{Stripped-User-Name:-%{User-Name:-None}} –challenge=%{mschap:Challenge:-00} –nt-response=%{mschap:NT-Response:-00}"

}

1.3.7 LDAP 配置 <SPAN style="FONT-SIZE: 9pt; COLOR:

本文章由 http://www.wifidog.pro/2015/03/27/wifidog%E9%85%8D%E7%BD%AE%E5%88%86%E6%9E%90.html 整理编辑,转载请注明出处