手工添加的LUCI WIFIDOG能保存UCI配置,但是不启动wifidog
问题出在init.d下的wifidog未enable, /etc/init.d/wifidog enable
本文章由 http://www.wifidog.pro/2015/01/29/wifidog-luci-1.html 整理编辑,转载请注明出处
问题出在init.d下的wifidog未enable, /etc/init.d/wifidog enable
本文章由 http://www.wifidog.pro/2015/01/29/wifidog-luci-1.html 整理编辑,转载请注明出处
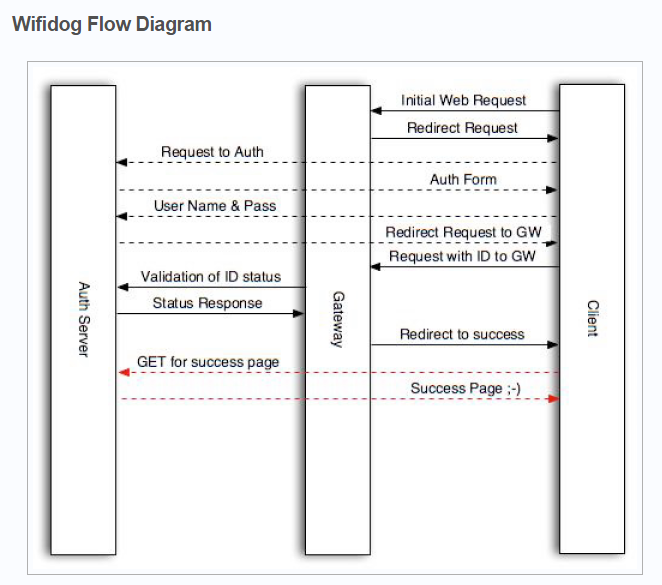
认证流程如下图:

认证流程详解:
1.Login登录(参照 login/index.php)
服务器验证后,Redirect to GW,携带 token
http://$_REQUEST[gw_address]:$_REQUEST[gw_port]/wifidog/auth?token=$token
2.Validation of ID
服务器返回 Status
Auth: 1
Messages: | 认证信息(如错误之类的消息)
common.php中有如下定义:
/* Constant shared with the gateway
auth.h中也有相应定义:
/**
 * @brief Authentication codes returned by auth server.
 *
 * Authentication result codes returned by auth_server_request() corresponding
 * to result code from the central server itself.
 */
typedef enum {
    AUTH_ERROR = -1, /**< An error occured during the validation process*/
    AUTH_DENIED = 0, /**< Client was denied by the auth server */
    AUTH_ALLOWED = 1, /**< Client was granted access by the auth server */
    AUTH_VALIDATION = 5, /**< A misnomer.  Client is in 15 min probation to validate his new account */
    AUTH_VALIDATION_FAILED = 6, /**< Client had X minutes to validate account by email and didn't = too late */
    AUTH_LOCKED = 254 /**< Account has been locked */
} t_authcode;
本文章由 http://www.wifidog.pro/2015/01/29/wifidog-authserver.html 整理编辑,转载请注明出处

1.The client does his initial request, as if he was already connected, (e.g.: http://www.google.ca)
2.The Gateway's firewall rules mangle the request to redirect it to a local port on the Gateway. When that's the done, the Gateway provides an HTTP Redirect reply that contains the Gateway ID, Gateway FQDN and other informations
3.The Client does his request to the Auth Server as specified by the Gateway, see Login Protocol
4.The Gateway replies with a (potentially custom) splash (login) page
5.The Client provides his identification informations (username and password)
6.Upon succesful authentication, the client gets an HTTP Redirect to the Gateway's own web server with his authentication proof (a one-time token), http://GatewayIP:GatewayPort/wifidog/auth?token=[auth token]
7.The Client then connects to the Gateway and thus gives it his token
8.The Gateway requests validation of the token from the Auth Server, see Client Protocol
9.The Auth Server confirms the token
10.The Gateway then sends a redirect to the Client to obtain the Success Page from the Auth Server, redirects to http://auth_server/portal/
11.The Auth Server notifies the Client that his request was successful
本文章由 http://www.wifidog.pro/2015/01/28/wifidog-flow.html 整理编辑,转载请注明出处
Wifi有一种web方式认证方案,当连接到某些不加密的热点之后,会跳转到一个网页来认证登陆,大家熟悉的CMCC就采用了这种web的验证方式。
它的原理是在得到正确的认证之前,会把所有的流量重定向到认证服务器上,通过认证后,便可以正常使用。
如果说仅仅想获取web验证时其他用户的用户名和密码,arp欺骗然后嗅探足够了。因为此时攻击者已经分配到了ip,且同一网关下产生的流量是不会重定向的。
但是目前的情况是,认证服务器用的https加密传输,无法嗅探到明文密码。
于是萌生了伪造热点及web认证服务器,然后记录密码的想法。
客户端在接受WiFi信号的时候有一个特点,在ssid相同的时候,会只保留信号强的那一个无线路由的ssid。
这样,只要伪造热点的ssid与原热点的相同,会有部分人搜到伪造的热点,从而登陆,记录密码。
本无线路由用的ddwrt的系统,装了wifidog来进行辅助web认证。
至于如何搭建web认证系统,百度一大把,但主要是用了wiwiz和wifiap这两个成熟的网站提供的方案。
但是,利用第三方的网站无法拦截到用户名和密码,而且无法控制认证的过程。
最好的解决方法是自己搭建一个简单的系统。
Wifidog的认证流程如下:
1、客户端发出一个http请求(http://www.xxx.com)
2、网关将该请求信息以及网关本身的一些信息作为参数,将原始的请求重定向到web认证服务器(http://auth_server/login/)
3、Web认证服务器通过客户端的认证之后,返回一个一次性的token,客户端带着这个token去网关上的wifidog开放的端口去做验证(http://GatewayIP:GatewayPort/wifidog/auth?token=[auth token])
4、Wifidog拿到token后,到web认证服务器检测token是否有效,如果有效则通过客户端的验证,开放访问权限,并将客户端重定向到web认证服务器的欢迎界面(http://auth_server/portal/);如果token无效,则需要继续验证
Wifidog官方推荐的web认证服务软件为authpuppy (http://www.authpuppy.org),不过其代码比较复杂,可以参考wifidog之前的web认证服务软件。获取方式为:
svn checkout https://dev.wifidog.org/svn/trunk/wifidog-auth
web认证服务软件用php写成,重点文件为wifidog-auth\wifidog\login\index.php(客户端web认证、产生token以及重定向到wifidog的开放端口)、wifidog-auth\wifidog\auth\index.php(wifidog验证token)、wifidog-auth\wifidog\portal\index.php(认证成功后页面重定向)。宏定义在wifidog-auth\wifidog\include\common.php文件中。
了解了基本流程就可以DIY出一个简单的web认证服务器了。在认证的过程中可以顺便记录下客户端的密码。
路由器上Wifidog配置如下图。重点配置的地方为端口号(port),认证服务器(AuthServer Hostname), 认证服务器web端口(AuthServer HTTP Port),路径(AuthServer Path)。

本文章由 http://www.wifidog.pro/2015/01/28/wifidog%E8%AE%A4%E8%AF%81-3.html 整理编辑,转载请注明出处