为wifidog认证跳转url添加客户端ip地址

默认的的wifidog认证页面跳转url是这样的
login/?gw_address=%s&gw_port=%d&gw_id=%s&url=%s
Example: https://auth.ilesansfil.org/login/?gw_id=0016B6DA9AE0&gw_address=7.0.0.1&gw_port=2060
由于业务需要,需要在跳转到认证页面时加一个客户端内网IP地址,即ClienIPAddress

下载wifidog添代码,打开http.c,找到

/* Re-direct them to auth server */
char *urlFragment;
safe_asprintf(&urlFragment, "%sgw_address=%s&gw_port=%d&gw_id=%s&url=%s",
auth_server->authserv_login_script_path_fragment,
config->gw_address,
config->gw_port,
config->gw_id,
url);
debug(LOG_INFO, "Captured %s requesting [%s] and re-directing them to login page", r->clientAddr, url);
http_send_redirect_to_auth(r, urlFragment, "Redirect to login page");
free(urlFragment);

修改为

/* Re-direct them to auth server */
char *urlFragment;
safe_asprintf(&urlFragment, "%sgw_address=%s&gw_port=%d&gw_id=%s&url=%s&clientip=%s",
auth_server->authserv_login_script_path_fragment,
config->gw_address,
config->gw_port,
config->gw_id,
url,
r->clientAddr);
debug(LOG_INFO, "Captured %s requesting [%s] and re-directing them to login page", r->clientAddr, url);
http_send_redirect_to_auth(r, urlFragment, "Redirect to login page");
free(urlFragment);

重新编译以后就OK了

现在认证跳转url就带有客户端ip地址了。

本文章由 http://www.wifidog.pro/2015/02/15/wifidog%E6%B7%BB%E5%8A%A0%E5%AE%A2%E6%88%B7%E7%AB%AFIP.html 整理编辑,转载请注明出处

一键实现DD-WRT升级web认证功能wifidog版

一、硬件准备(硬件支持列表)
请参照DD-WRT网站的“支持的硬件列表”:
如果你的产品不在列表中,请确认你的路由器支持DD-WRT,或与我们的技术人员联系。
已熟悉DD-WRT并正确配置上网的用户,请直接跳到第五点。
二、升级DD-WRT固件
请先将路由器升级为DD-WRT原版,并确认该版本支持wifidog功能(进入路由器管理界面的“服务》热点”查看是否有wifidog的选项。升级方法请百度)。
默认内网IP为192.168.1.1 DHCP开启(具体配置可参照第四点)。
Step 1:获取IP地址,访问192.168.1.1
Step 2:设置web管理界面的登录用户名和密码
Step 3:设置web管理界面语言为中文:
“管理》管理》语言》简体中文”:

三、配置网络参数
打开“设置》基本设置》WAN连接类型”,设置下图红色框处的参数(PPPoE、DHCP或静态IP,根据你的网络环境而定):
“可选设置”:输入路由器名称(任意名称,如OldTreeCoffee)
“网络设置》路由器IP”:
1)本地IP地址为192.168.X.X(X为1-254之间的任意数字,如192.168.12.1)
2)子网掩码为255.255.255.0
3)其它参数默认
“网络设置》网络地址服务器设置 (DHCP)”:
1)DHCP类型为“DHCP服务器”
2)DHCP服务器“启用”
3)起始IP地址为100(大于1小于255的数值)
4)最大DHCP用户数(100)
5)其它参数默认
注:某些路由器(如磊科NW618)可能还需要作如下调整(WAN无法获取DHCP地址或无法拨号时进行此操作)
进入“设置》VLANs”页面
取消W下面的小勾(红框处),点击“保存”;等待片刻,重新勾选W,点击“保存”,再点击“应用”,重启路由器,WAN即可恢复正常状态。
(如果其它路由器发现WAN无法使用,亦可尝试此方法)

四、配置无线网络
“无线》基本设置”
1)无线模式为“访问点(AP)”
2)无线网络模式为“混合”
3)无线网络名(SSID)为“wifiap.cn_XXX”
4)无线频道一般选择(1、6、11)三个频道的其中一个(如果无线信号不稳定,请尝试更改此参数)
5)其它参数默认
6)点击“保存”,再点击“应用”
至此,连接到的wifiap路由器的电脑(有线或无线)均可正常上网。

务必先确认路由器在未开启认证的时候能正常上网。

五、注册Wifiap中央管理平台账号
1)访问wifiap官方网站
2)点击右下角的“商家登录|后台管理”,并进行注册
3)填写注册相关资料,提交免费注册(请牢记你的登录账号和密码)
六、创建云端AP并更新标识
1)登录官方网站的管理后台
2)从顶部导航进入“热点管理》热点维护》【新增】”
3)热点名称:热点的唯一标识名称(脚本中的hotspotname)
4)热点类型:选择“商家版”
5)机器码:输入一段字符串,如wifiapkey
6)点击“添加”,成功添加此热点(在“热点维护”中的“更新标识”可修改更多参数)
7)在“热点维护”页面找到新增的热点,在“操作”中点击“生成启动脚本”
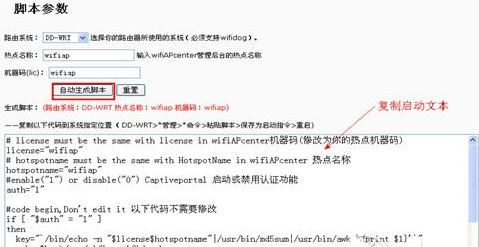
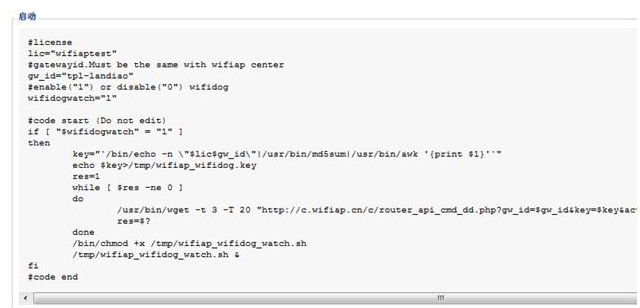
8)填写路由系统(DD-WRT)、热点名称(刚新增的热点)、机器码(刚新增的机器码),然后点击“自动生成脚本”,在文本框中复制脚本(见下图)
9)配置路由认证,粘贴脚本(见第七点)
1.png

七、配置路由器认证模块
进入wifiap路由器web管理界面,并打开“管理》命令”
在指令输入框处,粘贴脚本(在脚本参数中生成的脚本)
编辑完成后,点击“保存为启动指令”,然后重启路由器生效。如下图示:
2.png

八、启用web认证功能并配置认证页面
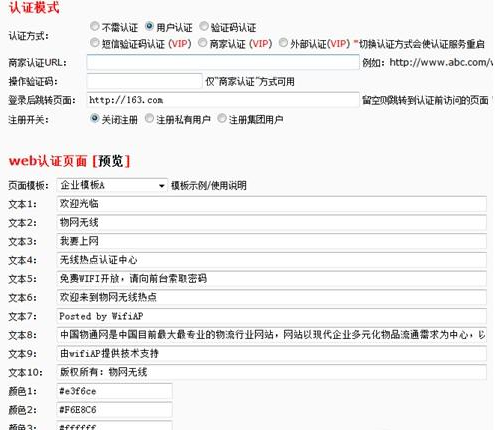
进入官方网站的“热点管理》认证页面配置”,找到刚创建的热点,并点击【认证配置】
1)认证模式》认证方式:选择“用户认证”(其它认证方式请参考“云中心管理系统说明”)
2)认证模式》登录后跳转页面:用户登录成功后强制跳转的页面,如贵公司的网站(留空则跳转到认证前访问的页面)
3)认证模式》注册开关:是否允许用户自助注册,和注册的类型
4)web认证页面》页面模板:务必选择一个合适的模板,并点击“模板示例/使用说明”配置好各文本和图片,点击“修改”确认提交
5)点击【预览】查看页面效果,如需要调整,可即时修改参数,最后点击“修改”生效
3.png

九、用户账号管理
进入官方网站的“账号管理》创建账号”,添加一个账号,如test,密码123
高级账号管理功能请参考“云中心管理系统说明”
十、重启路由器
回到路由器管理界面,进入“管理》管理”页面,点击右下角的“重启路由器”,认证功能将自动启动。
应用效果
打开浏览器,随便输入一个网址,将强制跳转到wifiap云后台配置的认证页面,用户必须输入账号密码方可进行上网。

本文章由 http://www.wifidog.pro/2015/02/15/ddwrt-wifidog%E6%97%A0%E7%BA%BF%E8%AE%A4%E8%AF%81.html 整理编辑,转载请注明出处

wifidog 整体代码分析

Wifidog将ping协议作为心跳机制向认证服务器发送当前状态信息,过程如下:

Ping线程的创建

/* Start heartbeat thread */

result =pthread_create(&tid_ping, NULL, (void *)thread_ping, NULL);

if (result != 0) {

    debug(LOG_ERR, "FATAL: Failed tocreate a new thread (ping) - exiting");

    termination_handler(0);

}

pthread_detach(tid_ping);

上面的过程创建子线程后,将该子线程的状态设置为detached,则该线程运行结束后会自动释放所有资源。并且是非阻塞的。

Thread_ping实现:

void    
thread_ping(void *arg)  
{
       pthread_cond_t             cond = PTHREAD_COND_INITIALIZER;    
       pthread_mutex_t           cond_mutex =PTHREAD_MUTEX_INITIALIZER;    
       struct      timespec  timeout;    

       while (1) {    
              /* Make sure wecheck the servers at the very begining */    
              debug(LOG_DEBUG,"Running ping()");    
              ping();                 

              /* Sleep for config.checkinterval seconds... */

              timeout.tv_sec= time(NULL) + config_get_config()->checkinterval;

              timeout.tv_nsec= 0;    

              /*Mutex must be locked for pthread_cond_timedwait... */

              pthread_mutex_lock(&cond_mutex);

              /*Thread safe "sleep" */

              pthread_cond_timedwait(&cond,&cond_mutex, &timeout);

              /*No longer needs to be locked */

              pthread_mutex_unlock(&cond_mutex);

       }    
}

红色部分为非常优雅的线程休眠,想下为什么不用sleep?用sleep会导致整个进程陷入休眠,不建议使用。

ping的过程:

a. 连接auth服务器
获取auth服务器的个数,wifidog支持备用auth服务器
进行auth服务器尝试计数
进行dns解析、会尝试按顺序对每个auth服务器进行解析,直到解析成功。
dns解析失败,则尝试对www.google.com、"www.yahoo.com"、进行解析,如果解析成功代表网络时通的,如果失败则代表网络不通,直接退出。网络是通的则会进行下一个auth服务器解析
dns解析成功,将auth服务器ip地址记录到auth_server->last_ip中,并进行socket连接
b. 获取本机设备的uptime(系统总运行时间与系统空闲时间)、meminfo、loadavg()信息
/*
loadavg
监控CPU的平均负载、这里的平均负载也就是可运行的进程的平均数
cat /proc/loadavg
前三个值分别对应系统在5分钟、10分钟、15分钟内的平均负载
第四个值的分子是正在运行的进程数,分母是进程总数,最后一个是最近运行的进程ID号
*/
c. 进行请求数据填充,格式如下:

snprintf(request,sizeof(request) - 1,                         "GET%s%sgw_id=%s&sys_uptime=%lu&sys_memfree=%u&sys_load=%.2f&wifidog_uptime=%luHTTP/1.0\r\n"    
                     "User-Agent:WiFiDog %s\r\n"    
                     "Host:%s\r\n"    
                     "\r\n",    
                     auth_server->authserv_path,    
                     auth_server->authserv_ping_script_path_fragment,    
                     config_get_config()->gw_id,   
                     sys_uptime,    
                     sys_memfree,    
                     sys_load,
                         (longunsigned int)((long unsigned int)time(NULL) - (long unsigned int)started_time),    
                     VERSION,    
                     auth_server->authserv_hostname);

Auth服务器在收到‘ping’包后只需要回复PONG字符串即可,这有点像supplicant的回复。
但即使这个过程有问题,也不妨碍wifidog重定向的使用,貌似这个模块的功能仅仅是把设备的状态发送给auth服务器。

流量控制

线程的创建:

/*Start clean up thread */

result= pthread_create(&tid_fw_counter, NULL, (void *)thread_client_timeout_check,NULL);

if(result != 0) {

   debug(LOG_ERR, "FATAL: Failed tocreate a new thread (fw_counter) - exiting");

   termination_handler(0);

}

pthread_detach(tid_fw_counter);

这地方和上面讲解的一样,不在重复。

主要函数:fw_sync_with_authserver,改函数的流程如下:

a. 调用iptables_fw_counters_update更新所有client的流程出入统计(利用iptable规则)

b. 遍历clinet list,该list是之前所有登入过的客户端

c. 如果有auth server,将每个client的ip、mac、token、incoming、outgoing发给auth server

d. 进行客户端流量更新超时检测,检测的规则如下:

p1->counters.last_updated+(config->checkinterval * config->clienttimeout)<= current_time

如果满足上面规则,则认为该client是不活动用户,会在iptable规则中删除该用户,清除在client list的记录,并通知auth server 该client REQUEST_TYPE_LOGOUT。

e. 如果上面一些条件不满足,则依据authresponse.authcode返回值进行处理
case AUTH_DENIED:
在iptable规则中删除该用户,清除在client list的记录
case AUTH_VALIDATION_FAILED:
验证超时,在iptable规则中删除该用户,清除在client list的记录
case AUTH_ALLOWED:
将改client fw_connection_state 置为FW_MARK_KNOWN,并将改client添加到允许上网的规则当中
case AUTH_VALIDATION:
不做任何事
case AUTH_ERROR:
不做任何事

认证流程
wifidog-flow-2009.png

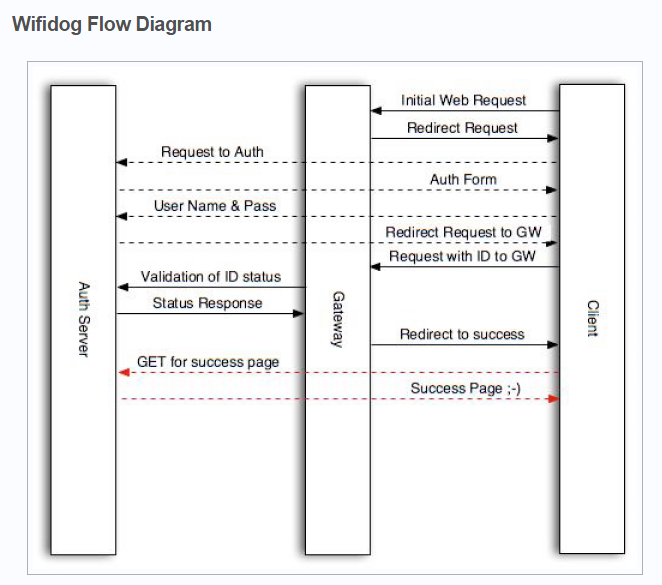
用户连接WIFI会跳转到以下地址:

http://auth_server/login?gw_id=[GatewayID, default: "default"]gw_address=[GatewayAddress, internal IP of router]gw_port=[GatewayPort, port that wifidog Gateway is listening on]

url=[user requested url]

auth_server #即认证的域名

gw_id #配置的网关名称

gw_address #回调的内网地址

gw_port #回调的端口

在这个阶段需要返回登录的页面,即授权的首页,并且需要将所有涉及跳转的第三方地址加入白名单
当验证用户身份之后,即用户登录成功之后重定向到网关地址
http://GatewayIP:GatewayPort/wifidog/auth?token=[auth token]
auth token #系统为用户生成的token

网关地址接受到消息后,会周期的发送用户信息,并确认是不是允许继续网络访问请求地址

http://auth_server/auth/index.php?   
stage=counters   
ip=    
mac=    
token=    
incoming=    
outgoing=

ip,mac,token为用户的基本信息,incoming/outgoing为用户的连接计数信息,用来限定用户是否可以继续连接
此时auth_server需要返回该请求:
0——拒绝,删除防火墙内用户以及用户的信息
6——用户验证失败,超时,会删除防火墙内信息(即会重新要求登录)
1——用户验证通过,并跳转到http://auth_server/portal/?gw_id=%s
5——用户需要验证,允许规则内的访问进行验证
-1——用户验证出错,用户可以继续访问网络

返回数据格式:
Auth:
如Auth: 1 #中间有个空格

系统会周期性发送心跳包,用来确认网关验证和认证服务器的正常工作请求地址

http://auth_sever/ping/?
gw_id=%s
sys_uptime=%lu
sys_memfree=%u
sys_load=%.2f
wifidog_uptime=%lu

auth_server此时需要返回“Pong”

可以通过该心跳包来监控整个认证的工作

本文章由 http://www.wifidog.pro/2015/02/13/wifidog%E4%BB%A3%E7%A0%81%E5%88%86%E6%9E%90-2.html 整理编辑,转载请注明出处
wifidog认证流程及相关重要函数调用

1、The client does his initial request, as if he was already connected, (e.g.: http://www.google.ca)
2、The Gateway’s firewall rules mangle the request to redirect it to a local port on the Gateway. When that’s the done, the Gateway provides an HTTP Redirect reply that contains the Gateway ID, Gateway FQDN and other informations
3、The Client does his request to the Auth Server as specified by the Gateway, see Login Protocol
4、The Gateway replies with a (potentially custom) splash (login) page
5、The Client provides his identification informations (username and password)
6、Upon succesful authentication, the client gets an HTTP Redirect to the Gateway’s own web server with his authentication proof (a one-time token), http://GatewayIP:GatewayPort/wifidog/auth?token=[auth token]
7、The Client then connects to the Gateway and thus gives it his token
8、The Gateway requests validation of the token from the Auth Server, see Client Protocol
9、The Auth Server confirms the token
10、The Gateway then sends a redirect to the Client to obtain the Success Page from the Auth Server, redirects to http://auth_server/portal/
12、The Auth Server notifies the Client that his request was successful

代码:

http_callback_404:
将未认证的请求重定向到Auth Server的登录界面:login页面

http_callback_auth:
客户端登陆成功后,Auth Server将客户端重定向到Gateway,形式如下:http://GatewayIP:GatewayPort/wifidog/auth?token=[auth token]

authenticate_client:
Gateway将拿到的token传给Auth Server,验证客户端,如果客户端被允许,将客户端重定向到Auth Server的portal界面Firewall.c中包含了对iptables相关的操作

本文章由 http://www.wifidog.pro/2015/02/13/wifidog%E8%AE%A4%E8%AF%81%E6%B5%81%E7%A8%8B.html 整理编辑,转载请注明出处