wifidog认证服务器Wiwiz Auth API集成示例代码(PHP版)
<?php

$userkey = "8C447CEAC649C9CC";  // replace with your own user key

//****************************************************
// Gets incoming parameters
//****************************************************

$pTokencode = $_REQUEST["tokencode"];   // incoming parameter "tokencode"
$pSrvurl = $_REQUEST["srvurl"];     // incoming parameter "srvurl"

session_start();
if($pTokencode != null)
    $_SESSION['tokencode'] = $pTokencode;
if($pSrvurl != null)
    $_SESSION['srvurl'] = $pSrvurl;
?>

<html>
<head>
<meta http-equiv="Content-Type" content="text/html; charset=UTF-8">
<meta http-equiv="Content-Language" content="zh">
<meta http-equiv="Pragma" content="no-cache">
<meta http-equiv="Cache-Control" content="no-cache">
<title> Wiwiz Auth API Usage Sample </title>
</head>
<body>

<form method="post">

User Name: <input type="text" name="username" />
<br>

Password: <input type="password" name="pswd" />
<br>

<input type="submit" name="login" value="Login" />
<br>

<?php
if(isset($_REQUEST['login'])) { // if "Login" button is clicked

    //****************************************************
    // Step 1. Do your business. E.g. check user login ...
    //****************************************************

    $loginSuccess = false;
    //
    // Do something you need.
    // e.g. verify the user
    //      ......
    //

    $loginSuccess = true; // assume login successful

    if($loginSuccess == false) {

        echo "Login Failed!";   // if user login failed, show an error message

    } else {

        //****************************************************
        // Step 2. Do the pre-auth by calling Wiwiz Auth API
        // IMPORTANT: Do this on your server side(ASP, C#, JSP/Servlet, PHP...),
        //            but DO NOT do this on your client side (HTML/Javascript)
        //****************************************************

        // parameter "action" : REQUIRED!
        // set it to "1" to authenticate the user
        // set it to "0" to block the user
        $action = "1";

        // parameter "tokencode": REQUIRED!
        // set identical to the incoming parameter
        $tokencode = $_SESSION['tokencode'];

        // parameter "srvurl": REQUIRED!
        // set identical to the incoming parameter
        $srvurl = $_SESSION['srvurl'];

        // parameter "endtime" : OPTIONAL
        // Format: yyyy-mm-dd hh:MM:ss  e.g. 2012-05-31 21:39:00
        // set this parameter to set the time to close the user's Internet connection
        // Note: the value must be url-encoded.
        $endtime = urlencode('2012-05-31 21:39:00');

        // parameter "postauth" : OPTIONAL
        // E.g. http://www.YourDomain.com
        // set this parameter to redirect to a specified URL after authenticated.
        // Note: the value should be url-encoded.
        $postauth = urlencode("http://www.wiwiz.com");

        $parameters = "?wiwiz_auth_api=1&ver=1.0". // parameter "wiwiz_auth_api" and "ver". Fixed value
                "&tokencode=". $tokencode . // parameter "tokencode". See above
                "&userkey=". $userkey .     // parameter "userkey". Set your own User Key
                "&action=". $action .       // parameter "action". See above
                "&endtime=". $endtime .     // parameter "endtime". See above
                "&postauth=". $postauth;    // parameter "postauth". See above

        $verifycode = file_get_contents($srvurl . $parameters); // gets "verifycode" - the verification result from Wiwiz server side

        $userstring = $_REQUEST['username'];                    // sets the Track Data (Optional), e.g. username

        if (strpos ($verifycode, "ERR") === 0) {
            // if there is an error, show error code
            echo "Error: ". $verifycode;

        } else {
            // OK, now. do Step 3.

            //****************************************************
            // Step 3. Complete the Authentication by calling Wiwiz Auth API
            //****************************************************
            $redirectUrl = $srvurl.     // use the value of incoming parameter "srvurl" as the redirection address
                    "?wiwiz_auth_api_login=1".  // parameter "wiwiz_auth_api_login"
                    "&tokencode=". $tokencode . // parameter "tokencode", set identical to the incoming parameter
                    "&verifycode=". $verifycode .   // parameter "verifycode", the verification result from Wiwiz server side
                    "&userstring=". $userstring;    // parameter "userstring" (Optional), the Track Data set by the user

            ob_start();
            header("Location: ". $redirectUrl); // finally, do the redirection
            ob_flush();

//          echo "<script>location.href=\"". $redirectUrl ."\"</script>";

        }

    }
}
?>

</form>

</body>
</html>
本文章由 http://www.wifidog.pro/2015/03/20/wifidog%E8%AE%A4%E8%AF%81%E6%9C%8D%E5%8A%A1%E5%99%A8PHP%E7%89%88.html 整理编辑,转载请注明出处
wifidog认证服务器Wiwiz Auth API集成示例代码(Java/JSP版)
<%@ page import="java.io.*"%>
<%@ page import="java.util.*"%>

<%@ page import="java.net.URL"%>
<%@ page import="java.net.URLConnection"%>
<%@ page import="java.net.URLEncoder"%>

<%
String userkey = "246DD22C084BB40E";    // 替换为你的User Key

//****************************************************
// 取得接收到的传入参数
//****************************************************

String pTokencode = request.getParameter("tokencode");  // 接收到的传入参数"tokencode"
String pSrvurl = request.getParameter("srvurl");        // 接收到的传入参数"srvurl"


/* 如必要,把传入参数存放于Session对象中 */
if(pTokencode != null)
    session.setAttribute("tokencode", pTokencode);
if(pSrvurl != null)
    session.setAttribute("srvurl", pSrvurl);
%>

<html>
<head>
<meta http-equiv="Content-Type" content="text/html; charset=UTF-8">
<meta http-equiv="Content-Language" content="zh">
<meta http-equiv="Pragma" content="no-cache">
<meta http-equiv="Cache-Control" content="no-cache">
<title> Wiwiz Auth API使用示例 </title>
</head>
<body>

<form method="post">

用户名: <input type="text" name="username" />
<br>

密码: <input type="password" name="pswd" />
<br>

<input type="submit" name="login" value="登录" />

<%
if(request.getParameter("login") != null) { // "登录"按钮按下后的处理

    //****************************************************
    // 第1步. 根据您的具体需要或业务,进行用户登录验证处理
    //****************************************************

    boolean loginSuccess = false;
    //
    // 根据系统自身的业务需求进行自己的账户验证/登录验证等处理
    //  ......
    //

    loginSuccess = true; // 这里假设用户登录已验证

    if(loginSuccess == false) {

        out.println("登录失败!");   // 如果登录失败则报错

    } else {

        //****************************************************
        // 第2步. 调用Wiwiz Auth API,进行预认证
        // 重要: 请在服务器端的程序中进行此处理(例如,ASP、C#、JSP/Servet、PHP...),
        //      而不要在直接客户端代码中进行此处理(例如,HTML/Javascript)
        //****************************************************

        // 参数 "action" : 必须!
        // 设置为"1"将使用户认证成功
        // 设置为"0"将使用户认证失败
        String action = "1";

        // 参数 "tokencode": 必须!
        // 设置与同名传入参数相同的值
        String tokencode = (String) session.getAttribute("tokencode");

        // 参数 "srvurl": 必须!
        // 设置与同名传入参数相同的值
        String srvurl = (String) session.getAttribute("srvurl");

        // 参数 "endtime" : 可选
        // 格式: yyyy-mm-dd hh:MM:ss  例如: 2012-05-31 21:39:00
        // 设置此参数将使用户的Internet连接在指定时间关闭
        // 注意: 对此参数的值必须进行url编码
        String endtime = URLEncoder.encode("2012-05-31 21:39:00", "utf-8");

        // 参数 "postauth" : 可选
        // 例如: http://www.YourDomain.com
        // 设置此参数将设置用户在通过认证后显示的页面地址
        // 注意: 对此参数的值应进行url编码
        String postauth = "http://www.wiwiz.com";

        String parameters =
                "wiwiz_auth_api=1&ver=1.0"+ // 参数 "wiwiz_auth_api" 与 "ver". 固定值
                "&tokencode="+ tokencode +  // 参数 "tokencode". 设置方法参考上面的说明
                "&userkey="+ userkey +      // 参数 "userkey". 设置方法参考上面的说明
                "&action="+ action +        // 参数 "action". 设置方法参考上面的说明
                "&endtime="+ endtime +      // 参数 "endtime". 设置方法参考上面的说明
                "&postauth="+ postauth;     // 参数 "postauth". 设置方法参考上面的说明

        URL u = new URL(srvurl);            // 使用传入参数"srvurl"的值作为请求地址
        URLConnection uc = u.openConnection();
        uc.setDoOutput(true);
        uc.setRequestProperty("Content-Type","application/x-www-form-urlencoded");
        PrintWriter pw = new PrintWriter(uc.getOutputStream());
        pw.println(parameters);
        pw.close();

        BufferedReader in = new BufferedReader(
        new InputStreamReader(uc.getInputStream()));
        String verifycode = in.readLine();  // 获取verifycode,即Wiwiz服务端返回的验证结果
        in.close();

        String userstring = "username:" + request.getParameter("username"); // 设置自定义追踪信息(可选),本例中设为用户名

        if(verifycode.startsWith("ERR")) {
            // 如果报错,则显示错误代码
            out.println("Error: "+ verifycode);

        } else {
            // 如没有报错则进行第3步。

            //****************************************************
            // 第3步. 调用Wiwiz Auth API,完成认证
            //****************************************************
            String redirectUrl = srvurl +           // 使用传入参数"srvurl"的值作为跳转地址的前缀
                    "?wiwiz_auth_api_login=1"+      // 参数 "wiwiz_auth_api_login",固定值
                    "&tokencode="+ tokencode +      // 参数 "tokencode",设置与同名传入参数相同的值
                    "&verifycode="+ verifycode +    // 参数 "verifycode",Wiwiz服务端返回的验证结果
                    "&userstring=" + userstring;    // 参数 "userstring"(可选),用户设置的自定义追踪信息

            response.sendRedirect(redirectUrl); // 最后,进行跳转
        }
    }
}
%>

</form>

</body>
</html>
本文章由 http://www.wifidog.pro/2015/03/20/wifidog%E8%AE%A4%E8%AF%81%E6%9C%8D%E5%8A%A1%E5%99%A8java-jsp%E7%89%88.html 整理编辑,转载请注明出处
wifidog认证服务接口Wiwiz Auth API参考手册与接口规范
[功能描述]
Wiwiz Auth API是Wiwiz HotSpot Builder提供的基于Web的外部开发接口。利用它可以实现在第三方系统/用户系统进行账户认证(Web认证)后接入网络并进行简单的认证控制。
将用户系统与Wiwiz Auth API集成的过程非常简单。用户仅需了解一种Web服务器端开发语言或工具(例如,ASP,C#/VB.Net,JSP/Servlet,PHP等),并使用它根据Wiwiz Auth API的接口规范为用户系统编写一个Web程序。
如果,你已利用Wiwiz Auth API与你的系统(例如,你的网站,论坛,博客或其他系统等)进行了集成,当某个客户在你的网络中打开浏览器并访问任意的http地址时,他将会首先看到你的网络或热点的Web认证页面,即你编写的Web程序。在这个页面中,他将根据你的要求进行身份验证或登录确认等操作,并得到你的授权。之后,他才可以访问Internet。
[使用条件与要求]
- 用户需拥有Wiwiz专业版账户。
- 查询Wiwiz账户的User Key。(注3)
- 在Wiwiz Web面板创建一个热点,在“认证规则设置”部分设置“认证方式”为“第三方认证(调用Wiwiz Auth API)”。设置“认证URL”为你为用户系统编写的Web程序地址。(注1)
- 已在本地网络设备中安装并设置了Wiwiz HotSpot Builder Utility(参考Wiwiz HotSpot Builder Utility的相关安装指南)。
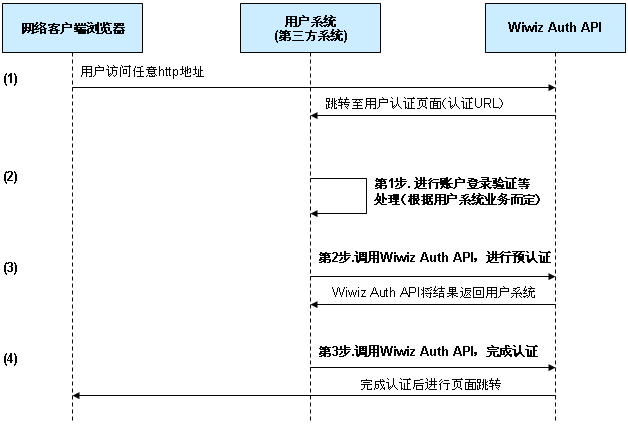
[调用示意图]

[调用流程说明]
(1) 网络中的客户端在浏览器中访问任意http网址,将会自动启动Web认证机制,请求会被Wiwiz服务端拦截并将浏览器页面跳转至“认证URL”(*注1)”。同时,Wiwiz服务端会通过“认证URL”向用户系统传送3个HTTP GET传入参数,tokencode,srvurl与url。参数的含义如下:

(2) 在用户系统中,根据用户系统的业务需求进行自己的账户验证/登录验证等处理。即,图中的“第1步”处理。
(3) 如在用户系统中的验证处理通过,则在用户系统的服务器端调用Wiwiz Auth API以进行预认证。即,图中的“第2步”处理。
- 调用方式为在服务器端(不是在客户端或浏览器侧)(注2)向Wiwiz服务端发起HTTP请求。请求地址为处理(1)中传入参数srvurl的值。
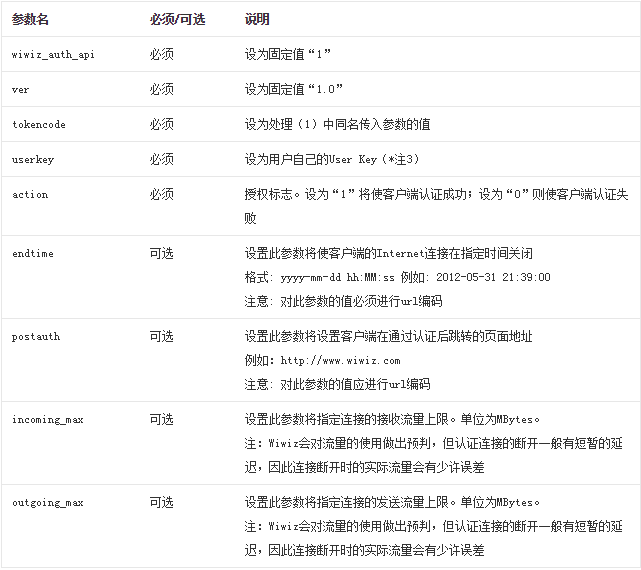
发起请求时需要设置若干参数(HTTP GET或HTTP POST参数),包括:

Wiwiz服务端接收到该请求后将返回一个Http Response作为验证结果,这个结果叫做verifycode。
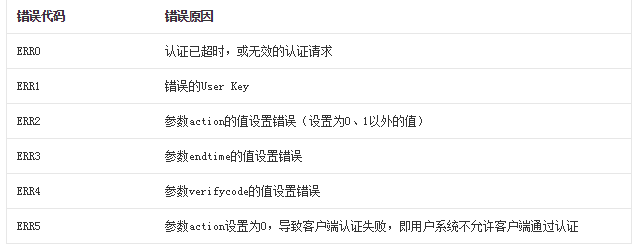
如果存在错误,verifycode的值为ERRX(X代表一位数字) (*注4)。
否则,verifycode应该是一组16位进制的数字。
(4) 然后,再次调用Wiwiz Auth API完成认证。即,图中的“第3步”处理。
- 调用方式为是在客户端/浏览器侧(*注5)向Wiwiz服务端发起一个HTTP请求。请求的地址为处理(1)中传入参数srvurl的值。
请求的同时需要设置以下参数(HTTP GET或HTTP POST参数),包括:

最后,认证完成。浏览器将显示认证后页面或用户指定的在参数postauth中设置的地址。
如遇到错误则显示错误页面并显示错误代码(*注6)。
[断开连接的方法]
如果需要切断某个已认证连接,可以在服务器端向Wiwiz服务端发起HTTP请求,请求的URL为:
格式:[srvurl]?disconn=2&t=[tokencode]&userkey=[userkey]
例:http://cp.wiwiz.com/as/s/login2/?disconn=2&t=A1398E284DC&userkey=246DD22C084BB40E
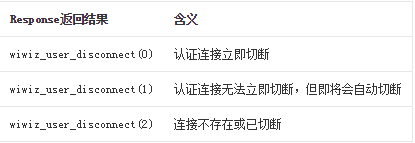
Wiwiz服务端接收到该请求后返回的Http Response的含义为:

[客户端用户自主断开连接的方法]
你可能希望客户端用户自己可以主动断开已认证的Internet连接。
你只需让客户端用户在浏览器访问以下网址即可:
格式:[srvurl]?disconn=1&t=[tokencode]
例:http://cp.wiwiz.com/as/s/login2/?disconn=1&t=A1398E284DC
这个访问请求成功后,其返回结果有以下3种:

[注解]
注1:“认证URL”可在Wiwiz Web面板的“热点设置”页面中设置。它就是用户根据Wiwiz Auth API的规范为用户系统写的Web程序的地址。
注2:<重要>出于安全考虑,进行预认证发起的HTTP请求一定要在服务器端程序中进行。例如,在ASP,C#/VB.Net,JSP/Servlet,PHP代码中,而不要使用HTML与Javascript在客户端发起请求。
注3:User Key可在Wiwiz Web面板的“用户菜单”->“升级选项”->“查询User Key”中查询。
注4:错误代码及错误原因:

注5:用于完成认证所发起的HTTP请求,最简单的方式是的方式是使浏览器跳转到指定地址,可使用服务器端代码通过向浏览器发送Redirect指令进行,也可使用客户端代码进行浏览器页面地址跳转,如HTML,JavaScript。
注6:错误代码及错误原因:

本文章由 http://www.wifidog.pro/2015/03/20/wifidog%E8%AE%A4%E8%AF%81%E6%9C%8D%E5%8A%A1%E6%8E%A5%E5%8F%A3.html 整理编辑,转载请注明出处