分类 wifidog流程 下的文章

wifidog 配置

OpenWRT 路由配置技巧

随着最近 Google 在国内已经完全无法访问,使得通过 VPN 访问网络的需求更加强烈,本文介绍的方法可以使一个普通的路由具备稳定连接 VPN 的能力,并能够根据目标访问网站选择国内外线路,从而得到一个既没有限制,也不会影响速度的 Wifi 环境,连接到这个网络的设备不需要任何配置即可安全上网,完全感觉不到任何不便。

chnroutes 路由表

这个路由表集中了所有分配到中国大陆的 IP 段,根据 http://ftp.apnic.net/apnic/stats/apnic/delegated-apnic-latest 每天自动更新,可使得在访问国内地址时不经过 VPN。

想想如果能够让家里的路由直接连接 VPN,在家连接 WiFi 的所有设备直接达到Fan墙的效果,应该很 Cool,所以最近在某宝整了一个 Netgear WNDR3800 二手路由回来,先后分别在 DD-WRT 和 OpenWRT 成功配置 VPN + chnroutes,最后还是选择了 OpenWRT。

DD-WRT vs OpenWRT

关于 DD-WRT 和 OpenWRT,我选择 OpenWRT 主要因为 DD-WRT ROM 中集成的软件太多,绝大多数用不到,要配置 jffs2 来保存脚本文件,一般配置则保存在nvram中,而且无线较不稳定,5G频段常搜索不到(当然可能是我这个路由器型号的支持问题)。OpenWRT 的配置文件语法统一,配置都存储在文件系统中,且 ROM 本身仅集成了必备组件,非常小,可以只安装需要的东西,WEB管理界面也是可选安装,简洁强大,经过若干天的使用一直比较稳定。

配置

已配置好 OpenWRT 上网的童鞋们可以直接跳过 1.刷 ROM 和 2.初始配置

  1. 刷 ROM
    a.首先确定你的设备可以被 OpenWRT 所支持(到这里查看支持的设备列表:http://wiki.openwrt.org/toh/start),然后到这里下载编译好的 ROM:http://downloads.openwrt.org/ 。最新的 stable 版本是 attitude_adjustment(12.09),我下载的是 trunk 版本。
    b.在 OpenWRT 官网找相应设备的 Wiki 页面查看刷机方法,一般都是在路由器官方Web固件升级页面直接刷入(我的 WNDR3800 Wiki页面是:http://wiki.openwrt.org/toh/netgear/wndr3800

2.初始配置
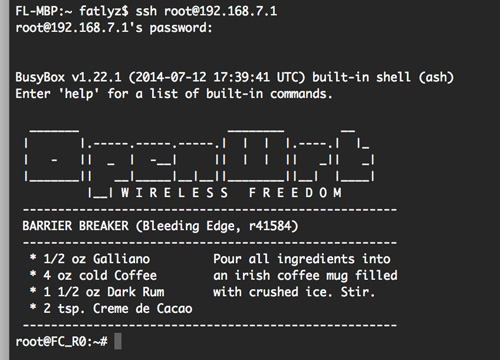
a.路由器启动后,有的型号没有安装 Wifi 模块,需要先用网线连接到 LAN 口,本机 IP 配置为静态 192.168.1.x,然后 telnet 到 192.168.1.1,更改 root 密码,然后 ssh 连入,参考:http://wiki.openwrt.org/doc/start#configuring.openwrt
1.jpg

b.配置 WAN 口,让路由连上 Internet,参考:http://wiki.openwrt.org/doc/howto/internet.connection

比如要配置 PPPoE:

uci set network.wan.proto=pppoe
uci set network.wan.username='yougotthisfromyour@isp.su'
uci set network.wan.password='yourpassword'
uci commit network
ifup wan

c.安装 LuCI Web 管理界面并设置开机自动启动,参考:http://wiki.openwrt.org/doc/howto/luci.essentials

opkg update
opkg install luci
/etc/init.d/uhttpd start
/etc/init.d/uhttpd enable

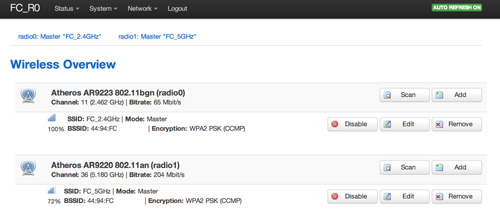
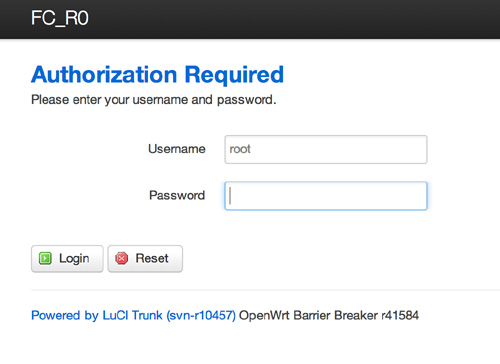
d.浏览器输入路由器 LAN 侧 IP(多为192.168.1.1),进行 Wifi 等配置
2.jpg

3.jpg

3.配置 DNS
a.创建 /etc/config/sec_resolv.conf

vim /etc/config/sec_resolv.conf

填入以下 DNS Servers:

nameserver 8.8.8.8
nameserver 8.8.4.4
nameserver 208.67.222.222

b.编辑 /etc/config/dhcp

vim /etc/config/dhcp

找到 option resolvfile 选项,替换为:

option resolvfile '/etc/config/sec_resolv.conf'

4.配置 PPTP
a.安装 ppp-mod-pptp

opkg updateopkg install ppp-mod-pptp

如果需要 LuCI 支持(推荐):

opkg install luci-proto-ppp

b.配置 vpn 接口,编辑 /etc/config/network 文件,应该已经有以下内容(如果没有,需要插入),并配置里面的 server、username 和 password:

config 'interface' 'vpn' 
        option 'ifname'    'pptp-vpn'  
        option 'proto'     'pptp'
        option 'username'  'vpnusername'
        option 'password'  'vpnpassword'
        option 'server'    'vpn.example.org or ipaddress' 
        option 'buffering' '1' 

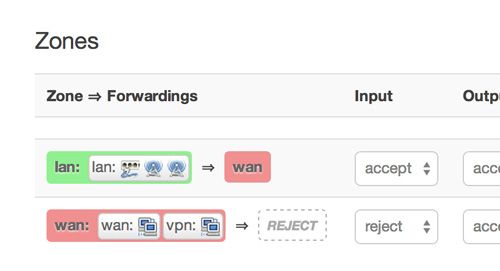
c.进入 Network -> Firewall ,把 vpn 加入 wan zone,效果如图:
4.jpg

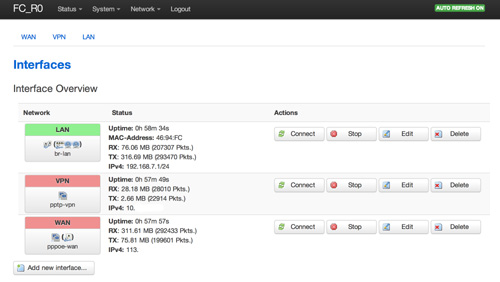
d.进入 Network -> Interfaces ,此时应该已经可以看到 VPN Interface 并可以连接,效果如图:
5.jpg

e.此时在本机 traceroute www.google.com,应该能得到类似以下的结果:

FL-MBP:~ fatlyz$ traceroute www.google.com 
traceroute: Warning: www.google.com has multiple addresses; using 74.125.239.113 
traceroute to www.google.com (74.125.239.113), 64 hops max, 52 byte packets
 1  fc_r0.lan (192.168.7.1)  2.266 ms  0.999 ms  0.946 ms
 2  10.7.0.1 (10.7.0.1)  189.259 ms  187.813 ms  188.368 ms
 3  23.92.24.2 (23.92.24.2)  189.847 ms  190.489 ms  188.939 ms
 4  10ge7-6.core3.fmt2.he.net (65.49.10.217)  188.508 ms  192.216 ms  202.863 ms
 5  10ge10-1.core1.sjc2.he.net (184.105.222.14)  195.695 ms  195.691 ms  284.242 ms
 6  72.14.219.161 (72.14.219.161)  189.196 ms  192.287 ms  193.220 ms
 7  216.239.49.170 (216.239.49.170)  192.496 ms  188.547 ms  189.881 ms
 8  66.249.95.29 (66.249.95.29)  190.125 ms  190.335 ms  190.026 ms
 9  nuq05s01-in-f17.1e100.net (74.125.239.113)  189.804 ms  190.556 ms  190.242 ms

可以看出,其中第二跳是 VPN 的网关,而 traceroute www.baidu.com 的话第二跳应该也是同样的结果。

这时已经可以访问 Google, Baidu 等国内外的站点了。

5.配置 chnroutes
a.到 chnroutes 项目的下载页面:http://chnroutes-dl.appspot.com/ 下载 linux.zip,解压

b.把 ip-pre-up 重命名为 chnroutes.sh,打开编辑,在 if [ ! -e /tmp/vpn_oldgw ]; then 前插入以下代码,以避免 ppp 连接脚本重复执行导致重复添加路由表项:

if [ $OLDGW == 'x.x.x.x' ]; then    exit 0
fi

其中 x.x.x.x 是 VPN 的网关,可以先本机连接上去之后查看一下网关地址。

c.ssh 连接到路由器,执行以下命令:

cd /etc/config/
mkdir pptp-vpn
cd pptp-vpn
vim chnroutes.sh

在 vim 中把编辑好的 chnroutes.sh 粘贴进去(当然也可以通过 ssh 直接把 chnroutes.sh 文件传过去,或者上传到某个地方再 wget 下载)

执行以下命令,设置权限为可执行:

chmod a+x chnroutes.sh

d.用 vim 编辑 /lib/netifd/ppp-up 文件:

vim /lib/netifd/ppp-up

在 [ -d /etc/ppp/ip-up.d ] && { 这一行前插入以下内容,确保 ppp 连接脚本能够被执行:

sh /etc/config/pptp-vpn/chnroutes.sh

e.重启路由,启动好之后,进入 LuCI 查看接口状态,等 WAN 和 VPN 都连接成功后,ssh进去,执行 route -n | head -n 10 ,效果应该类似这样:

root@FC_R0:/etc/config# route -n | head -n 10 
Kernel IP routing table 
Destination     Gateway         Genmask         Flags Metric Ref    Use Iface 
0.0.0.0         10.7.0.1      0.0.0.0         UG    0      0        0 pptp-vpn 
1.0.1.0         58.111.43.1   255.255.255.0   UG    0      0        0 pppoe-wan 
1.0.2.0         58.111.43.1   255.255.254.0   UG    0      0        0 pppoe-wan 
1.0.8.0         58.111.43.1   255.255.248.0   UG    0      0        0 pppoe-wan 
1.0.32.0        58.111.43.1   255.255.224.0   UG    0      0        0 pppoe-wan 
1.1.0.0         58.111.43.1   255.255.255.0   UG    0      0        0 pppoe-wan 
1.1.2.0         58.111.43.1   255.255.254.0   UG    0      0        0 pppoe-wan 
1.1.4.0         58.111.43.1   255.255.252.0   UG    0      0        0 pppoe-wan

其中 Destination 为 0.0.0.0 的是默认路由,网关为 VPN 网关,意味着默认流量都经过 VPN,而以下的条目则把目的为国内的网段都指向了 ISP 提供的网关。

至此 PPTP VPN 和 chnroutes 已经配置完毕。
6.配置 VPN 断线自动重连
a.创建 /etc/config/pptp-vpn/status-check.sh:

vim /etc/config/pptp-vpn/status-check.sh

在 vim 中粘贴以下内容(此脚本检测 VPN 连接状态,并在断线后会断开 WAN 和 VPN 接口,10秒后重新连接 WAN,并在 30 秒后重连 VPN):

#!/bin/sh
if [ -f "/tmp/vpn_status_check.lock" ]
then
        exit 0
fi
VPN_CONN=`ifconfig | grep pptp-vpn`
if [ -z "$VPN_CONN" ]
then
        touch /tmp/vpn_status_check.lock
        echo WAN_VPN_RECONNECT at: >> /tmp/vpn_status_check_reconn.log
        date >> /tmp/vpn_status_check_reconn.log
        ifdown vpn
        ifdown wan
        sleep 10
        ifup wan
        sleep 30
        ifdown vpn
        sleep 10
        ifup vpn
        sleep 40
        rm /tmp/vpn_status_check.lock
else
        date > /tmp/vpn_status_check.log
fi

执行以下命令,设置权限为可执行:

chmod a+x /etc/config/pptp-vpn/status-check.sh

b.进入LuCI 的 System -> Scheduled Tasks 填入以下内容,并保存:

*/1 * * * * /etc/config/pptp-vpn/status-check.sh

以上实际上是编辑了 cron 配置,cron 每分钟运行检测 / 重连脚本,重启 cron:

/etc/init.d/cron restart

c.静待几分钟,查看 /tmp 目录,应该能看到 vpn_oldgw 和 vpn_status_check.log 文件,查看 vpn_status_check.log 文件,可以看到最近一次检测 VPN 连接状态的时间。

root@FC_R0:/tmp# ls vpn*
vpn_oldgw             vpn_status_check.log
root@FC_R0:/tmp# cat vpn_status_check.log 
Tue Jul 15 00:04:02 HKT 2014
root@FC_R0:/tmp# 

你可以在 LuCI 中断开 VPN 接口,在接下来的4-5分钟,观察 WAN 和 VPN 的重连情况。

d.分别 traceroute www.google.com 和 www.baidu.com ,观察第二跳的地址:

FL-MBP:~ fatlyz$ traceroute www.google.com | head -n 3
traceroute: Warning: www.google.com has multiple addresses; using 74.125.239.115
traceroute to www.google.com (74.125.239.115), 64 hops max, 52 byte packets
 1  fc_r0.lan (192.168.7.1)  2.161 ms  0.912 ms  0.895 ms
 2  10.7.0.1 (10.7.0.1)  193.747 ms  187.789 ms  289.744 ms
 3  23.92.24.2 (23.92.24.2)  259.323 ms  354.625 ms  408.535 ms

FL-MBP:~ fatlyz$ traceroute www.baidu.com | head -n 3
traceroute to www.a.shifen.com (180.76.3.151), 64 hops max, 52 byte packets
 1  fc_r0.lan (192.168.7.1)  1.190 ms  0.984 ms  0.731 ms
 2  58.111.43.1 (58.111.43.1)  20.616 ms  38.822 ms  18.484 ms
 3  183.56.35.133 (183.56.35.133)  20.056 ms  52.353 ms  87.841 ms

可以看出,已成功对国内外的目标地址进行了路由选择。

至此,OpenWRT 路由的基本配置、PPTP VPN、chnroutes 和自动重连已经配置完成。

本文章由 http://www.wifidog.pro/2015/01/05/wifidog%E9%85%8D%E7%BD%AE.html 整理编辑,转载请注明出处
wifidog OpenWrt luci页面

OpenWrt luci添加上传下载及网络摄像头功能。
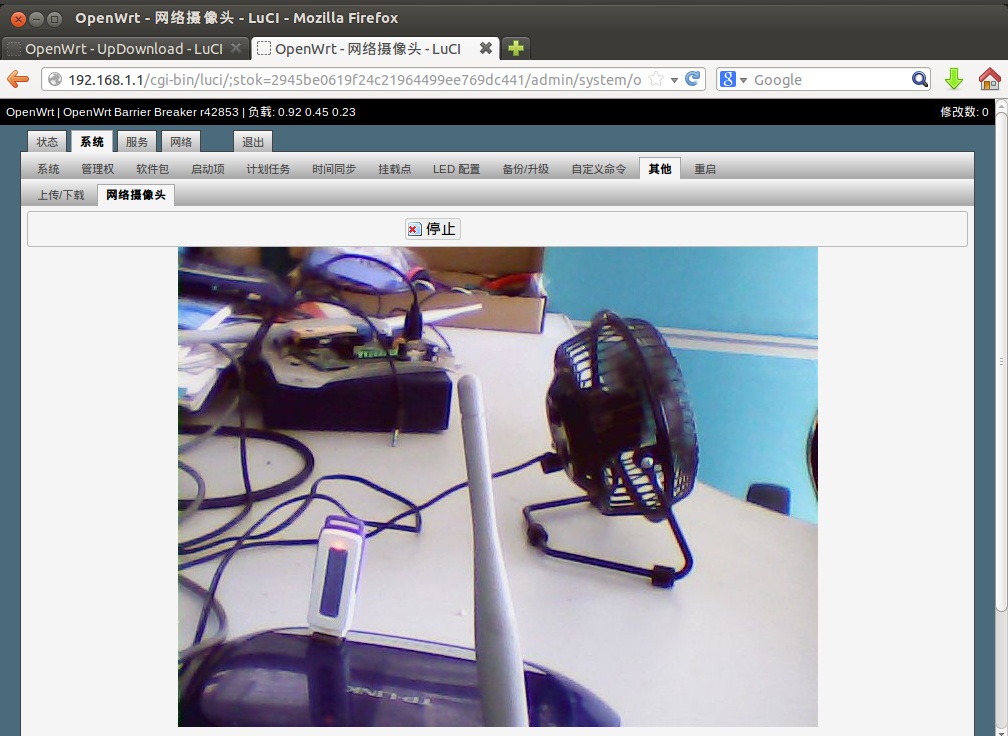
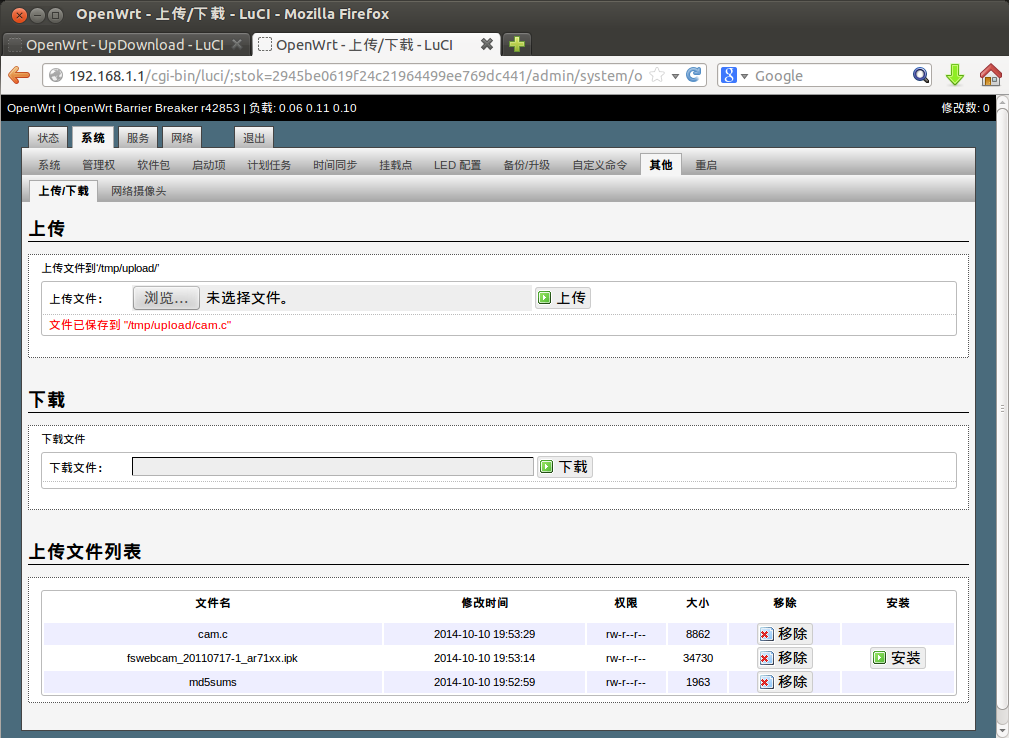
花了几天时间给OpenWrt弄了个上传下载及网络摄像头功能。对lua及luci不熟,时间花的有点多。此软件包是纯luci应用,可以安装在任意平台,网络摄像头要依赖mjpg-streamer。效果图如下:
1.png

2.jpg

主要源码如下:

controller/updownload.lua文件:

--[[
Other module
Description: File upload / download, web camera
Author: yuleniwo  xzm2@qq.com  QQ:529698939
]]--

module("luci.controller.other", package.seeall)

function index()
    local page = entry({"admin", "system", "other"}, alias("admin", "system", "other", "updownload"), _("Other"), 89)
    entry({"admin", "system", "other", "updownload"}, form("updownload"), _("Upload / Download"))
    if nixio.fs.access("/etc/config/mjpg-streamer") then
        entry({"admin", "system", "other", "webcam"}, call("Webcam"), _("Web Camera"))
    end
    page.i18n = "other"
    page.dependent = true
end

local translate = luci.i18n.translate
local http = luci.http

function Webcam()
    local iframe = '<iframe src="http://%s:%s@%s:%s" frameborder="no" border="0" width="800" height="600" marginwidth="0" marginheight="0" allowtransparency="yes"></iframe>'
    local html, msg, status
    local act = http.formvalue("act")
    if act then
        if act == "start" then
            luci.sys.call("/etc/init.d/mjpg-streamer start")
        elseif act == "stop" then
            luci.sys.call("/etc/init.d/mjpg-streamer stop")
            luci.sys.call("sleep 1")
        end
    end
    local v = nixio.fs.glob("/dev/video[0-9]")()
    if v then
        if luci.sys.call("pidof mjpg_streamer > /dev/null") == 0 then
            local uci, user, pwd, ip, port
            uci = require "luci.model.uci".cursor()
            user = uci:get("mjpg-streamer", "core", "username")
            pwd = uci:get("mjpg-streamer", "core", "password")
            ip = uci:get("network", "lan", "ipaddr")
            port = uci:get("mjpg-streamer", "core", "port")
            html = string.format(iframe, user, pwd, ip, port)
            status = true
        else
            status = false
            msg = translate("Service 'mjpg_streamer' not started.")
        end
    else
        msg = translate("Video device not found.")
    end
    luci.template.render("webcam", {html = html, msg = msg, status = status})
end

model/cbi/updownload.lua文件:

local fs = require "luci.fs"
local http = luci.http

ful = SimpleForm("upload", translate("Upload"), nil)
ful.reset = false
ful.submit = false

sul = ful:section(SimpleSection, "", translate("Upload file to '/tmp/upload/'"))
fu = sul:option(FileUpload, "")
fu.template = "cbi/other_upload"
um = sul:option(DummyValue, "", nil)
um.template = "cbi/other_dvalue"

fdl = SimpleForm("download", translate("Download"), nil)
fdl.reset = false
fdl.submit = false
sdl = fdl:section(SimpleSection, "", translate("Download file"))
fd = sdl:option(FileUpload, "")
fd.template = "cbi/other_download"
dm = sdl:option(DummyValue, "", nil)
dm.template = "cbi/other_dvalue"

function Download()
    local sPath, sFile, fd, block
    sPath = http.formvalue("dlfile")
    sFile = nixio.fs.basename(sPath)
    if luci.fs.isdirectory(sPath) then
        fd = io.popen('tar -C "%s" -cz .' % {sPath}, "r")
        sFile = sFile .. ".tar.gz"
    else
        fd = nixio.open(sPath, "r")
    end
    if not fd then
        dm.value = translate("Couldn't open file: ") .. sPath
        return
    end
    dm.value = nil
    http.header('Content-Disposition', 'attachment; filename="%s"' % {sFile})
    http.prepare_content("application/octet-stream")
    while true do
        block = fd:read(nixio.const.buffersize)
        if (not block) or (#block ==0) then
            break
        else
            http.write(block)
        end
    end
    fd:close()
    http.close()
end

local dir, fd
dir = "/tmp/upload/"
nixio.fs.mkdir(dir)
http.setfilehandler(
    function(meta, chunk, eof)
        if not fd then
            if not meta then return end
            fd = nixio.open(dir .. meta.file, "w")
            if not fd then
                um.value = translate("Create upload file error.")
                return
            end
        end
        if chunk and fd then
            fd:write(chunk)
        end
        if eof and fd then
            fd:close()
            fd = nil
            um.value = translate("File saved to") .. ' "/tmp/upload/' .. meta.file .. '"'
        end
    end
)

if luci.http.formvalue("upload") then
    local f = luci.http.formvalue("ulfile")
    if #f <= 0 then
        um.value = translate("No specify upload file.")
    end
elseif luci.http.formvalue("download") then
    Download()
end

local inits, attr = {}
for i, f in ipairs(fs.glob("/tmp/upload/*")) do
    attr = fs.stat(f)
    if attr then
        inits[i] = {}
        inits[i].name = fs.basename(f)
        inits[i].mtime = os.date("%Y-%m-%d %H:%M:%S", attr.mtime)
        inits[i].modestr = attr.modestr
        inits[i].size = tostring(attr.size)
        inits[i].remove = 0
        inits[i].install = false
    end
end

form = SimpleForm("filelist", translate("Upload file list"), nil)
form.reset = false
form.submit = false

tb = form:section(Table, inits)
nm = tb:option(DummyValue, "name", translate("File name"))
mt = tb:option(DummyValue, "mtime", translate("Modify time"))
ms = tb:option(DummyValue, "modestr", translate("Mode string"))
sz = tb:option(DummyValue, "size", translate("Size"))
btnrm = tb:option(Button, "remove", translate("Remove"))
btnrm.render = function(self, section, scope)
    self.inputstyle = "remove"
    Button.render(self, section, scope)
end

btnrm.write = function(self, section)
    local v = luci.fs.unlink("/tmp/upload/" .. luci.fs.basename(inits[section].name))
    if v then table.remove(inits, section) end
    return v
end

function IsIpkFile(name)
    name = name or ""
    local ext = string.lower(string.sub(name, -4, -1))
    return ext == ".ipk"
end

btnis = tb:option(Button, "install", translate("Install"))
btnis.template = "cbi/other_button"
btnis.render = function(self, section, scope)
    if not inits[section] then return false end
    if IsIpkFile(inits[section].name) then
        scope.display = ""
    else
        scope.display = "none"
    end
    self.inputstyle = "apply"
    Button.render(self, section, scope)
end

btnis.write = function(self, section)
    local r = luci.sys.exec(string.format('opkg --force-depends install "/tmp/upload/%s"', inits[section].name))
    form.description = string.format('<span style="color: red">%s</span>', r)
end

return ful, fdl, form

view/cbi/other_button.htm文件:

<%+cbi/valueheader%>
    <% if self:cfgvalue(section) ~= false then %>
        <input class="cbi-button cbi-input-<%=self.inputstyle or "button" %>" style="display: <%= display %>" type="submit"<%= attr("name", cbid) .. attr("id", cbid) .. attr("value", self.inputtitle or self.title)%> />
    <% else %>
        -
    <% end %>
<%+cbi/valuefooter%>

view/cbi/other_dvalue.htm文件:

<%+cbi/valueheader%>
<span style="color: red">
<%
    local val = self:cfgvalue(section) or self.default or ""
    write(pcdata(val))
%>
</span>
<%+cbi/valuefooter%>

view/cbi/other_upload.htm文件:

<%+cbi/valueheader%>
    <label class="cbi-value" style="display:inline-block; width: 80px" for="ulfile"><%:Upload file:%></label>
    <input class="cbi-input-file" style="width: 400px" type="file" id="ulfile" name="ulfile" />
    <input type="submit" class="cbi-button cbi-input-apply" name="upload" value="<%:Upload%>" />
<%+cbi/valuefooter%>

view/cbi/other_download.htm文件:

<%+cbi/valueheader%>
    <label class="cbi-value" style="display:inline-block; width: 80px" for="dlfile"><%:Download file:%></label>
    <input class="cbi-input-file" style="width: 400px" type="text" id="dlfile" name="dlfile" />
    <input type="submit" class="cbi-button cbi-input-apply" name="download" value="<%:Download%>" />
<%+cbi/valuefooter%>

view/webcam.htm文件:

<%+header%>
<div class="cbi-section-error"<% if not msg then %> style="display:none"<% end %>><%=msg%></div>
<form method="post" action="<%=REQUEST_URI%>"<%if status == nil then %> style="display:none"<% end %>>
    <div class="cbi-section-node">
        <div class="cbi-value cbi-value-last">
            <input type="hidden" name="act" value="<% if status then write('stop') else write('start') end %>" />
            <div class="cbi-value-field">
                <input class="cbi-button cbi-input-<% if status then write('remove') else write('apply') end %>" type="submit" value="<% if status then write(translate('Stop')) else write(translate('Start')) end %>" />
            </div>
        </div>
    </div>
</form>
<div style="text-align: center">
    <% if html then write(html) end %>
</div>
<%+footer%>

为了使添加的软件包能在openwrt源码make menuconfig时识别出来,需要在./feeds/luci/contrib/package/luci/Makefile增加如下语句:

$(eval $(call application,other,luci my other application))

软件包下载地址:luci-app-other_0.12.ipk

完整源码下载地址:luci-other_src.tar.gz

本文章由 http://www.wifidog.pro/2015/01/04/wifidog-luci.html 整理编辑,转载请注明出处

wifidog 设置

openwrt无线路由器一线多拨设置说明
注意:
该路由器的默认用户名为:root 密码:a97a04 ,wan口变为了lan1口,所以外线应插到标有数字“1”的接口,其余端口为lan口,用于连接电脑。
1、 将电脑与路由器的lan口连接(暂不插外线),并把电脑的ip地址和dns设为自动获 取,在IE中输入
http://192.168.1.1,输入用户名和密码,开始进行如下配置。
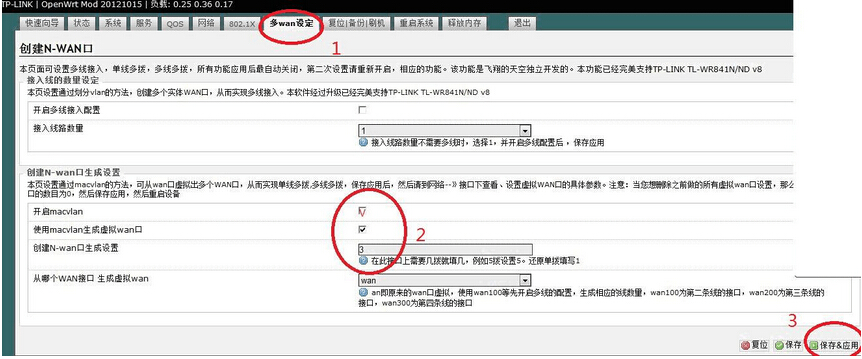
2、 进入“多wan设定”,如需3拨请设为3,4拨设为4,选择开启macvlan,并填入 生成wan口数量后保存应用。

1.jpg

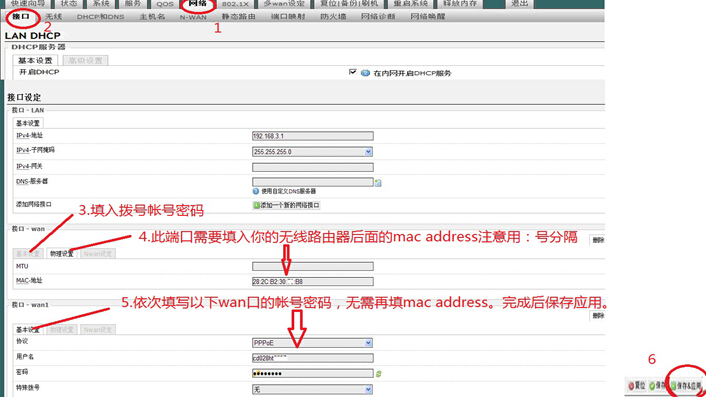
3、点击“网络”分别设置wan、wan1、wan2…..的帐号密码(暂时不设置下图中的第4步,等出现问题后再设置,请按图操作)。
2.jpg

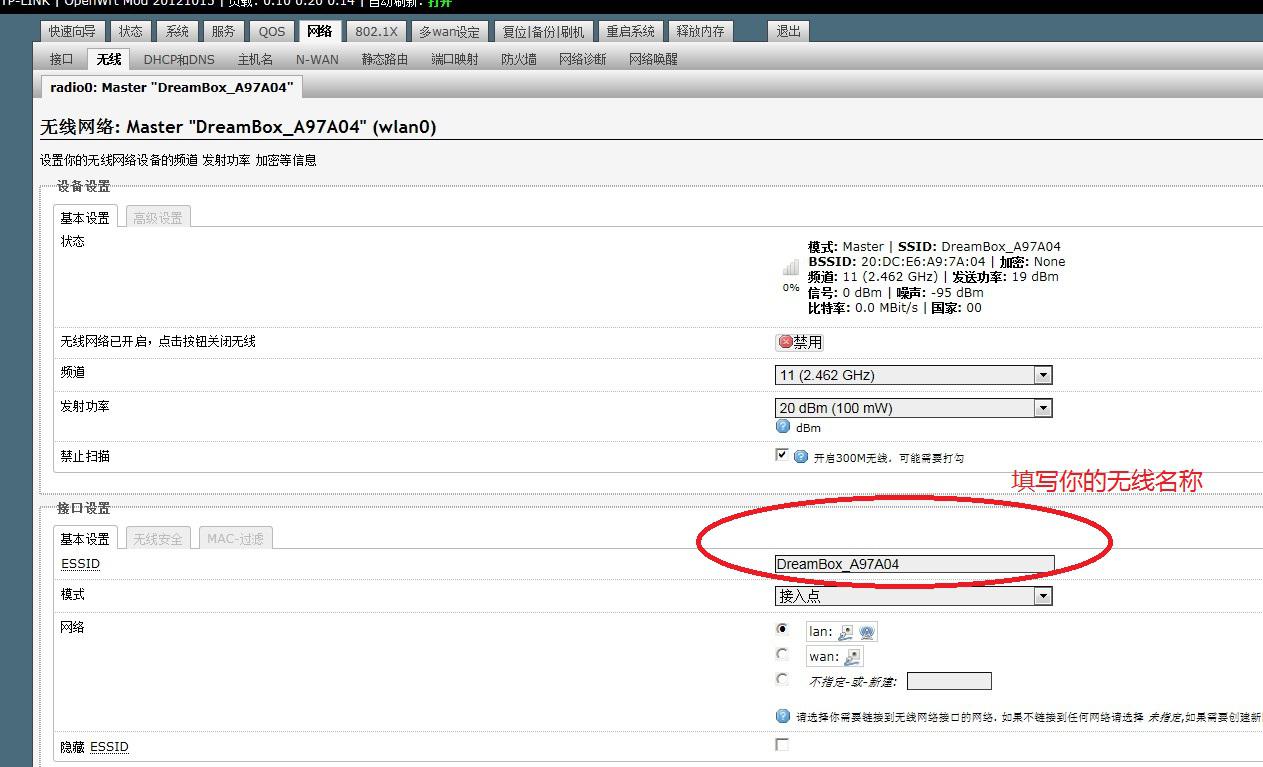
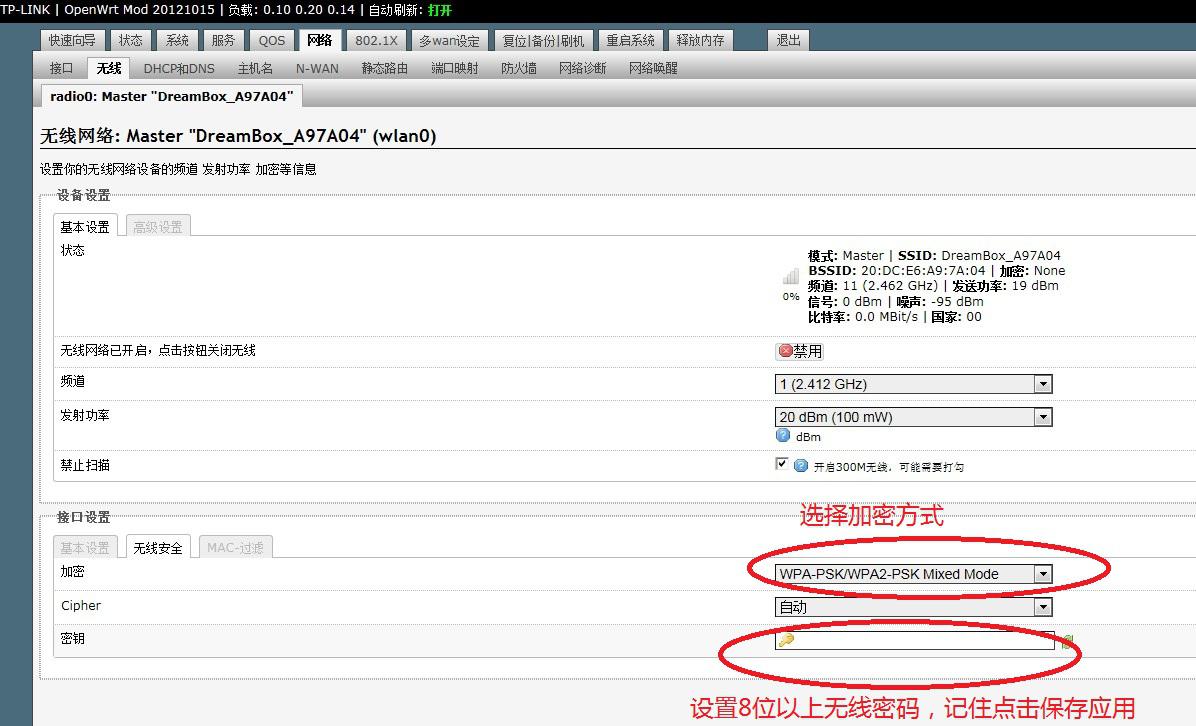
4、点击“网络”下面的“无线”然后点击修改,设置无线的名称,和安全密码。
3.jpg

4.jpg

5.jpg

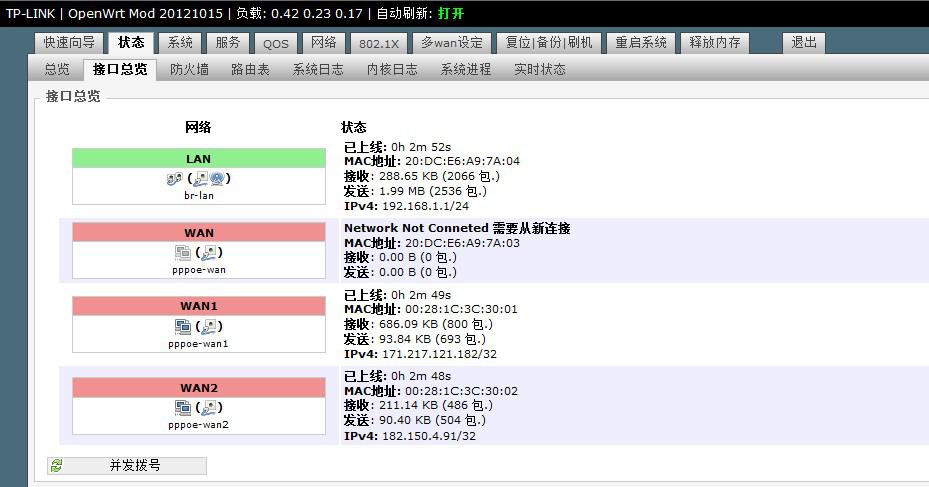
5、然后重新启动路由器,插上外线到标有数字“1”的接口,等待2分钟左右,进入“状态”下面的“接口总览”查看多拨情况,下图为一线三拨连接的情况,图中wan口无法连接上网,此原因有两种可能:(1)、你的线路最多支持两拨。(2)、因为没有设置wan口的物理地址,所以不能连接,如出现此情况请返回重新第3条图中第4步设置wan中的物理地址。
6.jpg

6、常见故障处理方法。
(1)、在接口总览菜单中我的所有红色wan口都出现“需要重新连接”上不了网,出现这种可能有两种情况:1、你把外线插错了,请插到标有数字“1”的接口。你所有wan口的帐号或密码设置都错了,请更正。
(2)、在接口总览中红色wan口其中一个连接不上显示“需要重新连接”,请你返回设置方法第3条,将路由器的mac地址设置为:EC:21:6A:C8:F6:18 请复制至页面粘贴上去,并认真检查你在该接口的帐号密码是否设置正确,然后保存应用。
(3)、如果出现非wan口的其它wan1….wan3…等接口无法连接上网,显示“需要重新连接”,出现这种情况有两种可能:1、你在该接口的帐号密码设置错误。2、你的线路已达到最高多拨次数请在“复位备份刷机”菜单中,选择恢复出厂重新设置好你的线路所支持的多拨次数,让所有wan口都能顺利拨上去,否则会出现无故掉线情况。
(4)、按设置方法第2条把开启macvlan和下面的勾都选中并填好多拨次数,保存应用后为什么勾会取消了?这种情况是正常的,当你选中那两个勾后,并填写好相应的数字保存应用后,在“网络--接口”菜单中会生成你填写数字相对应的wan口数量,表示已生效成功。
(5)、为什么我的无线信号不强,或者不稳定,有时还会掉线?出现这种情况是因为无线信号是在开放的空间传播,在这个空间中有同频率的无线信号干扰,所以请你在无线设置中选择一个合适的频道号来避开干扰源。
(6)、为什么我在设置路由器时输入http://192.168.1.1却进入了另一个页面?这是因为你的光猫或adsl的设备的ip地址也是192.168.1.1所以请你在设置无线路由器时,先不要插外线,等设置好后再接外线。
(7)、为什么我的下载速度时快时慢?出现这种情况请你按照第6条设置步骤操作,在系统之家同时下载几个大文件,看一下你的最高速度。因为你的速度快了,下载资源的服务器不一定快,这就是为什么下载有些文件快有些文件慢,(所有多拨不能叠加上传速度,没有一台设备能达到叠加上传,因为上传和下载的原理不同,上传是点对点传输)。
(8)、我进入不了无线路由器的设置页面了,该怎么办?
请重新拨电重启路由器,然后等待第一个指示灯由闪烁变成常亮时,按住后面的复位键保持15秒后放开,这时你会看到第一个指示灯快速闪烁直到所有灯亮一次后熄灭,表示你的路由器已恢复出厂设置,路由器进入重新启动状态,等待第一个指示灯常亮,表示已启动完成,然后按说明书重新设置即可。
7、因功能较多,其余功能不一一说明。

本文章由 http://www.wifidog.pro/2015/01/04/wifidog-%E8%AE%BE%E7%BD%AE.html 整理编辑,转载请注明出处

wifidog-openwrt FAQ

  1. 关于 OpenWrt
    当Linksys 释放 WRT54G/GS 的源码后,网上出现了很多不同版本的 Firmware 去增强原有的功能。大多数的 Firmware 都是99%使用 Linksys的源码,只有1%是加上去的,每一种 Firmware 都是针对特定的市场而设计,这样做有2个缺点,第一个是难以集合各版本Firmware的长处,第二个是这版本距离 Linux 正式发行版越来越远。
    OpenWrt 选择了另一条路,它从零开始,一点一点的把各软件加入去,使其接近 Linksys 版 Firmware的功能,而OpenWrt 的成功之处是它的文件系统是可写的,开发者无需在每一次修改后重新编译,另它更像一个小型的 Linux 电脑系统,也加快了开发速度。
  2. 为什么使用 OpenWrt
    因为 Linux 为我们提供了很多免费的软件,我们可以用一个很低的价钱购买像WRT54G的硬件,做成一个小型的 Linux 系统,现在OpenWrt已经提供了100多个已编译好的软件,而且数量还在不断增加,而 OpenWrt SDK 更简化了开发软件的工序
  3. OpenWrt 的历史
    OpenWrt 项目由 2004 年 1 月开始, 第一个版本是基于 Linksys 提供的 GPL 源码及 uclibc 中的 buildroot 项目, 这个版本称为 “stable” 版, 在网上至今仍有很多项目使用这个版本, 较为有名 Freifunk-Firmware 和 Sip@Home.
    到了2005年初, 一些新的开发人员加入了这项目, 几个月后他们释出了第一个 “experimental” 版本, 这和以前版本不同的是, 这版本差不多完全舍弃了 Linksys 的 GPL 源码, 使用了 buildroot2 作为核心技术, 将 OpenWrt 完全模块化,OpenWrt 使用 Linux 正式发行的核心源码(2.4.30),加上了一些补丁和网络驱动,开发队伍更为OpenWrt添加了许多免费的工具,你可以直拉把Image写入 Flash (mtd)里面,设定无线功能和VLAN交换功能,这个版本名为“White Russian”,而1.0版本大概于2005年底公布。
  4. 为什么是OpenWrt?
    Linksys WRT54G 是一个几乎在任何电脑商场都可以买到的无线路由器, 只需拿出4-5百元, 你就可以拥有一个配备 200MHz CPU, 4MB Flash, 16MB Ram的嵌入式开发系统, 而且在你完成你的开发后, 你还可以应用在生活上, 一点都不浪费。由于它使用 Linux 作为操作系统, 并公开源码及驱动, 在网络上已有很多为它而设计的开源项目, 包括HyperWRT, OpenWRT, SIP Phone等等, 实在是学习嵌入式 Linux 的入门级首选。为什么学习OpenWRT?你不需要对 MIPS 处理器有很深入的了解, 也不用懂得如何去设计一个 MIPS 处理器专用的内核, 因为这些在网上已有人为你做好, 你只需懂得如何安装和使用就行了, 不过你也可以去http://www.linux-mips.org 找到相关的资料。如果你对 Linux 系统有一定的认识, 并想学习或接触嵌入式 Linux 的话, OpenWRT很适合你, 你将学会一些无线路由器的基本知识, 以及一般嵌入式 Linux 的开发过程, 你会发现无论是 ARM, PowerPC 或 MIPS 的处理器, 都必需经过以下的开发过程:1. 创建 Linux 交叉编译环境2. 建立 Bootloader3. 移植 Linux 内核4. 建立 Rootfs (根文件系统)5. 安装驱动程序6. 安装软件7. 调试随着 Linux 的成熟, 大量不同的处理器内核和应用软件相继出现, 当你熟悉这些嵚入式 Linux 的基本开发流程后, 你不再局限于 MIPS 处理器和无线路由器, 你可以尝试在其它处理器, 或者非无线路由器的系统移植嵌入式 Linux, 定制合适自己的应用软件, 并建立一个完整的嵌入式产品。

本文章由http://www.wifidog.pro/2015/01/04/wifidog-Openwrt%E7%AE%80%E4%BB%8B.html 整理编辑,转载请注明出处