分类 wifidog安装 下的文章

wifidog安装及简单的配置

前言

最近在做关于路由器认证相关的工作,由于需求,认证的过程同往常的网页认证有稍许不同,因此,自己开始尝试编写wifidog的认证服务器,查阅了中外的一些资料,现将经验总结一下。

Wifidog的原理

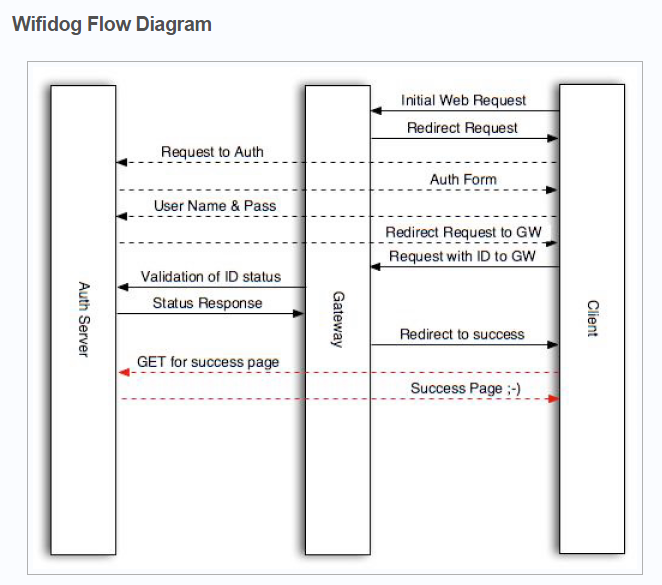
下图是在Wifidog的wiki网站上截取的wifidog认证流程图,网址为点击打开链接。
wifidog-flow-2009.png

wifidog由两部分组成,一个是运行在路由器上的程序,另一部分是运行在认证服务器上的程序。
wifidog的认证流程大致是:
1.首先,用户的终端可以连接上wifi,然后发起访问网站的请求,如www.baidu.com;
2.网关根据防火墙规则,将用户的请求重定向到本地端口(wifidog的监听端口);
3.网关将用户的访问重定向到认证服务器上的认证页面;
4.认证服务器返回登录页面至用户;
5.用户再向认证服务器提供凭据,如用户名和密码;
6.认证服务器根据用户提供的凭据来确定用户是否符合要求,是否可以上网;
7.如果符合要求,认证服务器将用户的访问重定向至路由器的网关并携带标识token;
8.网关向认证服务器确认用户信息;
9.如果符合要求,服务器向用户返回登录成功页面;
10.用户就可以上网了。

WifiDog在openwrt上的安装和配置

Wifidog的配置如下所示:

GatewayID default  
GatewayInterface br-lan  
GatewayAddress 192.168.1.1  
ExternalInterface br-lan  
AuthServer{
    Hostname justyoung.com(也可以是域名)
    SSLAvailable no
    HTTPPort 8080(默认是80)
    Path /wifidog/(文件名的两边都要加‘/’号,除非是根目录,只要一个‘/’)
    LoginScriptPathFragment login.php/? (这里把第一次登陆时重定向的位置也修改了,加了一个后缀,默认是login/?,)<pre class="plain" name="code">
    PingScriptPathFragment ping.php/?
    PortalScriptPathFragment portal.html?
    AuthScriptPathFragment auth.php/?
}可以有多个AuthServer,Wifidog会从第一个往后找,直到找到可用的认证服务器为止。

这段代码首先根据mac地址来判断登录用户是否合法,如果合法则直接重定向至192.168.1.1:2060/wifidog/auth?token=XXX,如果是不合法,则重定向至欢迎页面,引导用户获得认证。

本文章由 http://www.wifidog.pro/2015/02/28/wifidog%E5%AE%89%E8%A3%85-2.html 整理编辑,转载请注明出处

Wifidog鉴权服务器wifidog-auth的搭建

原来已经配置好的apache2、python、trac系统
在/etc/apache2/sites-enabled下增加的新的配置文件(域名和对应的目录)

sudo /etc/init.d/apache2 restart

这是可以用新域名访问对应目录下index.php了,但无法执行php代码只能下载该文件

sudo apt-get install php5
sudo apt-get install libapache2-mod-php5 # 安装遇到麻烦
sudo apt-get install postgresql
sudo apt-get install php5-cgi php5-common php5-pgsql php-pear php5-xmlrpc php5-curl language-pack-en-base subversion
sudo pear install XML_RPC
wget http://sourceforge.net/projects/phlickr/files/Phlickr-0.2.5.tgz
sudo pear install Phlickr-0.2.5.tgz
sudo apt-get install openssh-server
sudo apt-get install postfix

选择"internet site with smart host",然后配置
svn checkout https:// dev.wifidog.org/svn/trunk/wifidog-auth #放到/var/www目录下

现在修改文件/var/www/wifidog-auth/wifidog/classes/Dependency.php,否则智能安装会失败

$sudo vim /var/www/wifidog-auth/wifidog/classes/Dependency.php

将第122行改为:'website' => "http://www.smarty.net/"
将第123行改为:'installSourceUrl' => http://www.smarty.net/files/Smarty-2.6.26.tar.gz

$sudo vim /var/www/wifidog-auth/wifidog/config.php

将define('DEFAULT_LANG', 'fr_CA');改为define('DEFAULT_LANG', 'en_US');

本文章由 http://www.wifidog.pro/2015/02/27/wifidog%E6%9C%8D%E5%8A%A1%E5%99%A8wifidog-auth%E5%AE%89%E8%A3%85.html 整理编辑,转载请注明出处

openwrt 的 wifidog 安装说明

条件检查:

1 基本的linux环境,并且熟练使用

2 内核中带有netfilter的linux系统

3 iptables 包

4 gcc编译器,其他的编译器可能也行,但是没有经过测试

5 从sourceforge 获得的最新的wifidog的源码

安装准备工作

确保一切正常运行再继续进行下一步安装wifidog!!

  • 路由器能正常启动
  • 路由器可以启动接口
  • 路由器的路由正常运行
  • 路由器可以连接到internet
  • dns可以设置运行
  • dhcp正常运行
  • ipt_mac.o内核模块必须提前加载
  • 如果使用了NAT,路由器必须在iptables中正确的设置NAT/伪装 规则
  • wifi的客户的能够链接internet

以上条件在路由器启动或者重启后能自动的正常运行

开始安装

像任何开源的软件一样,先下载源码tarball,然后按照如下步骤安装 :

./autogen.sh

make

make install

在openwrt下安装wifidog:

mkdir ~/wifidog.openwrt
cd ~/wifidog.openwrt
wget http://downloads.openwrt.org/whiterussian/newest/OpenWrt-SDK-Linux-i686-1.tar.bz2
tar -jxvf OpenWrt-SDK-Linux-i686-1.tar.bz2
svn checkout https://dev.wifidog.org/svn/trunk/wifidog
cd wifidog
./autogen.sh
make ipk OPENWRTSDK=~/wifidog.openwrt/OpenWrt-SDK-Linux-i686-1

编译完成的包在:~/wifidog.openwrt/OpenWrt-SDK-Linux-i686-1/bin/packages

配置wifidog:编辑/etc/wifidog.conf

运行wifidog:

wifidog -f -d 7
  -f means to run in foreground (do not become a background daemon)
  -d 7 increases debug output level to the maximum

打开任意wifi的客户端,查看wifidog输出信息。

本文章由 http://www.wifidog.pro/2015/02/27/wifidog%E5%AE%89%E8%A3%85%E8%AF%B4%E6%98%8E.html 整理编辑,转载请注明出处

openwrt安装wifidog教程

Preparation

Prerequisites

Required Packages

  • iptables-mod-extra
  • iptables-mod-ipopt
  • kmod-ipt-nat
  • iptables-mod-nat-extra
  • libpthread

Installation

opkg update
opkg install wifidog
vi /etc/wifidog.conf
/etc/init.d/wifidog enable
/etc/init.d/wifidog start
netstat -a

You can also run wifidog in foreground/debug mode:

wifidog -f -d 7
  -f means to run in foreground (do not become a background daemon)
  -d 7 increases debug output level to the maximum

Configuration

Start on boot

To enable/disable start on boot:
/etc/init.d/wifidog enable this simply creates a symlink: /etc/rc.d/S?0??? → /etc/init.d/???
/etc/init.d/wifidog disable this removes the symlink again

本文章由 http://www.wifidog.pro/2015/02/27/openwrt%E5%AE%89%E8%A3%85wifidog-2.html 整理编辑,转载请注明出处