分类 wifidog原理 下的文章

wifidog安装Oauth login for Google and Facebook on OpenWrt routers

Oauth for OpenWrt routers aims to support authentication via OAuth services (Google, Facebook...) and run on the same box with WifiDog. It is using Luci and provides an alternative to single Auth Server for WifiDog. There is no need to setup a separated machine for authentication.

How does it work?

When a new guest uses Wifi from a router to go to the Internet, he/she will be presented a login page where he/she can use his Facebook or Google accounts to log in order to have permission of using our Wifi to access the Internet. When the session of using the Internet is over, a page with a message informing that the user is unauthenticated is displayed, and he/she is withdrawn the Internet access permission. This means he/she must be login again to have the permission.

System requirements

The followings are all you need to successfully deploy Oauth for OpenWrt:

  • OpenWrt firmware.
  • LuCi package.
  • Wifidog package.
  • Standard wget package.
  • Oauth for OpenWrt package.

a. Install Wifidog package:

  • Connect with your router via SSH.
  • Use this command to install Wifidog: opkg install wifidog.

Note: if you can not install wifidog, let's first use this command: “opkg update”, and then install it again.

b. Modify Wifidog's configuration file:

The configuration file of Wifidog is in /etc/wifidog.conf.

  • Use this command to access the file: vi /etc/wifidog.conf.
  • There are some parameters that you need to alter, according to your
    system: + ExternalInterface. + GatewayInterface. + GatewayAddress
    (your router) + AuthServer (your router) + GatewayPort.

c. Install Oauth for OpenWrt package:

We provide an ipk package to easily install via opkg.

You can also build your own from source (https://github.com/hongquan/Oauth for OpenWrt):

  • Copy the source folder to openwrt/package (source tree).
  • Rename Makefile_build_standalone to Makefile (replace the old
    Makefile).
  • Rename "dist" folder to "root" Choose the luci-app-Oauth for OpenWrt
    in"make menuconfig".
  • Run "make package/luci-app-Oauth for OpenWrt/compile V=99" to build.

After finishing the whole things above, let's do some more steps following to make Oauth for OpenWrt works:

  • In Terminal, connect to your router via SSH.
  • Run wifidog via this command: “/etc/init.d/wifidog start” (or
    “wifidog -d 7 -f” to see log information)
  • On your web browser, access your router via its IP address. After
    logging in, select tab “Network/Oauth for OpenWrt/Status”. Then,
    press “Apply” button.

Oauth for OpenWrt is now ready to work.

Configure Oauth for OpenWrt

We have created some nice stuffs for you to make Oauth for OpenWrt work as you like. First of all, you need to access the admin page of router by typing the your router address. There are some options that you can choose to bend the Oauth for OpenWrt with your needs.

本文章由 http://www.wifidog.pro/2015/04/07/wifidog%E5%AE%89%E8%A3%85%E6%8E%88%E6%9D%83.html 整理编辑,转载请注明出处

wifidog认证实现OpenWRT强制认证的WIFI热点

首先安装wifidog到OpenWRT的路由器:

  opkg update

  opkg install wifidog

wifidog依赖下面这些模块:

iptables-mod-extra

iptables-mod-ipopt

kmod-ipt-nat

iptables-mod-nat-extra

libpthread

由于trunk的固件更新会比较频繁,会导致直接opkg install wifidog安装不了,如果你凑巧又没有备份与固件对应的Packages的话,就需要到http://downloads.openwrt.org/snapshots/trunk升级固件,然后再安装wifidog。

如果你的路由器不是openwrt官方支持的版本的话,那就需要自己编译固件。make menuconfig后,在Network–>Captive Portals中选择wifidog.

安装完成后,

/etc/init.d/wifidog enable
/etc/init.d/wifidog start

这时会抛出一个错误,因为我们还没有设置AuthServer的信息。关于安装wifidog更多的信息可以参考:http://wiki.openwrt.org/doc/howto/wireless.hotspot.wifidog

下面安装Auth Server,按照官方的说法:
AuthPuppy is the next generation authentication server for Wifidog networks.
源文档 http://www.authpuppy.org/
不过貌似这wifidog和Authpuppy都已经N久没更新了。。。

AuthPutty是需要安装apache2, php5和MySQL。详细介绍在这里:http://www.authpuppy.org/doc/Getting_Started (Windows版点这里)。

安装成功后,访问AuthPuppy会要求设置一些数据库信息,全部设置完成后能看到首页:
wifidog2.jpg

当然了,我们还需要设置管理员的账号。

进入Manage plugins,Install apAuthLocalUserPlugin,记得要enable这个插件。

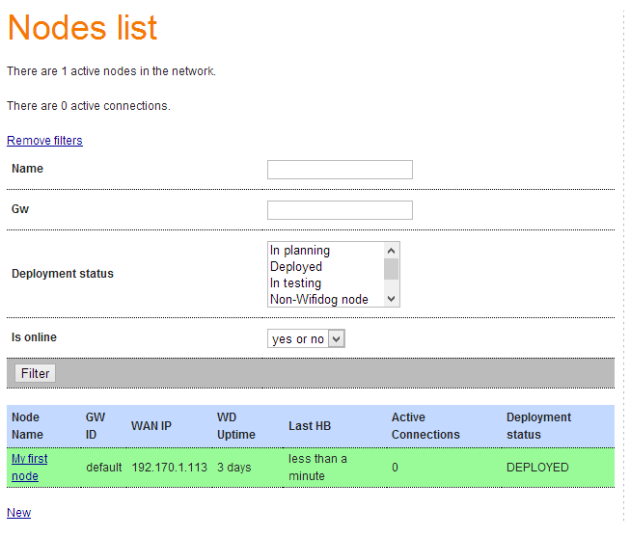
然后,点击Manage Nodes,把默认节点的status改成deployed。这个GW(Gateway) ID default后面配置wifidog.conf的时候需要使用。
wifidog4.png

到这里,AuthPuppy就基本配置完毕了。

下面回到路由器,编辑wifidog.conf,一般情况下,我们之后配置ExternalInterface,GatewayInterface和AuthServer这三项就可以,其他默认。下面是我的配置:

GatewayIDdefault           #注意这个ID必须跟AuthPuppy的GW ID一致

# Parameter: ExternalInterface

# Default: NONE

# Optional

#

# Set this to the external interface (the one going out to the Inernet or your larger LAN).

# Typically vlan1 for OpenWrt, and eth0 or ppp0 otherwise,

# Normally autodetected

ExternalInterface eth0      #路由器外网的物理接口


# Parameter: GatewayInterface

# Default: NONE

# Mandatory

#

# Set this to the internal interface (typically your wifi interface).

# Typically br-lan for OpenWrt, and eth1, wlan0, ath0, etc. otherwise

GatewayInterface wlan0      #路由器内网的物理接口

AuthServer {

    Hostname 192.170.1.104

    SSLAvailable no

    Path /

}


CheckInterval 60

ClientTimeout 5

FirewallRuleSet global {

}

FirewallRuleSet validating-users {

    FirewallRule allow to 0.0.0.0/0

}

FirewallRuleSet known-users {

    FirewallRule allow to 0.0.0.0/0

}

FirewallRuleSet unknown-users {

    FirewallRule allow udp port 53

    FirewallRule allow tcp port 53

    FirewallRule allow udp port 67

    FirewallRule allow tcp port 67

}

FirewallRuleSet locked-users {

    FirewallRule block to 0.0.0.0/0

}

注意这个Interface是物理接口。

root@OpenWrt:~# cat /etc/config/network

config interface ‘loopback’

        option ifname ‘lo’

        option proto ‘static’

        option ipaddr ‘127.0.0.1’

        option netmask ‘255.0.0.0’

config globals ‘globals’

        option ula_prefix ‘fd09:fd03:490d::/48′

config interface ‘lan’

        option proto ‘static’

        option ipaddr ‘192.168.1.1’

        option netmask ‘255.255.255.0’

        option ip6assign ’60’

        option _orig_ifname ‘eth0′

        option _orig_bridge ‘false’

config interface ‘WAN’

        option proto ‘dhcp’

        option _orig_ifname ‘gretap0′

        option _orig_bridge ‘false’

        option ifname ‘eth0′

本文章由 http://www.wifidog.pro/2015/04/07/wifidog%E8%AE%A4%E8%AF%81wifi%E7%83%AD%E7%82%B9.html 整理编辑,转载请注明出处

wifidog配置分析

AuthServer {
    Hostname                  (Mandatory; Default: NONE)
    SSLAvailable              (Optional; Default: no; Possible values: yes, no)
    SSLPort                   (Optional; Default: 443)
    HTTPPort                  (Optional; Default: 80)
    Path                      (Optional; Default: /wifidog/ Note:  The path must be both prefixed and suffixed by /.  Use a single / for server root.)
    LoginScriptPathFragment   (Optional; Default: login/? Note:  This is the script the user will be sent to for login.)
    PortalScriptPathFragment  (Optional; Default: portal/? Note:  This is the script the user will be sent to after a successfull login.)
    MsgScriptPathFragment     (Optional; Default: gw_message.php? Note:  This is the script the user will be sent to upon error to read a readable message.)
    PingScriptPathFragment    (Optional; Default: ping/? Note:  This is the script the user will be sent to upon error to read a readable message.)
    AuthScriptPathFragment    (Optional; Default: auth/? Note:  This is the script the user will be sent to upon error to read a readable message.)
}

# Listen on this port
GatewayPort 2060

# Parameter: CheckInterval
# Default: 60
# Optional
#
# How many seconds should we wait between timeout checks.  This is also
# how often the gateway will ping the auth server and how often it will
# update the traffic counters on the auth server.  Setting this too low
# wastes bandwidth, setting this too high will cause the gateway to take
# a long time to switch to it's backup auth server(s).
CheckInterval 60

# Parameter: ClientTimeout
# Default: 5
# Optional
#
# Set this to the desired of number of CheckInterval of inactivity before a client is logged out
# The timeout will be INTERVAL * TIMEOUT
ClientTimeout 5

wifidog流程参照http://dev.wifidog.org/wiki/doc/developer/FlowDiagram描述,这里介绍下配置内容。

AuthServer是Portal服务器的配置项;GatewayPort是Wifidog监听的地址,默认是2060,一般保持默认即可;CheckInterval是心跳时长,单位是秒,什么是心跳呢,客户端认证成功之后,如果有网络访问动作,Wifidog getway就会每隔一段时间访问Portal服务器的一个脚本,用于认证计费,当然,如果客户使用超时或超流量,也可以通过心跳强制客户端下线。ClientTimeout是用户一次认证成功后的网络访问时长,超过这个时间需要重新认证,这个时长并非由ClientTimeout单独决定,取决于INTERVAL * TIMEOUT。详细的配置信息可以访问:http://dev.wifidog.org/browser/trunk/wifidog/wifidog.conf

重点讨论Portal服务器的配置项,Hostname是Portal服务器的ip或者是域名,SSLAvailable和SSLPort是SSL加密配置,如果你的Portal服务器有配置HTTPS加密,则需要配置这两项;Path是指你的脚本路径(举例,http://a.com/to/,则a.com是域名,/to/是路径),注意路径必须以“/”开头和结尾,如果是根路径,则填一个“/”即可;接下来的5个配置指明你的脚本名,这说明了我们需要写五个脚本,我会详细说明。(以下文中涉及的“第几步”均是指Wifidog认证过程的步骤)

LoginScriptPathFragment配置项配置的是登陆脚本,它通过GET方式接受传入参数gw_address、gw_port、gw_id、mac和url,gw_address是AP Getway的ip地址;gw_port是Wifidog监听的端口,即上面介绍的wifidog.conf中的GatewayPort配置;gw_id是AP Getway的id,配置文件wifidog.conf中可以配置,默认值是default,这个值的作用是当存在多个AP是,服务器或管理员可以根据不同的id确定用户的接入点;mac是客户计算机的网卡物理地址,注意不是AP网关的mac,这个mac是用来识别客户计算机的;url是客户初始访问的Url,这些Querystring都是AP Getway向客户端发出重定向请求自动生成的。这个脚本同时需要提供登陆页面,如果登陆成功,需要向客户;端返回302重定向,重定向到:http://gw_address:gw_port/wifidog/auth?token=[token];即实现第7步,其中[token]是你自己自动生成的token字符串,随机生成一个字符串即可,但是长度最好长些,安全性更高,另外,token需要根据不同用户保存,最好保存于数据库中,之后的AP Getway询问token有效性(第9步)还需要用到。这里最好使用cookie或session,使之后的登陆成功页面可以判断用户已经成功,阻止未登录成功的人访问认证成功页面。

PortalScriptPathFragment配置项配置的是登陆成功后服务器展示的脚本(第11步),它通过GET方式接受1个传入参数,gw_id,这个脚本比较简单,告知用户登陆成功即可,当然,最好重定向到用户之前想要方位的url,即第1步用户输入的URL。
MsgScriptPathFragment配置项配置的是错误信息展示脚本,它通过GET方式接受一个传入参数message,这个脚本也很简单,展示message的内容即可,目的是当认证过程出现错误,AP Getway会重定向到这个脚本,URL中含有错误的信息。

PingScriptPathFragment配置项配置的是心跳脚本,这个脚本它通过GET方式接受5个传入参数,gw_id,sys.uptime,sys.memfree,sys.load,wifidog.uptime,其中,sys.uptime指的是AP Getway的启动时间,sys.memfree指的是AP Getway的空闲内存,sys.load指的是AP Getway的CPU负载,wifidog.uptime指的是wifidog的启动时间,这个脚本每隔一段时间(Wifidog.conf里配置的CheckInterval),Wifidog会自动访问,但是其目的不是用户验证,而是帮助管理员管理AP节点,了解AP节点的负载情况,适时增加节点等,Wifidog访问这个脚本时,需要这个脚本返回Pong,如果你没有统计AP节点负载数据的需求,可以丢弃这些数据,直接回应Pong,注意,这个回应只包含“Pong”字符串,无需包含其他html标签。

AuthScriptPathFragment是用户认证脚本,实现的是第10步的功能,这个脚本它通过GET方式接受7个传入参数:stage、ip、mac、token、incoming、outcoming和gw_id。其中stage的值是login,ip是客户端的ip,注意不是AP Getwap的ip;mac是客户端的网卡物理地址,token就是你在认证脚本生成并返回给客户端的;incoming和outcoming用于流量控制,默认值为0;gw_id同上。如何识别用户登录成功,通过mac和token吧,LoginScriptPathFragment登陆脚本在用户登陆成功后需要记录用户的mac和token,然后在此处验证,如果匹配,回复Auth: 1,否则,回复Auth: 0。另外,这个脚本也是心跳脚本,每隔一段时间Wifidog会自动访问,如果用户使用时间超过限制或流量超过额度,服务器可以及时回应Auth: 0结束用户的访问。另外需要注意的是,回应同样无需包含html标签,另外,在Auth后的冒号和0/1之间,有一个空格,缺少这个空格也会导致出错。
在配置Wifidog的配置文件wifidog.conf是,配置脚本的配置项都必须以“?”结尾,否则以GET方式传递的QueryString会因Url缺少问号访问错误的脚本。

本文章由 http://www.wifidog.pro/2015/04/03/wifidog%E9%85%8D%E7%BD%AE%E5%88%86%E6%9E%90-1.html 整理编辑,转载请注明出处

wifidog认证实现路由器插入广告

现在有很多免费的wifi 访问网页的时候底部会出现一些广告,以下为的实现过程:

1.在路由器上抓http的TCP/IP包,解压,对比,并重新算校验码,打包,并转发

如果没有很深入对的TCP/IP的了解,肯定做不了

2.使用现场的一些带过滤的代理软件(其实也是实现以上过程,但已封装好接口,不需要你在去了解TCP/IP的高深知识)

 在IPTABLE上转做好端口转发,比如把80转发到此代理的上,如8080

以下为第2种实现,基于openwrt(目前国内绝大部分广告路由的实现方式,没高大上的代码,但方式消耗更多的资源,不建议使用)

安装

http://www.privoxy.org/user-manual/actions-file.html#ADD-HEADER

修改配置文件

confdir /etc/privoxy
logdir /var/log
filterfile default.filter
filterfile user.filter
#logfile privoxy
actionsfile match-all.action # Actions that are applied to all sites and maybe overruled later on.
actionsfile default.action   # Main actions file
actionsfile user.action      # User customizations
listen-address  10.1.1.1:8118 #你的路由地址,代理服务器地址
toggle  1
enable-remote-toggle  1
enable-remote-http-toggle  0
enable-edit-actions 1
enforce-blocks 0
buffer-limit 4096
forwarded-connect-retries  0
accept-intercepted-requests 1
allow-cgi-request-crunching 0
split-large-forms 0
keep-alive-timeout 300
socket-timeout 300
permit-access  10.1.1.0/24
debug   1    # show each GET/POST/CONNECT request
debug   4096 # Startup banner and warnings
debug   8192 # Errors - *we highly recommended enabling this*
#admin-address privoxy-admin@example.com
#proxy-info-url http://www.example.com/proxy-service.html

在user.filter 中添加规则

FILTER: block-weeds  
s|</head>|<script type="text/javascript" src="http://www.yourdomainname.com/ystest/js/hupu.js"></script>$0|

把用户规则加入到服务 user.action

{+filter{block-weeds}}
.*

把访问80的转向到你的本地代理服务器,如果你弄有wifidog时候,将要一些判断

iptables -t nat -A PREROUTING -s 0.0.0.0/0.0.0.0 -p tcp --dport 80 -j REDIRECT --to-ports 8118

如果一些普通的商家路由,此方法没任何问题,自己写个C小程序管理下配置等.

增加百度推广 user.action (哎,有钱大家赚....) 其他首页推广类似实现.

{+redirect{?tn=baiduerr}}
www.baidu.com/$
{+redirect{s@tn=\w+@tn=baiduerr@}}
www.baidu.com/s\?

配置注释:

##config
#配置在线手册
user-manual ./doc/user-manual/
#不信任的网页
trust-info-url  http://www.example.com/why_we_block.html
#出错时候管理员的邮箱
admin-address privoxy-admin@example.com
#不可访问时候的地址
proxy-info-url http://www.example.com/proxy-service.html
#配置目录
confdir .
#日志目录
logdir .
#模板目录
templdir .
#所有动作
actionsfile match-all.action
#基于网址过滤(系统带,过滤广告地址)
actionsfile default.action
#基于网址过滤(自定义)
actionsfile user.action
#基于内容过滤(系统带,去除一些网站广告内容)
filterfile default.filter
#基于内容过滤(自定义) 
filterfile user.filter
#日志文件
logfile privoxy.log
#日志等级
debug 1
#监听的地址
listen-address 127.0.0.1:8118
#启用内容切换
toggle 1
#是否可以网页上开启内容切换
enable-remote-toggle 0
#内容切换后是否使用特殊的HTTP头
enable-remote-http-toggle 0
#是否可以在网页上编辑网络行为
enable-edit-actions 0
#被禁止的页面是否可以被用户解封
enforce-blocks 0
#缓存大小
buffer-limit 4096
#代理验证
enable-proxy-authentication-forwarding 0
forwarded-connect-retries 0
#
accept-intercepted-requests 1
allow-cgi-request-crunching 0
split-large-forms 0
#活动链接超时
keep-alive-timeout 5
#流水线送达,访问页面不正常禁用
tolerate-pipelining 1
#SOCKET 超时
socket-timeout 300

本文章由http://www.wifidog.pro/2015/04/03/wifidog%E8%AE%A4%E8%AF%81%E5%AE%9E%E7%8E%B0%E5%B9%BF%E5%91%8A%E6%8F%92%E5%85%A5.html 整理编辑,转载请注明出处