分类 wifidog原理 下的文章

wifidog 源码初分析(2)

上一篇分析了接入设备的首次浏览器访问请求如何通过 防火墙过滤规则 重定向到 wifidog 的 HTTP 服务中,本篇主要分析了 wifidog 在接收到 接入设备的 HTTP 访问请求后,如何将此 HTTP 请求重定向到 认证服务器(auth-server) 上。

通过上面的防火墙规则,会将通过上面的防火墙规则,会将HTTP请求的外部IP地址和端口通过NAT方式重定向至本地wifidog内嵌HTTP服务器的地址和端口上,并由内嵌HTTP服务器进行服务,而内嵌HTTP服务器的路径和回调处理如下:

if ((webserver = httpdCreate(config->gw_address, config->gw_port)) == NULL) {
    debug(LOG_ERR, "Could not create web server: %s", strerror(errno));
    exit(1);
}
debug(LOG_DEBUG, "Assigning callbacks to web server");
httpdAddCContent(webserver, "/", "wifidog", 0, NULL, http_callback_wifidog);
httpdAddCContent(webserver, "/wifidog", "", 0, NULL, http_callback_wifidog);
httpdAddCContent(webserver, "/wifidog", "about", 0, NULL, http_callback_about);
httpdAddCContent(webserver, "/wifidog", "status", 0, NULL, http_callback_status);
httpdAddCContent(webserver, "/wifidog", "auth", 0, NULL, http_callback_auth);

httpdAddC404Content(webserver, http_callback_404);

客户端首次访问时回调客户端首次访问时回调http_callback_404函数,在该函数中根据获取的客户端信息来配置重定向的URL fragment,如下:

void
http_callback_404(httpd *webserver, request *r)
{
    char tmp_url[MAX_BUF],
            *url,
            *mac;
    s_config    *config = config_get_config();
    t_auth_serv *auth_server = get_auth_server();
    memset(tmp_url, 0, sizeof(tmp_url));
    /*
     * XXX Note the code below assumes that the client's request is a plain
     * http request to a standard port. At any rate, this handler is called only
     * if the internet/auth server is down so it's not a huge loss, but still.
     */ /* 用户需要访问的URL */
        snprintf(tmp_url, (sizeof(tmp_url) - 1), "http://%s%s%s%s",
                        r->request.host,
                        r->request.path,
                        r->request.query[0] ? "?" : "",
                        r->request.query);
    url = httpdUrlEncode(tmp_url);
    if (!is_online()) {
        /* 路由器都接入不到 internet */
        char * buf;
        send_http_page(r, "Uh oh! Internet access unavailable!", buf);
        free(buf);
    }
    else if (!is_auth_online()) {
        /* auth server 挂起 */
        char * buf;
        send_http_page(r, "Uh oh! Login screen unavailable!", buf);
        free(buf);
    }
    else {
        /* 配置重定向到 auth server 的 url 参数 */
        char *urlFragment;
        if (!(mac = arp_get(r->clientAddr))) {
            /* We could not get their MAC address */
            debug(LOG_INFO, "Failed to retrieve MAC address for ip %s, so not putting in the login request", r->clientAddr);
            safe_asprintf(&urlFragment, "%sgw_address=%s&gw_port=%d&gw_id=%s&url=%s",
                auth_server->authserv_login_script_path_fragment,
                config->gw_address,
                config->gw_port,
                config->gw_id,
                url);
        } else {          
            debug(LOG_INFO, "Got client MAC address for ip %s: %s", r->clientAddr, mac);
            safe_asprintf(&urlFragment, "%sgw_address=%s&gw_port=%d&gw_id=%s&mac=%s&url=%s",
                auth_server->authserv_login_script_path_fragment,
                config->gw_address,
                config->gw_port,
                config->gw_id,
                mac,
                url);
        }
        /* 调用该函数将用户请求重定向到 auth server 的登录页面 */
        http_send_redirect_to_auth(r, urlFragment, "Redirect to login page");
        free(urlFragment);
    }
    free(url);
}

上面代码基本不用解释,具体重定向至auth server的消息在下面的 http_send_redirect_to_auth 函数中实现:

void http_send_redirect_to_auth(request *r, char *urlFragment, char *text)
{
    char *protocol = NULL;
    int port = 80;
    t_auth_serv *auth_server = get_auth_server();
    if (auth_server->authserv_use_ssl) {
        protocol = "https";
        port = auth_server->authserv_ssl_port;
    } else {
        protocol = "http";
        port = auth_server->authserv_http_port;
    }

    char *url = NULL;
    safe_asprintf(&url, "%s://%s:%d%s%s",
        protocol,
        auth_server->authserv_hostname,
        port,
        auth_server->authserv_path,
        urlFragment
    );
    http_send_redirect(r, url, text);
    free(url);
}

具体的重定向URL给个实例:

POST /login/?gw_address=192.168.1.1&gw_port=2060&gw_id=default&mac=44:94:fc:ef:28:40&url=http%3A//www.baidu.com/ HTTP/1.1

可以看到这里有这几个参数信息:

gw_address,路由器的LAN地址
gw_port:为wifidog的监听端口
gw_id:路由器的标识名
mac:客户端设备的MAC地址
url:为客户端访问的原URL(以便于重定向)

转载时请务必以超链接形式标明文章 原始出处 、作者信息和本声明。否则将追究法律责任。http://quietmadman.blog.51cto.com/3269500/1384761

本文章由 http://www.wifidog.pro/2015/01/23/wifidog%E6%BA%90%E7%A0%81%E5%88%86%E6%9E%90-2.html 整理编辑,转载请注明出处
wifidog 源码初分析(1)

因为最近公司内部有个关于路由器的项目使用了该开源项目做Demo,安装配置很简单,但是对运行机制不是太了解,所以抽了点时间初步对 wifidog 的源码进行了分析。
(对于 wifidog 是什么开源项目,以及如何安装配置,就不做解释了,直接 Google 吧)。
另外,wifidog 的核心还是依赖于 iptables 防火墙过滤规则来实现的,所以建议对 iptables 有了了解后再去阅读 wifidog 的源码。
在路由器上启动 wifidog 之后,wifidog 在启动时会初始化一堆的防火墙规则,如下:

/** Initialize the firewall rules
*/
int iptables_fw_init(void)
{
    … …
/*
     *
     * Everything in the NAT table
     *
     */
    /* Create new chains */
    iptables_do_command("-t nat -N " TABLE_WIFIDOG_OUTGOING);
    iptables_do_command("-t nat -N " TABLE_WIFIDOG_WIFI_TO_ROUTER);
    iptables_do_command("-t nat -N " TABLE_WIFIDOG_WIFI_TO_INTERNET);
    iptables_do_command("-t nat -N " TABLE_WIFIDOG_GLOBAL);
    iptables_do_command("-t nat -N " TABLE_WIFIDOG_UNKNOWN);
    iptables_do_command("-t nat -N " TABLE_WIFIDOG_AUTHSERVERS);
    /* Assign links and rules to these new chains */
    iptables_do_command("-t nat -A PREROUTING -i %s -j " TABLE_WIFIDOG_OUTGOING, config->gw_interface);
    iptables_do_command("-t nat -A " TABLE_WIFIDOG_OUTGOING " -d %s -j " TABLE_WIFIDOG_WIFI_TO_ROUTER, config->gw_address);
    iptables_do_command("-t nat -A " TABLE_WIFIDOG_WIFI_TO_ROUTER " -j ACCEPT");
    iptables_do_command("-t nat -A " TABLE_WIFIDOG_OUTGOING " -j " TABLE_WIFIDOG_WIFI_TO_INTERNET);
    iptables_do_command("-t nat -A " TABLE_WIFIDOG_WIFI_TO_INTERNET " -m mark --mark 0x%u -j ACCEPT", FW_MARK_KNOWN);
    iptables_do_command("-t nat -A " TABLE_WIFIDOG_WIFI_TO_INTERNET " -m mark --mark 0x%u -j ACCEPT", FW_MARK_PROBATION);
    iptables_do_command("-t nat -A " TABLE_WIFIDOG_WIFI_TO_INTERNET " -j " TABLE_WIFIDOG_UNKNOWN);
    iptables_do_command("-t nat -A " TABLE_WIFIDOG_UNKNOWN " -j " TABLE_WIFIDOG_AUTHSERVERS);
    iptables_do_command("-t nat -A " TABLE_WIFIDOG_UNKNOWN " -j " TABLE_WIFIDOG_GLOBAL);
    // 将 80 端口的访问重定向(REDIRECT)到 (本路由)网关web服务器的监听端口
    iptables_do_command("-t nat -A " TABLE_WIFIDOG_UNKNOWN " -p tcp --dport 80 -j REDIRECT --to-ports %d", gw_port);
    /*
     *
     * Everything in the FILTER table
     *
     */
    /* Create new chains */
    iptables_do_command("-t filter -N " TABLE_WIFIDOG_WIFI_TO_INTERNET);
    iptables_do_command("-t filter -N " TABLE_WIFIDOG_AUTHSERVERS);
    iptables_do_command("-t filter -N " TABLE_WIFIDOG_LOCKED);
    iptables_do_command("-t filter -N " TABLE_WIFIDOG_GLOBAL);
    iptables_do_command("-t filter -N " TABLE_WIFIDOG_VALIDATE);
    iptables_do_command("-t filter -N " TABLE_WIFIDOG_KNOWN);
    iptables_do_command("-t filter -N " TABLE_WIFIDOG_UNKNOWN);
    /* Assign links and rules to these new chains */
    /* Insert at the beginning */
    iptables_do_command("-t filter -I FORWARD -i %s -j " TABLE_WIFIDOG_WIFI_TO_INTERNET, config->gw_interface);
    iptables_do_command("-t filter -A " TABLE_WIFIDOG_WIFI_TO_INTERNET " -m state --state INVALID -j DROP");

    /* TCPMSS rule for PPPoE */
    iptables_do_command("-t filter -A " TABLE_WIFIDOG_WIFI_TO_INTERNET " -o %s -p tcp --tcp-flags SYN,RST SYN -j TCPMSS --clamp-mss-to-pmtu", ext_interface);
    iptables_do_command("-t filter -A " TABLE_WIFIDOG_WIFI_TO_INTERNET " -j " TABLE_WIFIDOG_AUTHSERVERS);
    iptables_fw_set_authservers();
    iptables_do_command("-t filter -A " TABLE_WIFIDOG_WIFI_TO_INTERNET " -m mark --mark 0x%u -j " TABLE_WIFIDOG_LOCKED, FW_MARK_LOCKED);
    iptables_load_ruleset("filter", "locked-users", TABLE_WIFIDOG_LOCKED);
    iptables_do_command("-t filter -A " TABLE_WIFIDOG_WIFI_TO_INTERNET " -j " TABLE_WIFIDOG_GLOBAL);
    iptables_load_ruleset("filter", "global", TABLE_WIFIDOG_GLOBAL);
    iptables_load_ruleset("nat", "global", TABLE_WIFIDOG_GLOBAL);
    iptables_do_command("-t filter -A " TABLE_WIFIDOG_WIFI_TO_INTERNET " -m mark --mark 0x%u -j " TABLE_WIFIDOG_VALIDATE, FW_MARK_PROBATION);
    iptables_load_ruleset("filter", "validating-users", TABLE_WIFIDOG_VALIDATE);
    iptables_do_command("-t filter -A " TABLE_WIFIDOG_WIFI_TO_INTERNET " -m mark --mark 0x%u -j " TABLE_WIFIDOG_KNOWN, FW_MARK_KNOWN);
    iptables_load_ruleset("filter", "known-users", TABLE_WIFIDOG_KNOWN);
    iptables_do_command("-t filter -A " TABLE_WIFIDOG_WIFI_TO_INTERNET " -j " TABLE_WIFIDOG_UNKNOWN);
    iptables_load_ruleset("filter", "unknown-users", TABLE_WIFIDOG_UNKNOWN);
    iptables_do_command("-t filter -A " TABLE_WIFIDOG_UNKNOWN " -j REJECT --reject-with icmp-port-unreachable");
    UNLOCK_CONFIG();
    return 1;
}

在该 防火墙规则的初始化过程中,会首先清除掉已有的防火墙规则,重新创建新的过滤链,另外,除了通过 iptables_do_command("-t nat -A "TABLE_WIFIDOG_UNKNOWN " -p tcp --dport 80 -j REDIRECT --to-ports %d",gw_port); 这个命令将 接入设备的 80 端口(HTTP)的访问重定向至网关自身的 HTTP 的端口之外,还通过 iptables_fw_set_authservers(); 函数设置了 鉴权服务器(auth-server) 的防火墙规则:

void iptables_fw_set_authservers(void)
{
    const s_config *config;
    t_auth_serv *auth_server;
    config = config_get_config();
    for (auth_server = config->auth_servers; auth_server != NULL; auth_server = auth_server->next) {
        if (auth_server->last_ip && strcmp(auth_server->last_ip, "0.0.0.0") != 0) {
            iptables_do_command("-t filter -A " TABLE_WIFIDOG_AUTHSERVERS " -d %s -j ACCEPT", auth_server->last_ip);
            iptables_do_command("-t nat -A " TABLE_WIFIDOG_AUTHSERVERS " -d %s -j ACCEPT", auth_server->last_ip);
        }
    }
}

首先从上面的代码可以看出 wifidog 支持多个 鉴权服务器,并且针对每一个鉴权服务器 设置了如下两条规则:

1)在filter表中追加一条[任何访问鉴权服务器都被接受]的WiFiDog_$ID$_AuthServers过滤链:

iptables -t filter -A  WiFiDog_$ID$_AuthServers -d auth-server地址 -j ACCEPT

2)在nat表中追加一条[任何访问鉴权服务器都被接受]的WiFiDog_$ID$_AuthServers过滤链:

iptables -t nat -A WiFiDog_$ID$_AuthServers  -d auth-server地址 -j ACCEPT

这样确保可以访问鉴权服务器,而不是拒绝所有的出口访问。

转载时请务必以超链接形式标明文章 原始出处 、作者信息和本声明。否则将追究法律责任。http://quietmadman.blog.51cto.com/3269500/1384175

本文章由 http://www.wifidog.pro/2015/01/23/wifidog-%E6%BA%90%E7%A0%81%E5%88%86%E6%9E%90-1.html 整理编辑,转载请注明出处

WiFidog简介

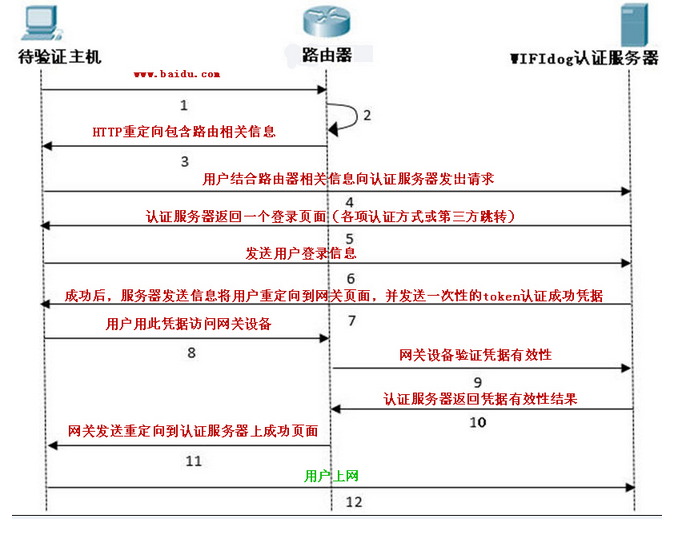
WIFIdog是一种新的认证方式,这种认证方式的优势在于安全性高,不容易被破解验证。
客户端发出初始化请求,比如访问www.baidu.com
网关的防火墙规则将这个请求重定向到本地网关的端口上。这个端口是Wifidog监听的端口。
Wfidog提供一个HTTP重定向回复,重定向到Web认证页面,重定向的Url的Querystring中包含了Gateway的ID,Gateway的FQDN以及其他的信息。
用户向认证服务器发出认证请求。
网关返回一个(可以是自定义的)splash(也称作“登录”)页面。
用户提供他的凭据信息,比如用户名和密码。
成功认证的话,客户端将会被重定向到网关的自己的web页面上,并且带有一个认证凭据(一个一次性的token)
用户就是用获取到的凭据访问网关。
网关去认证服务器询问token的有效性。
认证服务器确认token的有效性。
网关发送重定向给客户端,以从认证服务器上获取 成功提示页面,重定向到 http://portal_server:port/portal_script 这个位置。
认证服务器通知客户请求成功,可以上网了。
整个过程如下图所示
1.png

本文章由 http://www.wifidog.pro/2015/01/23/wifidog%E7%AE%80%E4%BB%8B-1.html 整理编辑,转载请注明出处

Wifidog及认证过程初分析

一、综述

wifidog是搭建无线热点认证系统的解决方案之一,他比nocat、nodog更适合互联网营销思路。常见的使用在openwrt系统上,它实现了路由器和认证服务器的数据交互,在路由器方(客户端)是用C 语言代码,通过wifidog程序和linux iptables防火墙实现接入用户的认证跳转和控制。在认证服务器方(服务端)是通过php(还有java版本的)实现用户的认证流程和管理。

优点:有开源代码,可以很方便的搭建认证系统。方便用户进行需求定制。

缺点:通过iptables方式实现,性能比较差,整体拉低了路由器的数据包处理速度,协议比较繁琐,对认证服务器的造成性能损耗比较大。

二、wifidog 结构分析

Wifidog 客户端代码简析:

├── libhttpd

│   ├── api.c

│   ├── httpd.h

│   ├── httpd_priv.h

│   ├── ip_acl.c

│   ├── Makefile.am

│   ├── protocol.c

│   ├── README

│   └── version.c


├── src

│   ├── auth.c

│   ├── auth.h

│   ├── centralserver.c

│   ├── centralserver.h

│   ├── client_list.c

│   ├── client_list.h

│   ├── commandline.c

│   ├── commandline.h

│   ├── common.h

│   ├── conf.c

│   ├── conf.h

│   ├── debug.c

│   ├── debug.h

│   ├── firewall.c

│   ├── firewall.h

│   ├── fw_iptables.c

│   ├── fw_iptables.h

│   ├── gateway.c

│   ├── gateway.h

│   ├── http.c

│   ├── httpd_thread.c

│   ├── httpd_thread.h

│   ├── http.h

│   ├── Makefile.am

│   ├── ping_thread.c

│   ├── ping_thread.h

│   ├── safe.c

│   ├── safe.h

│   ├── util.c

│   ├── util.h

│   ├── wdctl.c

│   ├── wdctl.h

│   ├── wdctl_thread.c

│   └── wdctl_thread.h

....

这是wifidog的部分源码。

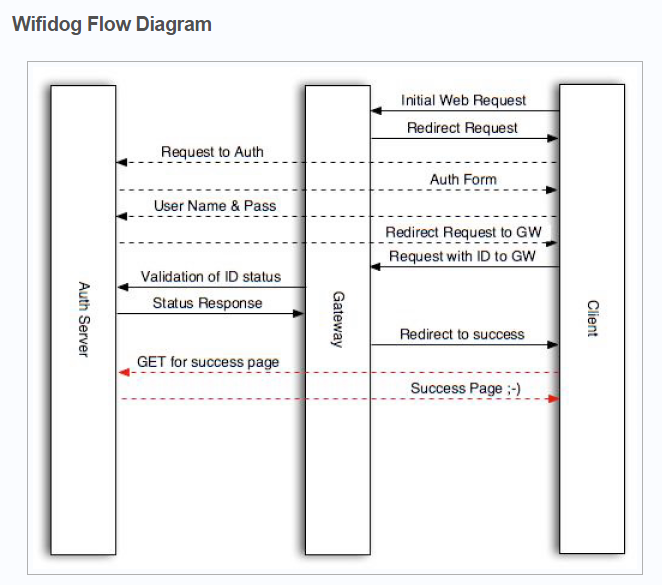
下面再来看看wifidog的认证流程图:
wifidog-flow-2009.png

认证的大致流程可以从图1中看到。下面结合代码的实现与图1来说下wifidog 的工作过程。

1、在网关上配置好wifidog.conf 后,运行wifidog程序。此时wifidog对wifidog.conf进行解析,并获取其中的配置选项。如:认证服务的地址或url 项Hostname 192.168.2.103 还有认证服务下的文件选项。如果为根目录下就是认证服务的处理程序,那么就设置为 Path /。Wifidog启动时会将这些参数读取,并保持在一个数组中,以供之后使用。然后调用iptables加入防火墙规则,阻止所以连接网关的用户上网。但是到达认证服务器的规则是打开的状态。

①0     0 ACCEPT     all  --  *      *       0.0.0.0/0            192.168.2.103

②55  2772 REDIRECT   tcp  --  *      *       0.0.0.0/0            0.0.0.0/0           tcp dpt:80 redir ports 2060

小结:此节主要用到conf.* 解析配置文件,firewall.* fw_iptables.* 进行防火墙规则添加 。

2、程序运行起来后,当有用户进行外网访问时。根据②中的防火墙规则,会将HTTP请求的外部IP地址和端口通过NAT方式重定向至本地wifidog内嵌HTTP服务器的地址和端口上,并由内嵌HTTP服务器进行服务,而内嵌HTTP服务器的路径和回调处理。然后将具体的请求信息发送给认证服务器。代码不详谈,下面看个实例URL:

POST /authpuppy/web/login/?gw_address=192.168.2.1&gw_port=2060&gw_id=default&url=http%3A//quietmadman.blog.51cto.com/3269500/1384761 HTTP/1.1

当我访问时,wifidog 将我访问的url重定向到上述的url上。目的就是去服务端做认证。

可以看到这里有这几个参数信息:
gw_address,路由器的LAN地址
gw_port:为wifidog的监听端口
gw_id:路由器的标识名
mac:客户端设备的MAC地址
url:为客户端访问的原URL(以便于重定向)

3、接步骤2,wifidog发送上述的url给认证服务器。这里我们使用的认证服务器是authpuppy。安装了apAuthSplashOnlyPlugin 插件。该插件无需输入用户名、密码,但需要点击按钮方可上网,也算是无秘钥认证。
接下来说下抓包看到的认证过程:

POST /authpuppy/web/login/?gw_address=192.168.2.1&gw_port=2060&gw_id=default&url=http%3A//quietmadman.blog.51cto.com/3269500/1384761 HTTP/1.1

...  ...

Referer: http://192.168.2.103/authpuppy/web/login/?gw_address=192.168.2.1&gw_port=2060&gw_id=default&url=http%3A//quietmadman.blog.51cto.com/3269500/1384761

Cookie: authpuppy=3oft24lljrish4731dibh2ji80


gw_id=default&gw_address=192.168.2.1&gw_port=2060&authenticator=apAuthSplashOnly&submit%5BapAuthSplashOnlyConnect%5D=Connect&apAuthSplashOnly%5Boptional_name%5D=HTTP/1.1 302 Found

...  ...

Location: http://192.168.2.1:2060/wifidog/auth?token=8eb3aae0ade3492cad361443ac54b9dcb644dbb2

上述过程是wifidog给认证服务器发送请求认证的URL,服务器收到后回送一个带token值的url到网关上。此段处理在服务端。网关收到后再次发送信息给认证服务器,如下报文:

 GET /wifidog/auth?token=8eb3aae0ade3492cad361443ac54b9dcb644dbb2 HTTP/1.1

...  ...

HTTP/1.0 307 Redirect to portal

Server: Hughes Technologies Embedded Server

Location: http://192.168.2.103:80/authpuppy/web/portal/?gw_id=default

Date: Mon, 07 Jul 2014 15:16:00 GMT

...  ...

GET /authpuppy/web/auth/?stage=login&ip=192.168.2.222&mac=64:27:37:e1:c3:d3&token=8eb3aae0ade3492cad361443ac54b9dcb644dbb2&incoming=0&outgoing=0&gw_id=default HTTP/1.0

...  ...

网关GET到token后,陆续的向认证服务器发送相关认证信息。

这里主要是两大步骤:

1)通过调用 auth_server_request(&auth_response, REQUEST_TYPE_LOGIN, r->clientAddr, mac, token, 0, 0); 让 认证服务器 对该客户端的 token 进行校验;

2)根据 认证服务器 返回的 token 校验结果进行不同的处理(主要是对该客户端的防火墙过滤规则进行不同的设置),这里主要以 AUTH_ALLOWED 校验结果进行分析,这里主要是两个动作:

2).1,通过 fw_allow 函数调用对此客户端"放行";

2).2,返回重定向至 认证服务器的 portal 路径访问的响应

GET /authpuppy/web/portal/?gw_id=default HTTP/1.1

Accept: image/jpeg, application/x-ms-application, image/gif, application/xaml+xml, image/pjpeg, application/x-ms-xbap, */*

Referer: http://192.168.2.103/authpuppy/web/login/?gw_address=192.168.2.1&gw_port=2060&gw_id=default&url=http%3A//quietmadman.blog.51cto.com/3269500/1384761

...  ...

Host: 192.168.2.103

...  ...

Location: http://quietmadman.blog.51cto.com/3269500/1384761

Wifidog返回信息到认证服务器的portal,portal返回给网关的信息如上。最后重定向到用户最初始访问的url上。
Wifidog 的client代码大致是这些。

三、认证服务端简介

服务端官方推荐的有两个,一个是authpuppy,还有一个是wifidog-auth。两个环境都已经搭建成功。

Authpuppy主要是一个authpuppy.core.php ,类似Linux的管理方式,中心是一个内核文件。扩展功能是以plugin插件的方式进行加载、卸载管理的。

优点:可管理性比较好,随用随加载;不用既可以卸载掉。

缺点:代码不易阅读。因要求易于管理,插件模块形式要求严格。对于小型功能来说浪费时间。

Wifidog-auth显得就是“全面”,理解起来稍微简单。

认证主要分为三块,ping保活、login认证、portal认证。代码可能有不同,但是有相同的协议,以及相同的回复内容。下面是wifidog与服务端通信协议的几个例子。

网关心跳(Ping协议)

Wifidog将ping协议作为心跳机制向认证服务器发送当前状态信息。这可以实现为认证服务器每个节点的状态生成中央日志。

Wifidog客户端在conf文件中进行设置,目的是通过http定期启动thread(ping_thread.c)向认证服务器发送状态信息。信息格式如下:

http://auth_sever/ping/?

gw_id=%s

sys_uptime=%lu

sys_memfree=%u

sys_load=%.2f

wifidog_uptime=%lu"

通过系统调用wifidog客户端收集的数据:

Headers/

HTTP/1.0\r\n"

"User-Agent: WiFiDog %s\r\n"

"Host: %s\r\n"

一个典型的HTTP需求应该是:

    GET /ping/?gw_id=001217DA42D2&sys_uptime=742725&sys_memfree=2604&sys_load=0.03&wifidog_uptime=3861 HTTP/1.0( k# O# X) };

User-Agent: WiFiDog 1.1.3_beta62 T. R"

Host: auth.ilesansfil.org

认证服务器认证协议

这个页面描述了当用户已经被认证并允许访问互联网时,为了认证用户和进程,wifidog网关和认证服务器之间的信息传送。

Wifidog客户端将定期的启动一个thread来报告每个用户的连接状况。目前它被用来报告每个用户输入/输出计数器,以显示用户依然在现,并允许认证服务器将不再连接的用户断开。

以下是发给每个在线用户的信息

auth_server:/auth/index.php?

stage=

ip=

mac=

token=

incoming=

outgoing=

注意:stage=计数器/登录,取决于是否是新客户端

即使输入输出变量会在所有信息中出现,但他们只对处于counter阶段的信息有效。其它情况下输入输出经常设置为0。

在做回复时,认证服务器会以有效身份或新用户信息,或者认证服务器错误提示形式进行回复。

回复格式如下:

Auth: <number from user status list>

新用户状态为:

0 - AUTH_DENIED - User firewall users are deleted and the user removed.% u) i  D; j: i4 J' X) \/ P

6 - AUTH_VALIDATION_FAILED - User email validation timeout has occured and user/firewall is deleted7 A% n+ s. z3 O9 r

1 - AUTH_ALLOWED - User was valid, add firewall rules if not present! A" _/ B* a8 ~$ g

5 - AUTH_VALIDATION - Permit user access to email to get validation email under default rules

-1 - AUTH_ERROR - An error occurred during the validation process

注意:认识服务器错误一般不会改变防火墙或用户状态

标准的URL为:

GET /auth/?stage=counters&ip=7.0.0.107&mac=00:40:05:5F:44:43&token=4f473ae3ddc5c1c2165f7a0973c57a98&incoming=6031353&outgoing=827770 HTTP/1.0

User-Agent: WiFiDog 1.1.3_beta6

Host: auth.ilesansfil.org

网关重定向浏览器

客户端浏览器在不同情况下会被重定向到其它页面:

初始化请求:

基于捕捉,客户端会被网关重定向到以下URL:

l login/?gw_address=%s&gw_port=%d&gw_id=%s&url=%s

例如:https://auth.ilesansfil.org/login/?gw_id=0016B6DA9AE0&gw_address=7.0.0.1&gw_port=2060

初始化请求之后

当请求被处理并且客户端已经被重定向到网关时

如果服务器回复AUTH_DENIED:注意你通常在标准认证服务器上看不到这样的提示。客户端将不会被重定向回网关。

l gw_message.php?message=denied

如果服务器回复AUTH_VALIDATION:

l gw_message.php?message=activate

如果服务器回复AUTH_ALLOWED:这是门户重定向

l portal/?gw_id=%s

如果服务器回复AUTH_VALIDATION_FAILED:注意你将不会在标准认证服务器看到此回复。客户端将不会重定向回网关。

l gw_message.php?message=failed_validation

认证服务器重定向浏览器

基于成功登录,客户端将被重定向到网关。 http://" . $gw_address . ":" . $gw_port . "/wifidog/auth?token=" . $token

URL示例:http://7.0.0.1:2060/wifidog/auth?token=4f473ae3ddc5c1c2165f7a0973c57a98

本文章由 http://www.wifidog.pro/2015/01/21/wifidog%E8%AE%A4%E8%AF%81%E8%BF%87%E7%A8%8B.html 整理编辑,转载请注明出处