分类 openwrt开发 下的文章

openwrt 固件的uci系统

UCI系统
"uci"是"Unified Configuration Interface"(统一配置界面)的缩写,意在OpenWrt整个系统的配置集中化。

系统配置应容易,更直接且在此有文档描述,从而使你的生活更轻松!

(它是White Russian系列OpenWrt基于nvram的配置的后继改进。)

许多程序在系统某处拥有自己的配置文件,

比如/etc/network/interfaces, /etc/exports, /etc/dnsmasq.conf或者 /etc/samba/samba.conf,

有时它们还使用稍有不同的语法。

在OpenWrt中你无需为此烦恼,我们只需更改UCI配置文件!

你不需要为了某个更改起效而重启系统!参阅下文中的命令行实用工具以了解如何做到这点。

还有不要忘了官方程序包(official binaries)里包含了很多后台程序,但默认情况下并未启用!

比如cron后台程序默认并未激活,因而只编辑crontab并无作用。

你需要用/etc/init.d/crond start起动它或用/etc/init.d/crond enable激活它。 大部分后台程序都可以disable(禁用),stop(停止)和restart(重起)。 还有一些非UCI配置你可以参阅。

共同原则

OpenWrt的所有配置文件皆位于/etc/config/目录下。每个文件大致与它所配置的那部分系统相关。可用文本编辑器、"uci" 命令行实用程序或各种编程API(比如 Shell, Lua and C)来编辑/修改这些配置文件。

配置文件

文件位置 描述
基本配置
/etc/config/dhcp dnsmasq和DHCP的配置
/etc/config/dropbear SSH服务端选项
/etc/config/firewall 中央防火墙配置
/etc/config/network 交换,接口和路由配置
/etc/config/system 杂项与系统配置
/etc/config/timeserver rdate的时间服务器列表
/etc/config/wireless 无线设置和无线网络的定义
IPv6
/etc/config/ahcpd Ad-Hoc配置协议(AHCP) 服务端配置以及转发器配置
/etc/config/aiccu AICCU 客户端配置
/etc/config/dhcp6c WIDE-DHCPv6 客户端配置
/etc/config/dhcp6s WIDE-DHCPv6 服务端配置
/etc/config/gw6c GW6c 客户端配置
/etc/config/radvd 路由通告 (radvd) 配置
其他
/etc/config/etherwake 以太网唤醒: etherwake
/etc/config/fstab 挂载点及swap
/etc/config/hd-idle 另一个可选的硬盘空闲休眠进程(需要路由器支持usb硬盘)
/etc/config/httpd 网页服务器配置选项(Busybox 自带httpd, 已被舍弃)
/etc/config/luci 基础 LuCI 配置
/etc/config/luci_statistics 包统计配置
/etc/config/mini_snmpd mini_snmpd 配置
/etc/config/mountd OpenWrt 自动挂载进程(类似autofs)
/etc/config/multiwan 简单多WAN出口配置
/etc/config/ntpclient ntp客户端配置,用以获取正确时间
/etc/config/pure-ftpd Pure-FTPd 服务端配置
/etc/config/qos QoS配置(流量限制与整形)
/etc/config/samba samba配置(Microsoft文件共享)
/etc/config/snmpd SNMPd(snmp服务进程) 配置
/etc/config/sshtunnel sshtunnel配置
/etc/config/stund STUN 服务端配置
/etc/config/transmission BitTorrent配置
/etc/config/uhttpd Web服务器配置(uHTTPd)
/etc/config/upnpd miniupnpd UPnP服务器配置
/etc/config/ushare uShare UPnP 服务器配置
/etc/config/vblade vblade 用户空间AOE(ATA over Ethernet)配置
/etc/config/vnstat vnstat 下载器配置
/etc/config/wifitoogle 使用按钮来开关WiFi的脚本
/etc/config/wol Wake-on-Lan: wol
/etc/config/znc ZNC 配置

本文章由http://www.wifidog.pro/2015/07/23/openwrt-uci.html整理编辑,转载请注明出处
openwrt刷固件恢复原厂固件

There is little point in merely uninstalling OpenWrt, what you actually want to do, is to replace OpenWrt with the original firmware. You are here, because the wiki-page for your device, does not help you with that. So, first have a look at the flash.layout

To replace OpenWrt with the original firmware, you most probably do not have to change the boot partition, or the partition containing specific information like NVRAM or ART. Even if you overwrote the bootloader when you installed OpenWrt on your device.

通过OpenWrt CLI恢复原厂

You can use the program mtd for this:

cd /tmp
wget http://www.example.org/original_firmware.bin
mtd -r write /tmp/original_firmware.bin firmware

OpenWrt has no built-in "pleasantries" to prevent you from going back to original firmware. But sometimes you need to be careful, see e.g. back.to.original.firmware.

If you get a error message on the above mtd command like "no valid command given" you are using an old version of mtd which doesn't support the -r or -e parameters.

Download a newer statically compiled version

cd /tmp
wget http://www.freewrt.org/downloads/tools/mtd-static
chmod a+x mtd.static
wget http://www.example.org/original.trx
./mtd.static -e linux -r write original.trx linux

TIP: PLEASE READ - Common mistakes thread section 2 also. It describes when you should use the

openwrt-brcm-2.4-squashfs.trx

image.
Only flash a trx, never flash a bin file?
If you only have a Linksys .bin firmware file, this is not a problem, simply cut off the header before using the commands below:

dd bs=32 skip=1 if=original.bin of=original.trx

TIP: If your replacement firmware has a web interface, remember to flush your browser cache, sessions etc. This will avoid misleading 404 errors.

通过OpenWrt的WebUI管理界面恢复原厂固件
通过 Booloader恢复原厂固件

To flash the original firmware back again via the bootloader, please follow the procedures already described in Installing OpenWrt. They are basically the same.

本文章由http://www.wifidog.pro/2015/07/16/openwrt%E5%8D%87%E7%BA%A7%E5%9B%BA%E4%BB%B6-1.html整理编辑,转载请注明出处

openwrt 登录管理页面openwrt管理页面密码

Openwrt没有现成的密码!你必须要在你通过telnet第一次登陆的时候设置一个。

系统

任何全新的被安装上的可爱的Openwrt镜像,都会开启这些默认设置:

  • dnsmasq (DHCP daemon) (一个负责分配IP地址和dns转发的服务)正在运行
  • 内部接口(一般是网卡口)的IP地址会被设置为192.168.1.1/24
  • 内部接口对外分配的IP地址范围在192.168.1.100 -250之间
  • dropbear (SSH daemon) 没有在运行
  • telnet daemon在标准端口上运行(23)

在全新安装Openwrt以后,在你设置一个密码之前系统会一直引导进入这个状态
通过telnet登陆

1.通过telnet 192.168.1.1登陆你的路由:

BusyBox v1.17.3 (2011-02-22 23:42:42 CET) built-in shell (ash)
Enter 'help' for a list of built-in commands.
  _______                     ________        __
 |       |.-----.-----.-----.|  |  |  |.----.|  |_
 |   -   ||  _  |  -__|     ||  |  |  ||   _||   _|
 |_______||   __|_____|__|__||________||__|  |____|
          |__| W I R E L E S S   F R E E D O M
 ATTITUDE ADJUSTMENT (bleeding edge, r26290) ----------
  * 1/4 oz Vodka      Pour all ingredents into mixing
  * 1/4 oz Gin        tin with ice, strain into glass.
  * 1/4 oz Amaretto
  * 1/4 oz Triple sec
  * 1/4 oz Peach schnapps
  * 1/4 oz Sour mix
  * 1 splash Cranberry juice
 -----------------------------------------------------
root@openwrt:~$

2.在提示框中输入passwd. 你将会得到为root用户设置一个新密码的提示:

root@openwrt:~$ passwd
Changing password for root
New password:
Retype password:
Password for root changed by root
root@openwrt:~$

3.请选择一个安全密码.
4.在你设置一个密码以后telnet守护进程将会被禁用,在提示框中输入exit退出
5.无需重启,现在SSH已经可以用了,如果WebUI(LuCI)同TLS-modules一起安装的话,那么HTTPS也同时起效了。
6.再次使用ssh root@192.168.1.1登陆,或者使用签名认证
7.继续基础配置

登陆到WebUI
LuCI

打开你的浏览器,通过路由器的默认地址(通常是 192.168.1.1)连接它,登录用户名使用root',密码为空''

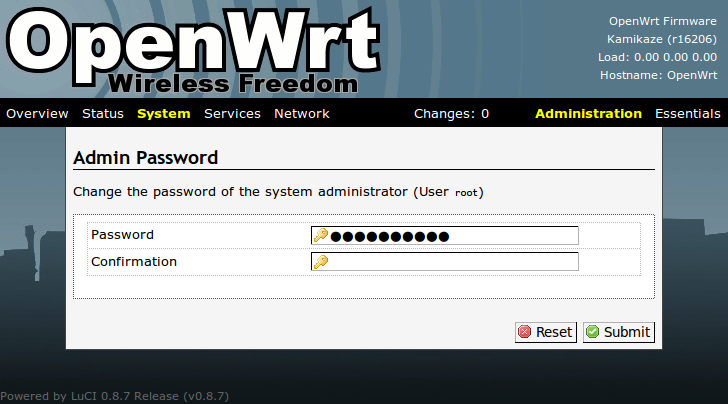
然后点击顶栏右边的Administration(管理),然后移到左边的System(系统)(只是鼠标移上去,别点击),点击弹出的菜单里面的Admin Password(管理员密码) 一个用来更改密码的页面会显示出来
openwrt.-.admin.password.-.luci.png

将你想要的密码填入Password(密码)域,在Confirmation(确认)域中重复这个密码.最后点击Submit(提交).

现在你的密码已设置。

X-Wrt

打开浏览器,连接它的默认地址(通常是192.168.1.1)到路由器。该webif现在请您设置一个密码。写你的密码进入新密码字段并再次确认密码字段,然后单击设置。

登陆问题

如果你遇到登陆问题,比如你无法登陆这个很可能是因为你的Linux或者Windows系统的防火墙设置问题,如果你有任何防火墙,你也许需要屏蔽他们,同事,只要你在OpenWrt中设置了一个密码,telnet将不再起作用(见上)

在设置密码以后没有SSH访问功能

过一到两分钟再试。在第一次启动的时候OpenWrt会忙于设置文件系统和生成SSH密钥;SSH服务器在密钥未生成以前不会启动。

本文章由http://www.wifidog.pro/2015/07/15/openwrt%E5%AF%86%E7%A0%81.html整理编辑,转载请注明出处

openwrt固件升级方法

四种方法
有四种方法可以把OpenWrt安装在一个设备上:

1.通过原始固件

通过你的浏览器打开原始固件的管理页面,然后通过使用"固件升级"选项安装OpenWrt固件。搞定。

注意: 一些时候原始固件的升级功能包含一些确定你没有刷入错误固件文件的校验功能,如果存在这个功能,他会阻止你通过这种方式安装OpenWrt。

2.通过Bootloader和网口

正是为了便于这方面,即更新固件, 绝大多的(不是所有)bootloader 里面内置了这种更新固件的功能. 有的内置 TFTP-client, 别的有 TFTP-server, 还有FTP-client 和 甚至于有 FTP-server. 你需要了解的有:

  • bootloader的预设IP地址 (启动到系统后的ip和BL的ip不一定相同哦!)
  • 使用的是以上那种协议
  • bootloader是做客户端还是服务端
  • 预设服务的端口号, 若不是 default
  • 接口要连上
  • 可能需要用户名和密码进行登录
  • 了解设备启动后连接的时间点是很有用的, 比如:要在设备上电的1-5秒内连接,否者设备会启动进入系统

一旦你明白了上面的参数,你就可以接着一下操作:

  1. 在你的电脑上安装相应的软件 (即在本案中bootloader内置了FTP-server,你就需要准备FTP连接软件了)
  2. 阅读该软甲你的手册! 比如 man tftp, man tftpd, man ftp, man ncftp, man ftpd, man
    pure-ftpd 或者 ..
  3. 给你的电脑设置一个与bootloader相同网段的静态ip
  4. 用正确的端口连接你的电脑
  5. 通电
  6. 与bootloader取得连接
  7. 按具体情况用openwrt固件来覆盖原来的固件
  8. 不要改掉或写到bootloader 直到明确指示这样做!(不然就就得到一块高价板砖了)

注意: 有时候bootloader会不让你刷非原厂的固件, 比如 t Inventel DV4210 (AKA Livebox)
时间点: 为了能上准时间点, 连接主机与路由直接要快. 要做到尽可能的快, 你可能需要关掉你网卡的连接速率自动协商功能(也就是开着双工100mbps啥的)尤其要 关掉媒体感知功能 在你的系统上面.

具体的操作

→ tftp
→ ftp
→ xmodem

3.via Bootloader and Serial port

→ serial

4.via JTAG

→ port.jtag

本文章由http://www.wifidog.pro/2015/07/13/openwrt%E5%8D%87%E7%BA%A7%E5%9B%BA%E4%BB%B6.html整理编辑,转载请注明出处