分类 默认分类 下的文章

2019年<跟着佐大学Lede/OpenWrt开发进阶培训班>开始报名啦!

公告:<跟着佐大学OpenWrt开发入门培训班>可继续报名,进阶班和入门班侧重点不同,请按需报班。入门班报名地址:http://forgotfun.org/2018/04/openwrt-training-2018.html

想法的由来:
承蒙网友们的厚爱,<跟着佐大学OpenWrt开发入门培训班>得到了大家广泛的好评。学员们感觉意犹未尽,一直催促我开二期进阶培训班。其实我对二期培训班是如履薄冰、胆战心惊,一期入门培训班已经几乎是完美无瑕,二期进阶培训班想要超越更是难上加难。我深知人如茶越泡越淡,持续高水平的技术输出对我来说是一种挑战,同时也是对我人气的一种考验。
二期进阶培训班是<跟着佐大学OpenWrt开发>系列教程的最终章,一期是炫技术,信手拈来,但二期实则屠龙技,曲高和寡。学成后,大家能否领悟出弑神技,全靠造化和天赋了,我能做的就是带领大家来到神殿的门口。愿我老去时,还有人能记起我的名字,曲终未必人散,有缘自会重逢。

受众群体:
<跟着佐大学OpenWrt开发入门培训班>带大家了解和熟悉OpenWrt的开发环境,旨在入门,针对人群是初学者、爱好者、玩家。<跟着佐大学OpenWrt开发进阶培训班>会带大家对OpenWrt系统内部有一个更深入的理解,旨在深入及实践。一期是外功,二期是内功,两者由浅入深基本上覆盖了OpenWrt的方方面面、林林总总。

授课方式:
网络授课+线上答疑:视频教学、配合QQ学员群互动答疑。视频为提前录制,非直播授课,无时间、地点要求,你可以在任意时间段内观看。配合线上的答疑,可以让你更快的进步。每周1-2次更新,教学时间为3-4个月。

费用说明:
399元人民币/人(注:在校学生凭本人有效身份证、学生证并审核通过后享受300元人民币/人的特惠价);老学员参加培训班享有39元优惠,名额限本人使用(注:学生优惠不可与此优惠叠加)。

退款说明:
付款后7日内可退款,超过7日不可退款,退款额=未录制课时数/全部课时数*399(注:课程录制完毕后,不支持退款)。

报名方法:
支付宝打款后(支付宝账号:forgotfun@qq.com 陆明峰 399元 备注:二期报名费),发送邮件到 forgotfun@qq.com ,邮件正文务必包含:QQ号、联系电话、报名费转款截图。收到邮件后,会在1-2个工作日内与你联系。

课时安排:
暂定20课时(根据报名人数和实际情况,后期会做调整)。

开课时间:
报名人数满50人后,开班。截止至2019年5月1日,未满则全额退款。

<跟着佐大学OpenWrt开发进阶培训班>教学大纲:
01.讲解无线相关的知识,频率、频宽、Country Code、工作模式(AP、AP client、WDS...)、无线模式。(1课时)
02.交叉编译工具的使用方法详解。(1课时)
03.软件移植、内核模块移植实践课。(1课时)
04.简单讲解ARP、IP、TCP、UDP协议。(1课时)
05.讲解路由器核心功能之PPPoE Client,pppd。(1课时)
06.讲解路由器核心功能之DNS Server,dnsmasq。(1课时)
07.讲解路由器核心功能之DHCP Server,dnsmasq。(1课时)
08.讲解路由器核心功能之DHCP Client,dhcpc。(1课时)
09.讲解路由器核心功能之Firewall。(1课时)
10.讲解路由器核心功能之网桥。(1课时)
11.讲解路由器核心功能之Qos。(1课时)
12.讲解路由器核心功能之路由。(1课时)
13.讲解路由器核心功能之DDNS、NTP Client、HTTP Server。(1课时)
14.讲解iptables的命令使用方法和常见应用,讲解filter表、nat表、mangle表的区别及用途。(3-4课时)
15.OpenWrt UI开发入门,基于佐大自己研发的Tomato UI作为讲解范例。(3-4课时)
16.路由器常用调试命令讲解:ifconfig、ping、traceroute、ip、route、arp、wget、telnet、tftp、nc、netstat、nslookup、dig、iw、iwconfig、iperf。(1课时)

<跟着佐大学OpenWrt开发进阶培训班>报名地址:http://forgotfun.org/2019/03/openwrt-training-2019.html

wifidog认证实现OpenWRT强制认证的WIFI热点

首先安装wifidog到OpenWRT的路由器:

  opkg update

  opkg install wifidog

wifidog依赖下面这些模块:

iptables-mod-extra

iptables-mod-ipopt

kmod-ipt-nat

iptables-mod-nat-extra

libpthread

由于trunk的固件更新会比较频繁,会导致直接opkg install wifidog安装不了,如果你凑巧又没有备份与固件对应的Packages的话,就需要到http://downloads.openwrt.org/snapshots/trunk升级固件,然后再安装wifidog。

如果你的路由器不是openwrt官方支持的版本的话,那就需要自己编译固件。make menuconfig后,在Network–>Captive Portals中选择wifidog.

安装完成后,

/etc/init.d/wifidog enable
/etc/init.d/wifidog start

这时会抛出一个错误,因为我们还没有设置AuthServer的信息。关于安装wifidog更多的信息可以参考:http://wiki.openwrt.org/doc/howto/wireless.hotspot.wifidog

下面安装Auth Server,按照官方的说法:
AuthPuppy is the next generation authentication server for Wifidog networks.
源文档 http://www.authpuppy.org/
不过貌似这wifidog和Authpuppy都已经N久没更新了。。。

AuthPutty是需要安装apache2, php5和MySQL。详细介绍在这里:http://www.authpuppy.org/doc/Getting_Started (Windows版点这里)。

安装成功后,访问AuthPuppy会要求设置一些数据库信息,全部设置完成后能看到首页:
wifidog2.jpg

当然了,我们还需要设置管理员的账号。

进入Manage plugins,Install apAuthLocalUserPlugin,记得要enable这个插件。

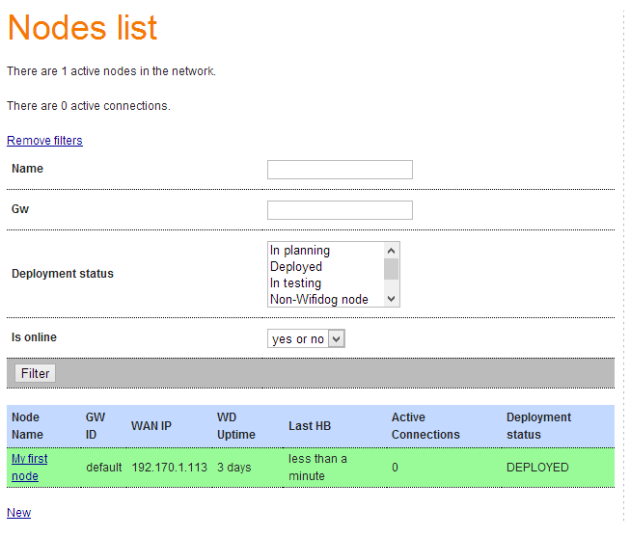
然后,点击Manage Nodes,把默认节点的status改成deployed。这个GW(Gateway) ID default后面配置wifidog.conf的时候需要使用。
wifidog4.png

到这里,AuthPuppy就基本配置完毕了。

下面回到路由器,编辑wifidog.conf,一般情况下,我们之后配置ExternalInterface,GatewayInterface和AuthServer这三项就可以,其他默认。下面是我的配置:

GatewayIDdefault           #注意这个ID必须跟AuthPuppy的GW ID一致

# Parameter: ExternalInterface

# Default: NONE

# Optional

#

# Set this to the external interface (the one going out to the Inernet or your larger LAN).

# Typically vlan1 for OpenWrt, and eth0 or ppp0 otherwise,

# Normally autodetected

ExternalInterface eth0      #路由器外网的物理接口


# Parameter: GatewayInterface

# Default: NONE

# Mandatory

#

# Set this to the internal interface (typically your wifi interface).

# Typically br-lan for OpenWrt, and eth1, wlan0, ath0, etc. otherwise

GatewayInterface wlan0      #路由器内网的物理接口

AuthServer {

    Hostname 192.170.1.104

    SSLAvailable no

    Path /

}


CheckInterval 60

ClientTimeout 5

FirewallRuleSet global {

}

FirewallRuleSet validating-users {

    FirewallRule allow to 0.0.0.0/0

}

FirewallRuleSet known-users {

    FirewallRule allow to 0.0.0.0/0

}

FirewallRuleSet unknown-users {

    FirewallRule allow udp port 53

    FirewallRule allow tcp port 53

    FirewallRule allow udp port 67

    FirewallRule allow tcp port 67

}

FirewallRuleSet locked-users {

    FirewallRule block to 0.0.0.0/0

}

注意这个Interface是物理接口。

root@OpenWrt:~# cat /etc/config/network

config interface ‘loopback’

        option ifname ‘lo’

        option proto ‘static’

        option ipaddr ‘127.0.0.1’

        option netmask ‘255.0.0.0’

config globals ‘globals’

        option ula_prefix ‘fd09:fd03:490d::/48′

config interface ‘lan’

        option proto ‘static’

        option ipaddr ‘192.168.1.1’

        option netmask ‘255.255.255.0’

        option ip6assign ’60’

        option _orig_ifname ‘eth0′

        option _orig_bridge ‘false’

config interface ‘WAN’

        option proto ‘dhcp’

        option _orig_ifname ‘gretap0′

        option _orig_bridge ‘false’

        option ifname ‘eth0′

本文章由 http://www.wifidog.pro/2015/04/07/wifidog%E8%AE%A4%E8%AF%81wifi%E7%83%AD%E7%82%B9.html 整理编辑,转载请注明出处

海蜘蛛Tomato V3.3系统编译视频教程

很久没发布Tomato固件和帖子,今天给大家奉上一篇Tomato编译的教程,后期可能会陆陆续续地上传一些技术类视频,方便大家学习。由于工作和经济压力原因,没有时间做固件,但是非常感觉大家对我的支持。
未来的一段时间,我会转到幕后做一些Tomato的视频开发教程,让更多的人加入开发队伍中来。

视频是4K录制的,高清的土豆比较模糊,请大家选择超清播放,优酷视频还在审核中,请大家耐心等待。

视频中需要用到的代码和资料

请使用Ubuntu 64位系统

http://dl.hi-spider.com/mips/GPL_Hi-spider_tomatoV3.3.tar.gz

1.设置编译环境
在Ubuntu的系统执行如下命令

sudo apt-get update
sudo apt-get install build-essential linux-headers-$(uname -r)
sudo apt-get install libncurses5 libncurses5-dev m4 bison flex libstdc++6-4.4-dev g++-4.4 g++ libtool sqlite
sudo apt-get install gcc g++ binutils patch bzip2 flex bison make gettext unzip zlib1g-dev
sudo apt-get install libc6 libncurses5-dev  automake


2.配置交叉编译工具

sudo cp -R opt/brcm 源码的位置/shibby_v3/tools/brcm /opt/brcm

vi ~/.bashrc
在最后一行处加入
if [ -d "/opt/brcm" ] ; then
    PATH=/opt/brcm/hndtools-mipsel-uclibc/bin:/opt/brcm/hndtools-mipsel-linux/bin:$PATH
fi
保存退出, 以便每次启动linux时能找到编译器.
source ~/.bashrc


find -type d -exec chmod +x {} \;

技术相关咨询和路由器定制联系:18013582125(QQ和手机是同一个)

本文章由 http://www.wifidog.pro/2015/04/03/tomato%E6%B5%B7%E8%9C%98%E8%9B%9B%E7%BC%96%E8%AF%91.html 整理编辑,转载请注明出处

wifidog源码wifidog分析用户连接

用户连接启动线程(void thread_httpd(void * args))

此段代码是当有新用户(未认证的用户)连接时创建的线程,其主要功能为

获取用户浏览器发送过来的http报头
分析http报头,分析是否包含关键路径
不包含关键路径则调用404回调函数
包含关键路径则执行关键路径回调函数(这里主要讲解"/wifidog/auth"路径)

void
thread_httpd(void *args)
{
    void **params;
    httpd *webserver;
    request *r;

    params = (void **)args;
    webserver = *params;
    r = *(params + 1);
    free(params);

    /* 获取http报文 */
    if (httpdReadRequest(webserver, r) == 0) {
        debug(LOG_DEBUG, "Processing request from %s", r->clientAddr);
        debug(LOG_DEBUG, "Calling httpdProcessRequest() for %s", r->clientAddr);
        /* 分析http报文 */
        httpdProcessRequest(webserver, r);
        debug(LOG_DEBUG, "Returned from httpdProcessRequest() for %s", r->clientAddr);
    }
    else {
        debug(LOG_DEBUG, "No valid request received from %s", r->clientAddr);
    }
    debug(LOG_DEBUG, "Closing connection with %s", r->clientAddr);
    httpdEndRequest(r);
}


/* 被thread_httpd调用 */
void httpdProcessRequest(httpd *server, request *r)
{
    char dirName[HTTP_MAX_URL],
        entryName[HTTP_MAX_URL],
        *cp;
    httpDir *dir;
    httpContent *entry;

    r->response.responseLength = 0;
    strncpy(dirName, httpdRequestPath(r), HTTP_MAX_URL);
    dirName[HTTP_MAX_URL-1]=0;
    cp = rindex(dirName, '/');
    if (cp == NULL)
    {
        printf("Invalid request path '%s'\n",dirName);
        return;
    }
    strncpy(entryName, cp + 1, HTTP_MAX_URL);
    entryName[HTTP_MAX_URL-1]=0;
    if (cp != dirName)
        *cp = 0;
    else
        *(cp+1) = 0;

     /* 获取http报文中的关键路径,在main_loop中已经设置 */
    dir = _httpd_findContentDir(server, dirName, HTTP_FALSE);
    if (dir == NULL)
    {
        /* http报文中未包含关键路径,执行404回调函数(在404回调函数中新用户被重定向到认证服务器) */
        _httpd_send404(server, r);
        _httpd_writeAccessLog(server, r);
        return;
    }
    /* 获取关键路径内容描述符 */
    entry = _httpd_findContentEntry(r, dir, entryName);
    if (entry == NULL)
    {
        _httpd_send404(server, r);
        _httpd_writeAccessLog(server, r);
        return;
    }
    if (entry->preload)
    {
        if ((entry->preload)(server) < 0)
        {
            _httpd_writeAccessLog(server, r);
            return;
        }
    }
    switch(entry->type)
    {
        case HTTP_C_FUNCT:
        case HTTP_C_WILDCARD:
            /* 如果是被认证服务器重定向到网关的用户,此处的关键路径为"/wifidog/auth",并执行回调函数 */
            (entry->function)(server, r);
            break;

        case HTTP_STATIC:
            _httpd_sendStatic(server, r, entry->data);
            break;

        case HTTP_FILE:
            _httpd_sendFile(server, r, entry->path);
            break;

        case HTTP_WILDCARD:
            if (_httpd_sendDirectoryEntry(server, r, entry,
                        entryName)<0)
            {
                _httpd_send404(server, r);
            }
            break;
    }
    _httpd_writeAccessLog(server, r);
}

本文章由 http://www.wifidog.pro/2015/04/02/wifidog%E6%BA%90%E7%A0%81wifidog%E5%88%86%E6%9E%90.html 整理编辑,转载请注明出处