佐须之男 发布的文章

wifidog web界面

OpenWrt Web界面修改及功能实现实例说明
通过上篇文章的介绍,我们应该了解了Lua语言在OpenWrt Web配置页面的基本对应功能设计方法。本文将以一个页面为例,来说明Lua语言如何实现页面控件以及怎么使输入或操作的选项在系统中生效。

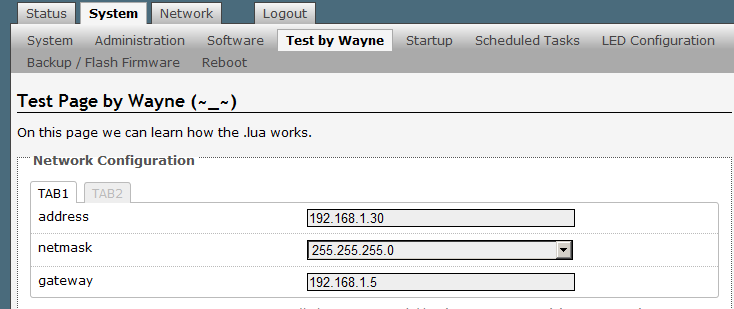
页面如图所示:
1.png

首先,我们要在System栏下建立分页"Test by Wayne",使用cbi模块实现,修改目录lua\luci\controller\admin下的system.lua文件。

在function index()中添加语句:

entry({"admin", "system", "test"}, cbi("admin_system/test"), "Test by Wayne", 30).dependent=false

接下来就需要在lua\luci\model\cbi\admin_system中创建test.lua文件并完成控件元素编辑。

上一篇文章中已经说过,所有的控件都由Map开始,在这里我测试的是网络设置,语句如下:

m = Map("network", translate("Test Page by Wayne (~_~)"), translate("On this page we can learn how the .lua works."))

然后需要创建分块”Network Configuration”。创建section之前,需要在etc/config目录下的network文件中添加一个配置,就取名叫netset吧,network文件如下:

config 'interface' 'loopback'
        option 'ifname' 'lo'
        option 'proto' 'static'
                   ……
config 'interface' 'lan'
        option 'ifname' 'eth0'
        option 'type' 'bridge'
        option 'proto' 'static'
                   ……
config 'netset'

修改好配置文件后,使用如下语句创建section:

s = m:section(TypedSection, "netset", translate("Network Configuration"))

第一个控件”address”属于cbi类型的Value类型,并且定义输入类型为ip4addr,实现如下:

ipaddr1 = s:taboption("wan1", Value, "ipaddr1", translate("address"))
ipaddr1.datatype = "ip4addr"

控件”netmask”在这里其实是ListValue的效果,但是此处为了拥有custom自定义的选项,设置的类型为Value,实现如下:

netmask1 = s:taboption("wan1", Value, "netmask1", translate("netmask"))
netmask1.datatype = "ip4addr"
netmask1:value("255.255.255.0")
netmask1:value("255.255.0.0")
netmask1:value("255.0.0.0")

2.png

到这里,控件都已经可以添加并显示了,剩下的工作就是输入的值如IP地址和网关信息怎么获取生效了。

在进行编辑Save & Apply后,再打开etc/config/network文件,发现文件内容如下:

config 'interface' 'loopback'
        option 'ifname' 'lo'
        option 'proto' 'static'
                   ……
config 'interface' 'lan'
        option 'ifname' 'eth0'
        option 'type' 'bridge'
        option 'proto' 'static'
                   ……
config 'netset'
        option 'ipaddr1' '192.168.1.30'
        option 'netmask1' '255.255.255.0'
        option 'gateway1' '192.168.1.5'

即所操作的内容都在配置文件中自动保存,而配置文件中的值获取方式就很多了,我们可以使用uci命令得到。

Usage: uci [<options>] <command> [<arguments>]

Commands:
        batch
        export     [<config>]
        import     [<config>]
        changes    [<config>]
        commit     [<config>]
        add        <config> <section-type>
        add_list   <config>.<section>.<option>=<string>
        show       [<config>[.<section>[.<option>]]]
        get        <config>.<section>[.<option>]
        set        <config>.<section>[.<option>]=<value>
        delete     <config>[.<section[.<option>]]
        rename     <config>.<section>[.<option>]=<name>
        revert     <config>[.<section>[.<option>]]
        reorder    <config>.<section>=<position>

这样,一个页面的定制和功能的实现过程就完成了。

作者:Wayne
出处:http://www.cnblogs.com/dwayne/
本文版权归作者和博客园共有,欢迎转载,但未经作者同意请保留此段声明,且在文章页面明显位置给出原文链接。

本文章由 http://www.wifidog.pro/2015/01/05/wifidog-web.html 整理编辑,转载请注明出处

wifidog固件更新

刷入openwrt固件和首次使用
将OpenWrt刷入路由器
  要在路由器上使用OpenWrt,首先要将路由器固件刷新为OpenWrt,即相当于OpenWrt 系统的安装,不同型号的路由器的安装方法可能也会不一样,但一般常用的有三种方法:
  1.Web上传固件更新(就是路由器设置或管理界面的那个固件更新)
  2.PFTP上传固件更新(最简单的就是HFS了)
  3.编程器写入固件(编程器固件不同于上述两种固件)
  具体型号的路由器适用于哪种或哪几种方法,需自行尝试。
  开始使用OpenWrt
  要对OpenWrt进行配置,一般有两条途径:
  1.SSH登录通过命令行控制
  2.Web登录通过Web界面设置
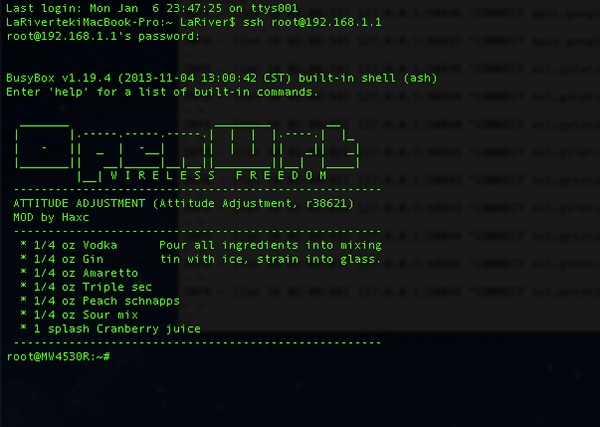
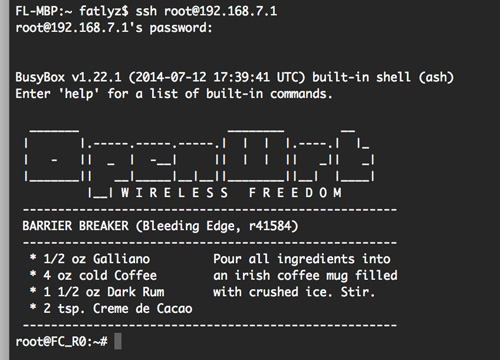
  首次安装OpenWrt后,需要设置密码才可以使用SSH登录,方法是使用telnet登录或者Web登录设置密码。在Windows下面telnet和SSH登录可以使用Putty,在Linux或Mac下可分别使用如下命令:

ssh –l root 192.168.1.1 //Linux
ssh –l root@192.168.1.1 //Mac

1.jpg

一般指令与常见Linux发行版相同,但是OpenWrt使用自己的包管理器:opkg,使用“opkg –help”查看帮助信息。以下是一些常用操作命令:

opkg update //更新软件包列表
opkg install  //在线安装软件包
opkg remove  //移除软件包

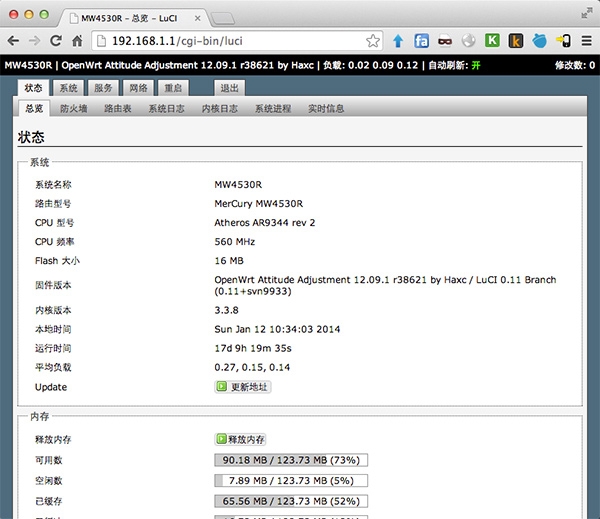
登录Web管理界面,前提是该OpenWrt系统中要安装了Web界面,一般是Luci,登录方式与普通路由器无异,打开浏览器,输入路由器IP即可进入登录界面,OpenWrt的默认IP是192.168.1.1。
2.jpg

到此,OpenWrt的大门已为你敞开。接下来,开始尝试利用OpenWrt实现更多智能应用吧。

本文章由 http://www.wifidog.pro/2015/01/05/wifidog%E5%9B%BA%E4%BB%B6.html 整理编辑,转载请注明出处

wifidog 配置

OpenWRT 路由配置技巧

随着最近 Google 在国内已经完全无法访问,使得通过 VPN 访问网络的需求更加强烈,本文介绍的方法可以使一个普通的路由具备稳定连接 VPN 的能力,并能够根据目标访问网站选择国内外线路,从而得到一个既没有限制,也不会影响速度的 Wifi 环境,连接到这个网络的设备不需要任何配置即可安全上网,完全感觉不到任何不便。

chnroutes 路由表

这个路由表集中了所有分配到中国大陆的 IP 段,根据 http://ftp.apnic.net/apnic/stats/apnic/delegated-apnic-latest 每天自动更新,可使得在访问国内地址时不经过 VPN。

想想如果能够让家里的路由直接连接 VPN,在家连接 WiFi 的所有设备直接达到Fan墙的效果,应该很 Cool,所以最近在某宝整了一个 Netgear WNDR3800 二手路由回来,先后分别在 DD-WRT 和 OpenWRT 成功配置 VPN + chnroutes,最后还是选择了 OpenWRT。

DD-WRT vs OpenWRT

关于 DD-WRT 和 OpenWRT,我选择 OpenWRT 主要因为 DD-WRT ROM 中集成的软件太多,绝大多数用不到,要配置 jffs2 来保存脚本文件,一般配置则保存在nvram中,而且无线较不稳定,5G频段常搜索不到(当然可能是我这个路由器型号的支持问题)。OpenWRT 的配置文件语法统一,配置都存储在文件系统中,且 ROM 本身仅集成了必备组件,非常小,可以只安装需要的东西,WEB管理界面也是可选安装,简洁强大,经过若干天的使用一直比较稳定。

配置

已配置好 OpenWRT 上网的童鞋们可以直接跳过 1.刷 ROM 和 2.初始配置

  1. 刷 ROM
    a.首先确定你的设备可以被 OpenWRT 所支持(到这里查看支持的设备列表:http://wiki.openwrt.org/toh/start),然后到这里下载编译好的 ROM:http://downloads.openwrt.org/ 。最新的 stable 版本是 attitude_adjustment(12.09),我下载的是 trunk 版本。
    b.在 OpenWRT 官网找相应设备的 Wiki 页面查看刷机方法,一般都是在路由器官方Web固件升级页面直接刷入(我的 WNDR3800 Wiki页面是:http://wiki.openwrt.org/toh/netgear/wndr3800

2.初始配置
a.路由器启动后,有的型号没有安装 Wifi 模块,需要先用网线连接到 LAN 口,本机 IP 配置为静态 192.168.1.x,然后 telnet 到 192.168.1.1,更改 root 密码,然后 ssh 连入,参考:http://wiki.openwrt.org/doc/start#configuring.openwrt
1.jpg

b.配置 WAN 口,让路由连上 Internet,参考:http://wiki.openwrt.org/doc/howto/internet.connection

比如要配置 PPPoE:

uci set network.wan.proto=pppoe
uci set network.wan.username='yougotthisfromyour@isp.su'
uci set network.wan.password='yourpassword'
uci commit network
ifup wan

c.安装 LuCI Web 管理界面并设置开机自动启动,参考:http://wiki.openwrt.org/doc/howto/luci.essentials

opkg update
opkg install luci
/etc/init.d/uhttpd start
/etc/init.d/uhttpd enable

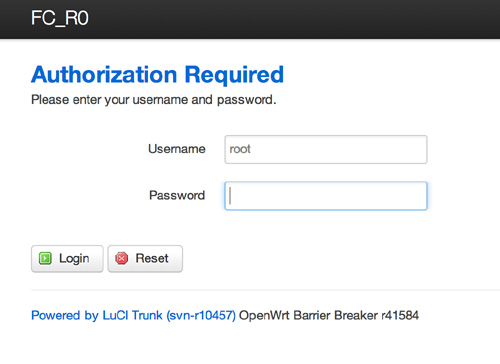
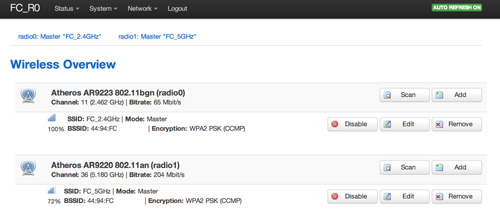
d.浏览器输入路由器 LAN 侧 IP(多为192.168.1.1),进行 Wifi 等配置
2.jpg

3.jpg

3.配置 DNS
a.创建 /etc/config/sec_resolv.conf

vim /etc/config/sec_resolv.conf

填入以下 DNS Servers:

nameserver 8.8.8.8
nameserver 8.8.4.4
nameserver 208.67.222.222

b.编辑 /etc/config/dhcp

vim /etc/config/dhcp

找到 option resolvfile 选项,替换为:

option resolvfile '/etc/config/sec_resolv.conf'

4.配置 PPTP
a.安装 ppp-mod-pptp

opkg updateopkg install ppp-mod-pptp

如果需要 LuCI 支持(推荐):

opkg install luci-proto-ppp

b.配置 vpn 接口,编辑 /etc/config/network 文件,应该已经有以下内容(如果没有,需要插入),并配置里面的 server、username 和 password:

config 'interface' 'vpn' 
        option 'ifname'    'pptp-vpn'  
        option 'proto'     'pptp'
        option 'username'  'vpnusername'
        option 'password'  'vpnpassword'
        option 'server'    'vpn.example.org or ipaddress' 
        option 'buffering' '1' 

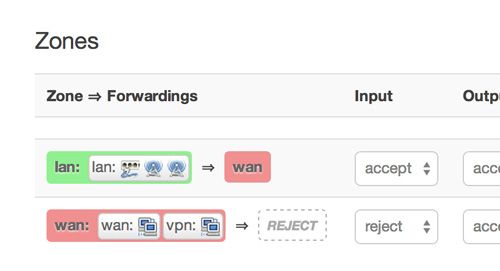
c.进入 Network -> Firewall ,把 vpn 加入 wan zone,效果如图:
4.jpg

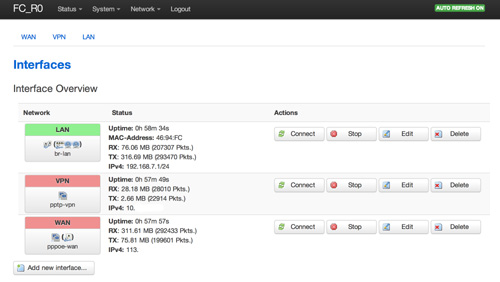
d.进入 Network -> Interfaces ,此时应该已经可以看到 VPN Interface 并可以连接,效果如图:
5.jpg

e.此时在本机 traceroute www.google.com,应该能得到类似以下的结果:

FL-MBP:~ fatlyz$ traceroute www.google.com 
traceroute: Warning: www.google.com has multiple addresses; using 74.125.239.113 
traceroute to www.google.com (74.125.239.113), 64 hops max, 52 byte packets
 1  fc_r0.lan (192.168.7.1)  2.266 ms  0.999 ms  0.946 ms
 2  10.7.0.1 (10.7.0.1)  189.259 ms  187.813 ms  188.368 ms
 3  23.92.24.2 (23.92.24.2)  189.847 ms  190.489 ms  188.939 ms
 4  10ge7-6.core3.fmt2.he.net (65.49.10.217)  188.508 ms  192.216 ms  202.863 ms
 5  10ge10-1.core1.sjc2.he.net (184.105.222.14)  195.695 ms  195.691 ms  284.242 ms
 6  72.14.219.161 (72.14.219.161)  189.196 ms  192.287 ms  193.220 ms
 7  216.239.49.170 (216.239.49.170)  192.496 ms  188.547 ms  189.881 ms
 8  66.249.95.29 (66.249.95.29)  190.125 ms  190.335 ms  190.026 ms
 9  nuq05s01-in-f17.1e100.net (74.125.239.113)  189.804 ms  190.556 ms  190.242 ms

可以看出,其中第二跳是 VPN 的网关,而 traceroute www.baidu.com 的话第二跳应该也是同样的结果。

这时已经可以访问 Google, Baidu 等国内外的站点了。

5.配置 chnroutes
a.到 chnroutes 项目的下载页面:http://chnroutes-dl.appspot.com/ 下载 linux.zip,解压

b.把 ip-pre-up 重命名为 chnroutes.sh,打开编辑,在 if [ ! -e /tmp/vpn_oldgw ]; then 前插入以下代码,以避免 ppp 连接脚本重复执行导致重复添加路由表项:

if [ $OLDGW == 'x.x.x.x' ]; then    exit 0
fi

其中 x.x.x.x 是 VPN 的网关,可以先本机连接上去之后查看一下网关地址。

c.ssh 连接到路由器,执行以下命令:

cd /etc/config/
mkdir pptp-vpn
cd pptp-vpn
vim chnroutes.sh

在 vim 中把编辑好的 chnroutes.sh 粘贴进去(当然也可以通过 ssh 直接把 chnroutes.sh 文件传过去,或者上传到某个地方再 wget 下载)

执行以下命令,设置权限为可执行:

chmod a+x chnroutes.sh

d.用 vim 编辑 /lib/netifd/ppp-up 文件:

vim /lib/netifd/ppp-up

在 [ -d /etc/ppp/ip-up.d ] && { 这一行前插入以下内容,确保 ppp 连接脚本能够被执行:

sh /etc/config/pptp-vpn/chnroutes.sh

e.重启路由,启动好之后,进入 LuCI 查看接口状态,等 WAN 和 VPN 都连接成功后,ssh进去,执行 route -n | head -n 10 ,效果应该类似这样:

root@FC_R0:/etc/config# route -n | head -n 10 
Kernel IP routing table 
Destination     Gateway         Genmask         Flags Metric Ref    Use Iface 
0.0.0.0         10.7.0.1      0.0.0.0         UG    0      0        0 pptp-vpn 
1.0.1.0         58.111.43.1   255.255.255.0   UG    0      0        0 pppoe-wan 
1.0.2.0         58.111.43.1   255.255.254.0   UG    0      0        0 pppoe-wan 
1.0.8.0         58.111.43.1   255.255.248.0   UG    0      0        0 pppoe-wan 
1.0.32.0        58.111.43.1   255.255.224.0   UG    0      0        0 pppoe-wan 
1.1.0.0         58.111.43.1   255.255.255.0   UG    0      0        0 pppoe-wan 
1.1.2.0         58.111.43.1   255.255.254.0   UG    0      0        0 pppoe-wan 
1.1.4.0         58.111.43.1   255.255.252.0   UG    0      0        0 pppoe-wan

其中 Destination 为 0.0.0.0 的是默认路由,网关为 VPN 网关,意味着默认流量都经过 VPN,而以下的条目则把目的为国内的网段都指向了 ISP 提供的网关。

至此 PPTP VPN 和 chnroutes 已经配置完毕。
6.配置 VPN 断线自动重连
a.创建 /etc/config/pptp-vpn/status-check.sh:

vim /etc/config/pptp-vpn/status-check.sh

在 vim 中粘贴以下内容(此脚本检测 VPN 连接状态,并在断线后会断开 WAN 和 VPN 接口,10秒后重新连接 WAN,并在 30 秒后重连 VPN):

#!/bin/sh
if [ -f "/tmp/vpn_status_check.lock" ]
then
        exit 0
fi
VPN_CONN=`ifconfig | grep pptp-vpn`
if [ -z "$VPN_CONN" ]
then
        touch /tmp/vpn_status_check.lock
        echo WAN_VPN_RECONNECT at: >> /tmp/vpn_status_check_reconn.log
        date >> /tmp/vpn_status_check_reconn.log
        ifdown vpn
        ifdown wan
        sleep 10
        ifup wan
        sleep 30
        ifdown vpn
        sleep 10
        ifup vpn
        sleep 40
        rm /tmp/vpn_status_check.lock
else
        date > /tmp/vpn_status_check.log
fi

执行以下命令,设置权限为可执行:

chmod a+x /etc/config/pptp-vpn/status-check.sh

b.进入LuCI 的 System -> Scheduled Tasks 填入以下内容,并保存:

*/1 * * * * /etc/config/pptp-vpn/status-check.sh

以上实际上是编辑了 cron 配置,cron 每分钟运行检测 / 重连脚本,重启 cron:

/etc/init.d/cron restart

c.静待几分钟,查看 /tmp 目录,应该能看到 vpn_oldgw 和 vpn_status_check.log 文件,查看 vpn_status_check.log 文件,可以看到最近一次检测 VPN 连接状态的时间。

root@FC_R0:/tmp# ls vpn*
vpn_oldgw             vpn_status_check.log
root@FC_R0:/tmp# cat vpn_status_check.log 
Tue Jul 15 00:04:02 HKT 2014
root@FC_R0:/tmp# 

你可以在 LuCI 中断开 VPN 接口,在接下来的4-5分钟,观察 WAN 和 VPN 的重连情况。

d.分别 traceroute www.google.com 和 www.baidu.com ,观察第二跳的地址:

FL-MBP:~ fatlyz$ traceroute www.google.com | head -n 3
traceroute: Warning: www.google.com has multiple addresses; using 74.125.239.115
traceroute to www.google.com (74.125.239.115), 64 hops max, 52 byte packets
 1  fc_r0.lan (192.168.7.1)  2.161 ms  0.912 ms  0.895 ms
 2  10.7.0.1 (10.7.0.1)  193.747 ms  187.789 ms  289.744 ms
 3  23.92.24.2 (23.92.24.2)  259.323 ms  354.625 ms  408.535 ms

FL-MBP:~ fatlyz$ traceroute www.baidu.com | head -n 3
traceroute to www.a.shifen.com (180.76.3.151), 64 hops max, 52 byte packets
 1  fc_r0.lan (192.168.7.1)  1.190 ms  0.984 ms  0.731 ms
 2  58.111.43.1 (58.111.43.1)  20.616 ms  38.822 ms  18.484 ms
 3  183.56.35.133 (183.56.35.133)  20.056 ms  52.353 ms  87.841 ms

可以看出,已成功对国内外的目标地址进行了路由选择。

至此,OpenWRT 路由的基本配置、PPTP VPN、chnroutes 和自动重连已经配置完成。

本文章由 http://www.wifidog.pro/2015/01/05/wifidog%E9%85%8D%E7%BD%AE.html 整理编辑,转载请注明出处

wifidog OpenWrt luci页面

OpenWrt luci添加上传下载及网络摄像头功能。
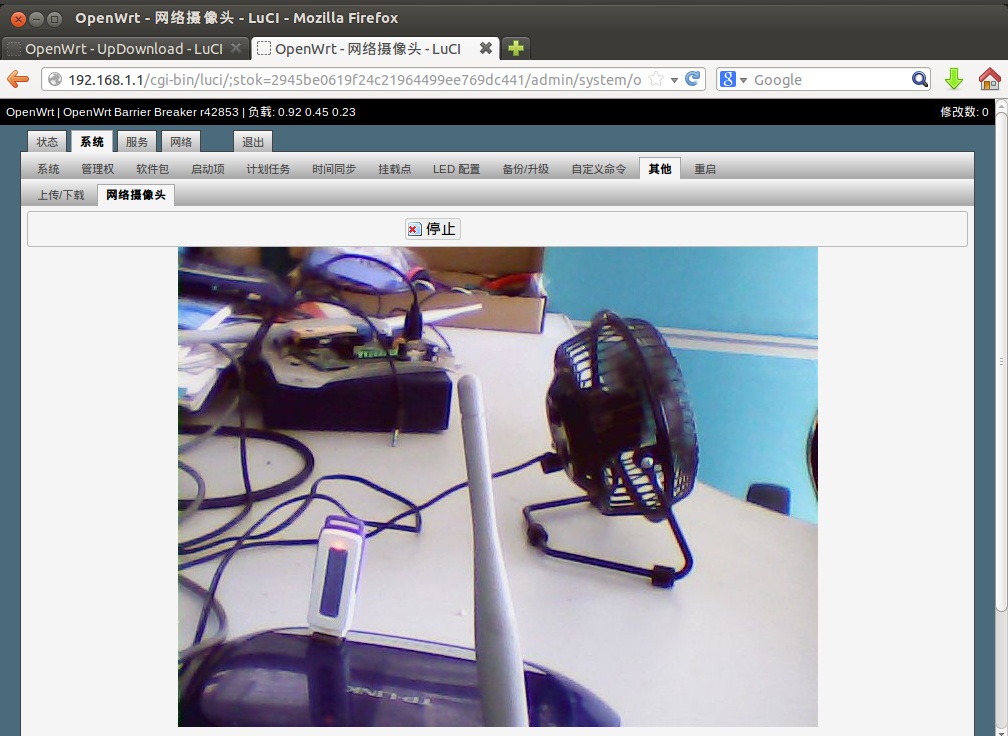
花了几天时间给OpenWrt弄了个上传下载及网络摄像头功能。对lua及luci不熟,时间花的有点多。此软件包是纯luci应用,可以安装在任意平台,网络摄像头要依赖mjpg-streamer。效果图如下:
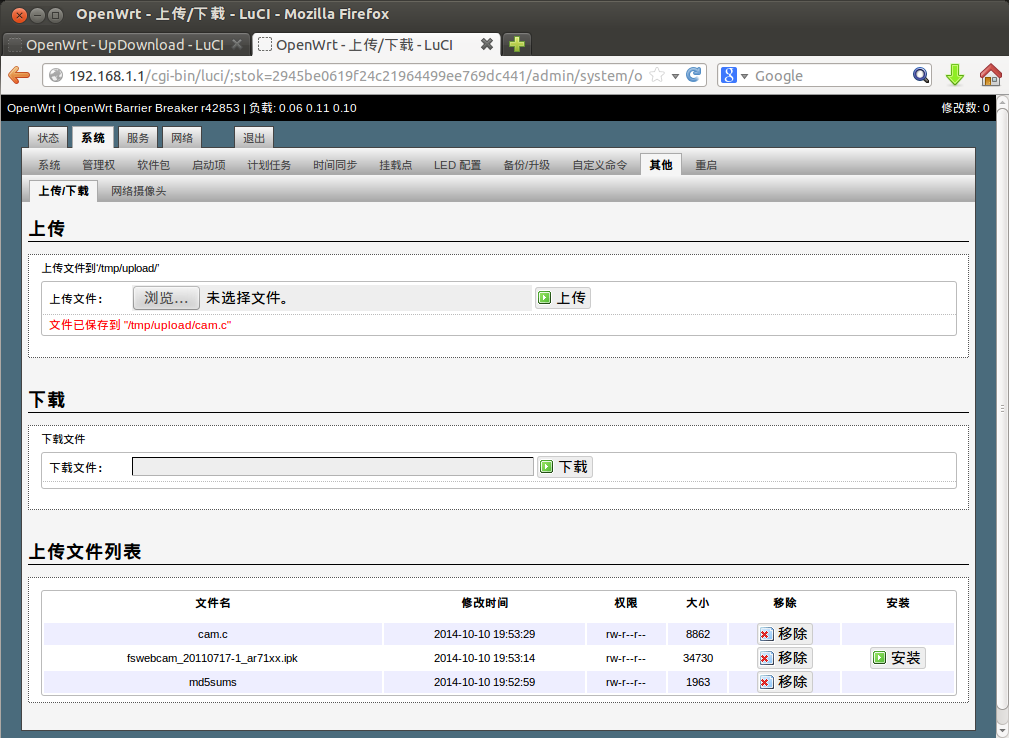
1.png

2.jpg

主要源码如下:

controller/updownload.lua文件:

--[[
Other module
Description: File upload / download, web camera
Author: yuleniwo  xzm2@qq.com  QQ:529698939
]]--

module("luci.controller.other", package.seeall)

function index()
    local page = entry({"admin", "system", "other"}, alias("admin", "system", "other", "updownload"), _("Other"), 89)
    entry({"admin", "system", "other", "updownload"}, form("updownload"), _("Upload / Download"))
    if nixio.fs.access("/etc/config/mjpg-streamer") then
        entry({"admin", "system", "other", "webcam"}, call("Webcam"), _("Web Camera"))
    end
    page.i18n = "other"
    page.dependent = true
end

local translate = luci.i18n.translate
local http = luci.http

function Webcam()
    local iframe = '<iframe src="http://%s:%s@%s:%s" frameborder="no" border="0" width="800" height="600" marginwidth="0" marginheight="0" allowtransparency="yes"></iframe>'
    local html, msg, status
    local act = http.formvalue("act")
    if act then
        if act == "start" then
            luci.sys.call("/etc/init.d/mjpg-streamer start")
        elseif act == "stop" then
            luci.sys.call("/etc/init.d/mjpg-streamer stop")
            luci.sys.call("sleep 1")
        end
    end
    local v = nixio.fs.glob("/dev/video[0-9]")()
    if v then
        if luci.sys.call("pidof mjpg_streamer > /dev/null") == 0 then
            local uci, user, pwd, ip, port
            uci = require "luci.model.uci".cursor()
            user = uci:get("mjpg-streamer", "core", "username")
            pwd = uci:get("mjpg-streamer", "core", "password")
            ip = uci:get("network", "lan", "ipaddr")
            port = uci:get("mjpg-streamer", "core", "port")
            html = string.format(iframe, user, pwd, ip, port)
            status = true
        else
            status = false
            msg = translate("Service 'mjpg_streamer' not started.")
        end
    else
        msg = translate("Video device not found.")
    end
    luci.template.render("webcam", {html = html, msg = msg, status = status})
end

model/cbi/updownload.lua文件:

local fs = require "luci.fs"
local http = luci.http

ful = SimpleForm("upload", translate("Upload"), nil)
ful.reset = false
ful.submit = false

sul = ful:section(SimpleSection, "", translate("Upload file to '/tmp/upload/'"))
fu = sul:option(FileUpload, "")
fu.template = "cbi/other_upload"
um = sul:option(DummyValue, "", nil)
um.template = "cbi/other_dvalue"

fdl = SimpleForm("download", translate("Download"), nil)
fdl.reset = false
fdl.submit = false
sdl = fdl:section(SimpleSection, "", translate("Download file"))
fd = sdl:option(FileUpload, "")
fd.template = "cbi/other_download"
dm = sdl:option(DummyValue, "", nil)
dm.template = "cbi/other_dvalue"

function Download()
    local sPath, sFile, fd, block
    sPath = http.formvalue("dlfile")
    sFile = nixio.fs.basename(sPath)
    if luci.fs.isdirectory(sPath) then
        fd = io.popen('tar -C "%s" -cz .' % {sPath}, "r")
        sFile = sFile .. ".tar.gz"
    else
        fd = nixio.open(sPath, "r")
    end
    if not fd then
        dm.value = translate("Couldn't open file: ") .. sPath
        return
    end
    dm.value = nil
    http.header('Content-Disposition', 'attachment; filename="%s"' % {sFile})
    http.prepare_content("application/octet-stream")
    while true do
        block = fd:read(nixio.const.buffersize)
        if (not block) or (#block ==0) then
            break
        else
            http.write(block)
        end
    end
    fd:close()
    http.close()
end

local dir, fd
dir = "/tmp/upload/"
nixio.fs.mkdir(dir)
http.setfilehandler(
    function(meta, chunk, eof)
        if not fd then
            if not meta then return end
            fd = nixio.open(dir .. meta.file, "w")
            if not fd then
                um.value = translate("Create upload file error.")
                return
            end
        end
        if chunk and fd then
            fd:write(chunk)
        end
        if eof and fd then
            fd:close()
            fd = nil
            um.value = translate("File saved to") .. ' "/tmp/upload/' .. meta.file .. '"'
        end
    end
)

if luci.http.formvalue("upload") then
    local f = luci.http.formvalue("ulfile")
    if #f <= 0 then
        um.value = translate("No specify upload file.")
    end
elseif luci.http.formvalue("download") then
    Download()
end

local inits, attr = {}
for i, f in ipairs(fs.glob("/tmp/upload/*")) do
    attr = fs.stat(f)
    if attr then
        inits[i] = {}
        inits[i].name = fs.basename(f)
        inits[i].mtime = os.date("%Y-%m-%d %H:%M:%S", attr.mtime)
        inits[i].modestr = attr.modestr
        inits[i].size = tostring(attr.size)
        inits[i].remove = 0
        inits[i].install = false
    end
end

form = SimpleForm("filelist", translate("Upload file list"), nil)
form.reset = false
form.submit = false

tb = form:section(Table, inits)
nm = tb:option(DummyValue, "name", translate("File name"))
mt = tb:option(DummyValue, "mtime", translate("Modify time"))
ms = tb:option(DummyValue, "modestr", translate("Mode string"))
sz = tb:option(DummyValue, "size", translate("Size"))
btnrm = tb:option(Button, "remove", translate("Remove"))
btnrm.render = function(self, section, scope)
    self.inputstyle = "remove"
    Button.render(self, section, scope)
end

btnrm.write = function(self, section)
    local v = luci.fs.unlink("/tmp/upload/" .. luci.fs.basename(inits[section].name))
    if v then table.remove(inits, section) end
    return v
end

function IsIpkFile(name)
    name = name or ""
    local ext = string.lower(string.sub(name, -4, -1))
    return ext == ".ipk"
end

btnis = tb:option(Button, "install", translate("Install"))
btnis.template = "cbi/other_button"
btnis.render = function(self, section, scope)
    if not inits[section] then return false end
    if IsIpkFile(inits[section].name) then
        scope.display = ""
    else
        scope.display = "none"
    end
    self.inputstyle = "apply"
    Button.render(self, section, scope)
end

btnis.write = function(self, section)
    local r = luci.sys.exec(string.format('opkg --force-depends install "/tmp/upload/%s"', inits[section].name))
    form.description = string.format('<span style="color: red">%s</span>', r)
end

return ful, fdl, form

view/cbi/other_button.htm文件:

<%+cbi/valueheader%>
    <% if self:cfgvalue(section) ~= false then %>
        <input class="cbi-button cbi-input-<%=self.inputstyle or "button" %>" style="display: <%= display %>" type="submit"<%= attr("name", cbid) .. attr("id", cbid) .. attr("value", self.inputtitle or self.title)%> />
    <% else %>
        -
    <% end %>
<%+cbi/valuefooter%>

view/cbi/other_dvalue.htm文件:

<%+cbi/valueheader%>
<span style="color: red">
<%
    local val = self:cfgvalue(section) or self.default or ""
    write(pcdata(val))
%>
</span>
<%+cbi/valuefooter%>

view/cbi/other_upload.htm文件:

<%+cbi/valueheader%>
    <label class="cbi-value" style="display:inline-block; width: 80px" for="ulfile"><%:Upload file:%></label>
    <input class="cbi-input-file" style="width: 400px" type="file" id="ulfile" name="ulfile" />
    <input type="submit" class="cbi-button cbi-input-apply" name="upload" value="<%:Upload%>" />
<%+cbi/valuefooter%>

view/cbi/other_download.htm文件:

<%+cbi/valueheader%>
    <label class="cbi-value" style="display:inline-block; width: 80px" for="dlfile"><%:Download file:%></label>
    <input class="cbi-input-file" style="width: 400px" type="text" id="dlfile" name="dlfile" />
    <input type="submit" class="cbi-button cbi-input-apply" name="download" value="<%:Download%>" />
<%+cbi/valuefooter%>

view/webcam.htm文件:

<%+header%>
<div class="cbi-section-error"<% if not msg then %> style="display:none"<% end %>><%=msg%></div>
<form method="post" action="<%=REQUEST_URI%>"<%if status == nil then %> style="display:none"<% end %>>
    <div class="cbi-section-node">
        <div class="cbi-value cbi-value-last">
            <input type="hidden" name="act" value="<% if status then write('stop') else write('start') end %>" />
            <div class="cbi-value-field">
                <input class="cbi-button cbi-input-<% if status then write('remove') else write('apply') end %>" type="submit" value="<% if status then write(translate('Stop')) else write(translate('Start')) end %>" />
            </div>
        </div>
    </div>
</form>
<div style="text-align: center">
    <% if html then write(html) end %>
</div>
<%+footer%>

为了使添加的软件包能在openwrt源码make menuconfig时识别出来,需要在./feeds/luci/contrib/package/luci/Makefile增加如下语句:

$(eval $(call application,other,luci my other application))

软件包下载地址:luci-app-other_0.12.ipk

完整源码下载地址:luci-other_src.tar.gz

本文章由 http://www.wifidog.pro/2015/01/04/wifidog-luci.html 整理编辑,转载请注明出处