wifidog 整体代码分析
Wifidog将ping协议作为心跳机制向认证服务器发送当前状态信息,过程如下:
Ping线程的创建
/* Start heartbeat thread */
result =pthread_create(&tid_ping, NULL, (void *)thread_ping, NULL);
if (result != 0) {
    debug(LOG_ERR, "FATAL: Failed tocreate a new thread (ping) - exiting");

    termination_handler(0);

}

pthread_detach(tid_ping);
上面的过程创建子线程后,将该子线程的状态设置为detached,则该线程运行结束后会自动释放所有资源。并且是非阻塞的。
Thread_ping实现:
void
thread_ping(void *arg)
{
       pthread_cond_t             cond = PTHREAD_COND_INITIALIZER;
       pthread_mutex_t           cond_mutex =PTHREAD_MUTEX_INITIALIZER;
       struct      timespec  timeout;

       while (1) {
              /* Make sure wecheck the servers at the very begining */
              debug(LOG_DEBUG,"Running ping()");
              ping();

              /* Sleep for config.checkinterval seconds... */

              timeout.tv_sec= time(NULL) + config_get_config()->checkinterval;

              timeout.tv_nsec= 0;

              /*Mutex must be locked for pthread_cond_timedwait... */

              pthread_mutex_lock(&cond_mutex);

              /*Thread safe "sleep" */

              pthread_cond_timedwait(&cond,&cond_mutex, &timeout);

              /*No longer needs to be locked */

              pthread_mutex_unlock(&cond_mutex);

       }
}
红色部分为非常优雅的线程休眠,想下为什么不用sleep?用sleep会导致整个进程陷入休眠,不建议使用。
ping的过程:
a. 连接auth服务器
获取auth服务器的个数,wifidog支持备用auth服务器
进行auth服务器尝试计数
进行dns解析、会尝试按顺序对每个auth服务器进行解析,直到解析成功。
dns解析失败,则尝试对www.google.com、"www.yahoo.com"、进行解析,如果解析成功代表网络时通的,如果失败则代表网络不通,直接退出。网络是通的则会进行下一个auth服务器解析
dns解析成功,将auth服务器ip地址记录到auth_server->last_ip中,并进行socket连接
b. 获取本机设备的uptime(系统总运行时间与系统空闲时间)、meminfo、loadavg()信息
/*
loadavg
监控CPU的平均负载、这里的平均负载也就是可运行的进程的平均数
cat /proc/loadavg
前三个值分别对应系统在5分钟、10分钟、15分钟内的平均负载
第四个值的分子是正在运行的进程数,分母是进程总数,最后一个是最近运行的进程ID号
*/
c. 进行请求数据填充,格式如下:
snprintf(request,sizeof(request) - 1,                         "GET%s%sgw_id=%s&sys_uptime=%lu&sys_memfree=%u&sys_load=%.2f&wifidog_uptime=%luHTTP/1.0\r\n"
                     "User-Agent:WiFiDog %s\r\n"
                     "Host:%s\r\n"
                     "\r\n",
                     auth_server->authserv_path,
                     auth_server->authserv_ping_script_path_fragment,
                     config_get_config()->gw_id,
                     sys_uptime,
                     sys_memfree,
                     sys_load,
                         (longunsigned int)((long unsigned int)time(NULL) - (long unsigned int)started_time),
                     VERSION,
                     auth_server->authserv_hostname);
Auth服务器在收到‘ping’包后只需要回复PONG字符串即可,这有点像supplicant的回复。
但即使这个过程有问题,也不妨碍wifidog重定向的使用,貌似这个模块的功能仅仅是把设备的状态发送给auth服务器。
流量控制
线程的创建:
/*Start clean up thread */
result= pthread_create(&tid_fw_counter, NULL, (void *)thread_client_timeout_check,NULL);
if(result != 0) {
   debug(LOG_ERR, "FATAL: Failed tocreate a new thread (fw_counter) - exiting");

   termination_handler(0);
}
pthread_detach(tid_fw_counter);
这地方和上面讲解的一样,不在重复。
主要函数:fw_sync_with_authserver,改函数的流程如下:
a. 调用iptables_fw_counters_update更新所有client的流程出入统计(利用iptable规则)
b. 遍历clinet list,该list是之前所有登入过的客户端
c. 如果有auth server,将每个client的ip、mac、token、incoming、outgoing发给auth server
d. 进行客户端流量更新超时检测,检测的规则如下:
p1->counters.last_updated+(config->checkinterval * config->clienttimeout)<= current_time
如果满足上面规则,则认为该client是不活动用户,会在iptable规则中删除该用户,清除在client list的记录,并通知auth server 该client REQUEST_TYPE_LOGOUT。
e. 如果上面一些条件不满足,则依据authresponse.authcode返回值进行处理
case AUTH_DENIED:
在iptable规则中删除该用户,清除在client list的记录
case AUTH_VALIDATION_FAILED:
验证超时,在iptable规则中删除该用户,清除在client list的记录
case AUTH_ALLOWED:
将改client fw_connection_state 置为FW_MARK_KNOWN,并将改client添加到允许上网的规则当中
case AUTH_VALIDATION:
不做任何事
case AUTH_ERROR:
不做任何事
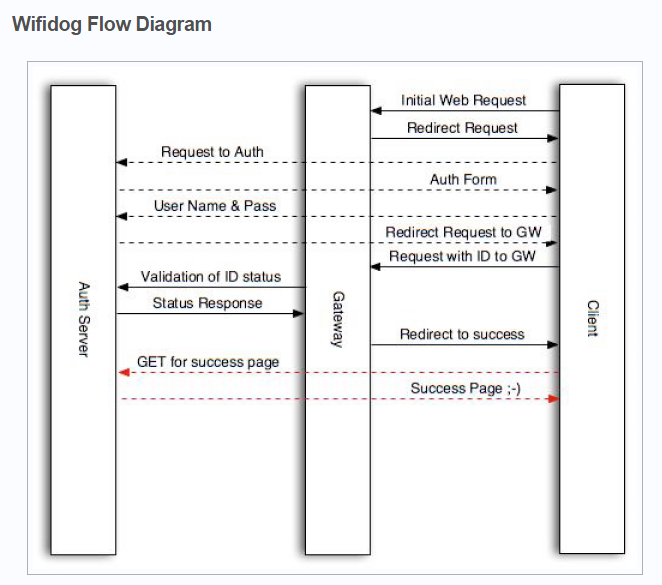
认证流程

用户连接WIFI会跳转到以下地址:
http://auth_server/login?gw_id=[GatewayID, default: "default"]gw_address=[GatewayAddress, internal IP of router]gw_port=[GatewayPort, port that wifidog Gateway is listening on]

url=[user requested url]

auth_server #即认证的域名

gw_id #配置的网关名称

gw_address #回调的内网地址

gw_port #回调的端口
在这个阶段需要返回登录的页面,即授权的首页,并且需要将所有涉及跳转的第三方地址加入白名单
当验证用户身份之后,即用户登录成功之后重定向到网关地址
http://GatewayIP:GatewayPort/wifidog/auth?token=[auth token]
auth token #系统为用户生成的token
网关地址接受到消息后,会周期的发送用户信息,并确认是不是允许继续网络访问请求地址
http://auth_server/auth/index.php?
stage=counters
ip=
mac=
token=
incoming=
outgoing=
ip,mac,token为用户的基本信息,incoming/outgoing为用户的连接计数信息,用来限定用户是否可以继续连接
此时auth_server需要返回该请求:
0——拒绝,删除防火墙内用户以及用户的信息
6——用户验证失败,超时,会删除防火墙内信息(即会重新要求登录)
1——用户验证通过,并跳转到http://auth_server/portal/?gw_id=%s
5——用户需要验证,允许规则内的访问进行验证
-1——用户验证出错,用户可以继续访问网络
返回数据格式:
Auth:
如Auth: 1 #中间有个空格
系统会周期性发送心跳包,用来确认网关验证和认证服务器的正常工作请求地址
http://auth_sever/ping/?
gw_id=%s
sys_uptime=%lu
sys_memfree=%u
sys_load=%.2f
wifidog_uptime=%lu
auth_server此时需要返回“Pong”
可以通过该心跳包来监控整个认证的工作
本文章由 http://www.wifidog.pro/2015/02/13/wifidog%E4%BB%A3%E7%A0%81%E5%88%86%E6%9E%90-2.html 整理编辑,转载请注明出处